Tutorials: HUE Animation
Tutorials: Stop Motion Studio
Tutorials: HUE Intuition
Tutorials: HUE Cameras
Tutorials: HUE Camera Viewer
Tutorials: HUE Animation
You will have received either an activation code or a license key with your purchase of the HUE Animation software.
Activation codes
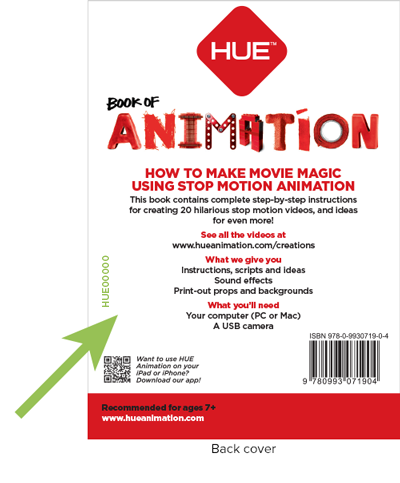
An activation code is used only once, to register your software on our website and to generate your license key used for all future activations. Activation codes are printed on the back of the HUE Book of Animation as shown here.
HUE Animation activation codes always start with ‘HUE’, like this: HUE1234567890
Activation codes do not use the letter ‘o’, so any ‘o’s in your code should be entered as zeroes (‘0’).
License keys
Customers who placed software-only or bulk license orders might receive a license key instead of going through the extra registration stage above. If so, your software will have been registered automatically on our website and your license keys will be displayed here.
HUE Animation license keys are longer, and look like this: 123456-123456-1234-1234567890
You will have been sent a confirmation email with your activation details and account password during the original registration. This can sometimes be found in a Spam or Junk Mail folder.
Registering your software through the HUE website
Note: For schools, we recommend using a central email address rather than a specific teacher’s account to make sure that the license details remain easily accessible in future.
1. Download
It is best to always download the latest version from the website rather than installing the version that you may have on a CD, as Windows/Mac system updates are released on a regular basis.
2. Install
Double click on the downloaded file to launch the software installer and install HUE Animation on your computer.
3. Activate
…with an Activation Code.
Choose the Activate with an activation code option for first time activations. An account will be automatically created on our website, registering your activation code to the email address that you choose during activation. You will receive a confirmation email with your license key, which you will need to use for any further activations.
…with a License Key.
Choose the Activate with a license key option if you have already registered your activation code, or if you have purchased a software-only license online.
…with an Offline Key.
If the computer you’re using has no Internet access, you may need to register your activation code through our website to obtain your license key. A full step-by-step tutorial can be found here.
If you have registered your activation code before but you don’t know your license key or how to download the latest version of the software, please note that all of your software updates and license details are always stored on your online HUE account. If you have forgotten your login details, you can request a password reset or lost license reminder.
If you’re having any other trouble accessing your software, please contact us with all of the relevant details (order number, activation details, error message etc.) and we’ll be able to help.
Here are a few tips you can use to enhance your animated movies.
- Make storyboards! Plan what you want to do and what props you need before you start.
- If you have the HUE Animation Studio pack, check your CD for printable backdrops and storyboards.
- Try pointing your HUE camera straight down at the table and moving the props around on the flat table space instead of filming from the side.
- Avoid moving the camera; instead, make your props “move”.
- Animate with small movements to make the animations look realistic.
- Use text sparingly. Make imagery the focus. Animation is a ‘dynamic model’ of things that
change over time. - Use non-reflective backgrounds like fabrics, construction paper, and foam.
- Think about color and contrast when creating your props. Make them large enough to be seen and recognized when captured in your movie.
- You’re no longer stuck in reality. Play in worlds we can’t interact with using a video camera. Focus on the unseen. Animation allows you to stop time and show how things change.
- Speed up or slow down time. You can stop time from frame to frame and show things in slow motion (e.g. how molecules move) or in fast motion (e.g. digestion in a cow).
- Work with a friend or group! Discussing, defending positions, and deciding are powerful exercises.
- Contact our team if you need help.
- Have fun, and be creative!
Once you have saved your finished video to your computer, it is ready to be uploaded to your chosen video streaming website. Browse to a site like YouTube, Dailymotion or Vimeo to set up your account then start uploading your animations for the world to see.
Sharing directly to YouTube
If you already have a YouTube account, you can share your finished animation straight from the software. Select YouTube from the Share menu or click the Share button at the top of the screen.

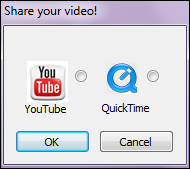
If you used the button, you will be asked to choose whether you want to export to QuickTime or YouTube. Select the button next to YouTube then click OK.
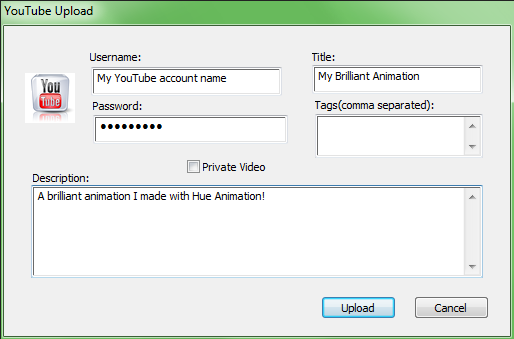
After choosing a name and description for your movie as shown below, all you have to do is press Upload. The video will be available on your YouTube account once it has been processed.
Please note that when you Share a finished animation, the software will automatically save a copy of the movie in the project’s folder on your computer.
If you want to export a movie file without sharing it online, check the Saving tutorial for the instructions.
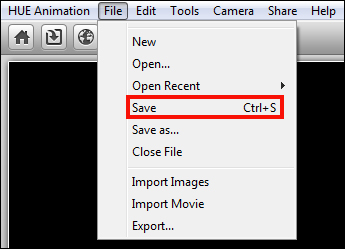
To save your project so you can go back to work on it later, go to the File menu and select Save.
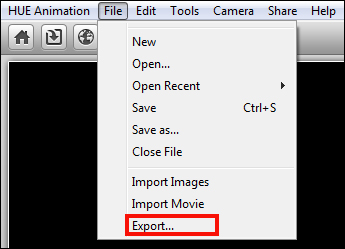
If you have finished your movie and want to export it as a standalone movie file to share with your friends, go to the File menu and select Export.
If you want to adjust the quality of your final movie before exporting it, click on the Settings buttons to make changes.
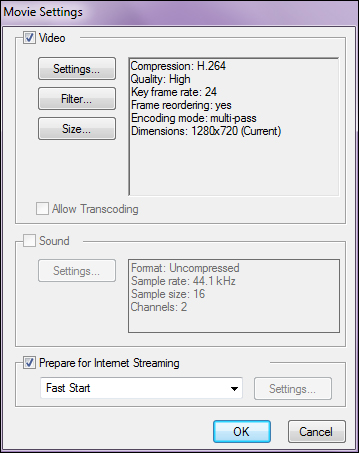
There are various video compression types to choose from, such as H.264 or MP4. Click OK when you’re done.
Depending on the number of frames and audio files you’ve got in your animation, exporting the movie file from the animation software may take between few seconds and several minutes.
By default, your project will be saved in the HUE Animation folder, which is located in your Documents folder on Mac OS X or My Documents folder on Windows.
See our separate Sharing tutorial to learn how to upload your video directly to the web.
Autosave
The software automatically saves your work regularly. As it is possible to make important changes between automatic saves, we recommend that you save often to ensure you do not lose any work.
There are two different sets of tools you can use to edit your animated movies within HUE Animation: the Edit Frame screen and the Manage Timeline tab.
The Edit Frame screen
Adding text, shapes, or other drawings to frames
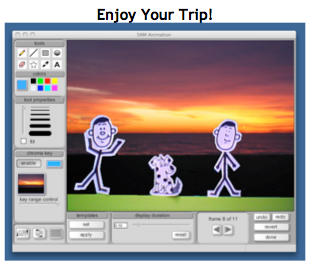
You can add text, drawings, or other simple shapes (lines, rectangles, and circles) to your image(s). First, choose a frame on which to draw. Then click the Edit Frame button to the left of the playback controls. (You can also double click on the frame you want to edit). A screen with a paint toolbox on the left side will appear.

You can use the tools around the edge of the screen to annotate and enhance your animation frames.

Simply select the tool of your choice and begin editing your frame!

The Colors box allows you to choose the color for your drawings or text. The large box shows which color is currently selected. You can use the Tool Properties area below to select the thickness of the lines being drawn, or the size of the text. Fill creates solid shapes rather than an outline.

The Chroma Key box allows you to select colors in your stills and insert your own background images. More information about this feature can be found at this link.

The three small buttons in the bottom left part of the Edit Frame screen allow you to flip your frame vertically and horizontally, and overlap a grid on top of the window to make it easier to line up text or drawings. The grid is only displayed while editing; it won’t appear in the finished movie.
![]()
Applying edits created on one frame to another
Once you have finished with the edits that you wish to duplicate, the Templates box allows you to create a reusable template from any existing frame. Simply click on Set to record any edits you have made to the frame. You can then apply it to other frames using the Apply button.

You can use the Switch Frame controls to move through your timeline without leaving the Edit Frame screen.

The Display Duration box allows you to alter the amount of time a frame is displayed. You can make it longer or shorter using the slider, or click on Reset to return the duration to its original setting.

Leaving the Edit Frame screen
Clicking the Undo button will remove edits you’ve made, and clicking Revert will clear all edits made on that image.

When you have finished editing, press the Done button in the bottom right corner to return to the main screen.

Your edits will appear on the frame you chose.
The Manage Timeline tab
This is the last of the four tabs above the right side of the screen. When you click on it, some additional controls will appear on the left side of the main HUE Animation screen.

Grouping frames together as a clip
To group clips together:
- Go to the Manage Timeline tab.
- Click on the first frame you wish to group, hold down the shift key, and then click on the last frame you wish to group into the clip.
- Click the icon shown above, with a an arrow pointing a film strip, to group your selected images together.
- To ungroup the clip back into individual frames, select the clip and press the button in the bottom left of the Manage Timeline panel.
Editing tips
- Explore the different functions in the Manage Timeline tab as you edit. See which ones you find most helpful.
- You can move multiple frames at a time by clicking and holding shift to select multiple frames.
- You can also group frames into a clip in order to facilitate editing and reordering.
- Use templates to add text to multiple frames.
- View your animation often as you edit to make sure you’re getting the desired result.
- Remember that you can use the Manage Timeline tab and the Edit Frame button for editing (they both have different features).
Video tutorial
HUE Animation makes it easy to change the orientation of your images coming from your camera. To flip the image, click on the Camera menu at the top of the screen. You can flip it vertically or horizontally by selecting the options from the bottom of the menu.

Flipping the camera is a good way to get the camera lens close to small models such as LEGO® Minifigures at any angle you want to use.
You can also place your models (or paper cut-outs) flat on the table or floor and position the camera above them, using the flip/mirror tools to get the angle and lighting perfect. This makes filming flight sequences much easier!
Windows
You can select Preferences… from the HUE Animation menu to access the software’s settings screen.
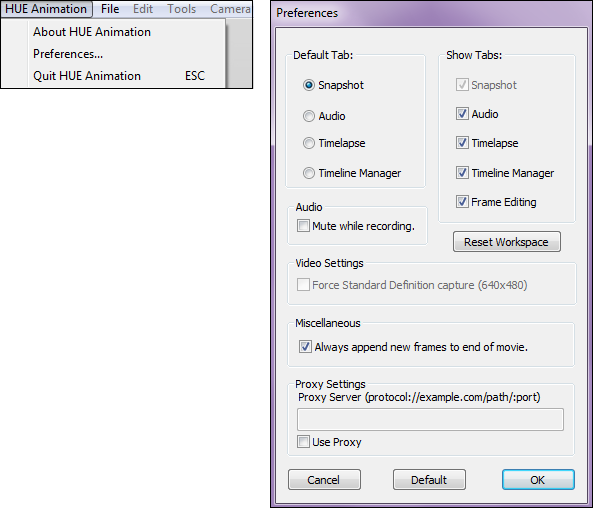
Default Tab
This setting determines which tab you see first when you open HUE Animation. It’s usually best to leave it on Snapshot, but if you use Timelapse more often or spend a lot of time editing your movies you might find that one of the other tabs is more useful.
Enabled Tabs
If you want to disable any tabs in order to make it easier to find the features you use most, uncheck them in the list. This is helpful when using HUE Animation in a classroom. You can disable unnecessary features to control what students are able to access and work on. Your Default Tab will be greyed out, so to disable that you will need to change your Default Tab first.
Mute while recording
You can choose whether other audio tracks will be muted when you’re recording audio. This is helpful if you have background music and want to use narration as well.
Reset Workspace
This button will allow you to choose a new Workspace folder the next time you open HUE Animation. It doesn’t delete any of your projects. If you click it by mistake, you can simply pick the same Workspace you were using before the next time you start the software. For more details about the Workspace folder, see the Activation tutorial.
Note: The option to Force Standard Definition Capture currently has no effect.
Always append new frames to end of movie
If this option is checked, new frames will always be added to your animation at the end of your movie’s timeline. If it’s not checked, the new frames will follow whichever frame is selected in your timeline when you press the Capture button.
The Windows edition has an extra setting at the bottom of the window for configuring a Proxy Server. If you’re using HUE Animation in a school or office environment with a proxy, you can enter your settings here.
Once you’ve made your changes, click the OK button to save them and go back to the main HUE Animation screen.
Note: You can return to the default settings at any time by selecting Default before clicking the OK button.
Mac OS X
You can select Preferences… from the HUE Animation menu to access the software’s settings screen.

Default Tab
This setting determines which tab you see first when you open HUE Animation. It’s usually best to leave it on Snapshot, but if you use Timelapse more often or spend a lot of time editing your movies you might find that one of the other tabs is more useful.
Enabled Tabs
If you want to disable any tabs in order to make it easier to find the features you use most, uncheck them in the list. This is helpful when using HUE Animation in a classroom. You can disable unnecessary features to control what students are able to access and work on. Your Default Tab will be greyed out, so to disable that you will need to change your Default Tab first.
Mute while recording
You can choose whether other audio tracks will be muted when you’re recording audio. This is helpful if you have background music and want to use narration as well.
Always append new frames to end of movie
If this option is checked, new frames will always be added to your animation at the end of your movie’s timeline. If it’s not checked, the new frames will follow whichever frame is selected in your timeline when you press the Capture button.
Reset Workspace
This button will allow you to choose a new Workspace folder the next time you open HUE Animation. It doesn’t delete any of your projects. If you click it by mistake, you can simply pick the same Workspace you were using before the next time you start the software. For more details about the Workspace folder, see the Activation tutorial.
Once you’ve made your changes, click the OK button to save them and go back to the main HUE Animation screen.
Note: You can return to the default settings at any time by selecting Default before clicking the OK button.
Time-lapse photography is a great way to show things happening much more quickly than they do in real life. By automatically taking pictures while you do something, you can turn the pictures into a movie.
You can use time-lapse to show yourself drawing a picture or decorating a cake, or you can use it to show flowers growing or food being eaten. A dedicated time-lapse mode is included in the HUE Animation software.
Using Time-lapse in HUE Animation
1. Click on the Time-lapse tab (it’s the one with a stopwatch icon).

2. Once you’re in the Time-lapse screen, you will see two sliding tabs on the timeline below the image. The blue tab (on the top) is the Interval tab. You can slide it back and forth to change the amount of time between each picture. The red tab (on the bottom) is the Duration tab. You can slide it back and forth to set how long you want the software to keep taking pictures.
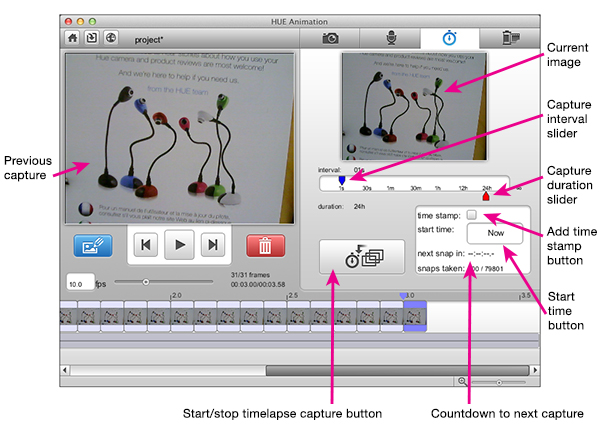
3. Click the large Timelapse Capture button when you want to start. You can also use the start time function at the bottom of the time lapse display to indicate when you want the picture taking to begin.
4. Once the software begins taking pictures, the timer at the bottom will tell you how much time is left until the next picture. There is also a counter which shows how many frames have been recorded.
You can see an example of a time-lapse movie recorded with the software below.
Time-lapse tips
- If you want to use time stamps, remember to check the box before you start recording.
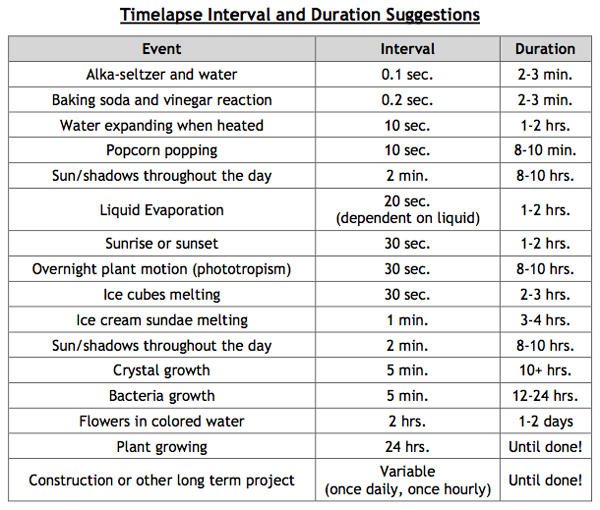
- Test out different intervals to find the best one for your project. When in doubt, choose a slightly shorter interval. You can always delete frames if it’s too slow.
- Remember to use the fastest moving part of the event to select your capture interval.
- Consider the duration of the event you want to capture. Choose one a bit longer than you think is necessary, just in case it takes longer than you expect!
- If you’re unsure of the duration, remember you can always set it at 24 hours and stop it when you’re done.
Special Effects
There are thousands of imaginative special effects you can come up with when you’re creating stop motion animation. We put together a few ideas in this video tutorial.
Chroma Key
Another feature of the software is Chroma Key or ‘green screening’. You can use this technique to remove the background from a frame and replace it with something completely different.
This function works best if there is a high contrast between the background and props, and if there is little color variance in the background. When filming real people, using a flat blue or green background will usually produce the best results. If you’re filming toys or models, choose a single color which doesn’t appear on any of your props for the best results.
Chroma Key is part of the Edit Frame controls in HUE Animation.
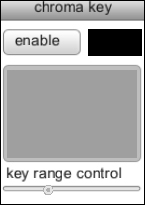
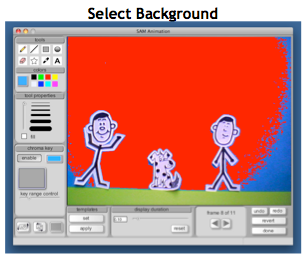
First of all, Enable Chroma Key then click the rectangular black box next to the Enable button. You can then choose the background color you want to remove by immediately clicking on part of your animation frame to the right. The background will turn red, as shown.
Use the Key Range Control slider to increase or decrease the sensitivity. The red area in the background will change in size.
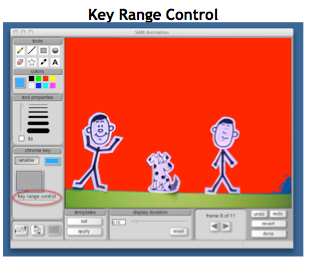
If some areas still aren’t highlighted in red, you can use the Chroma key reveal tool to draw over them and turn them red. You can make adjustments with this tool later on as well.

Next, click the Chroma Key Image Selector box. It’s the large grey box beneath the Enable button.
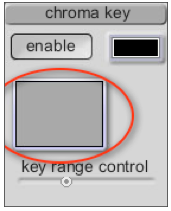
You will be prompted to select a picture from anywhere on your computer. Once you have found the picture you want to use for the background, click Select Image; anything that was highlighted in red before will be replaced by the photo.
You will need to go through this process with each new frame you wish to use with Chroma Key. It’s not possible to save the edits to a Template and apply Chroma Key to multiple frames at once.
Tip: If you have HUE Animation Studio, you can fold out the stage built into the packaging and use the bottom part as a simple ‘green screen’.
Chroma Key Video
To import image or video files into your HUE Animation project, go to File → Import and select the appropriate file(s). You can import more than one at the same time by holding the shift key when you make your selection, but we recommend only importing a few at a time so as not to overload your computer’s memory.
Before you import a video or image, remember to note where your cursor is on the video timeline, as the images/video will drop in to the right of the cursor. Large videos will take longer to import than individual pictures.
If you import a video, the video will be added as a ‘clip’ composed of a number of still frames. You can separate the clip into individual images using the Ungroup Clip To Frames button in the Manage Timeline tab.
Tip: You can reposition your frames by selecting them and dragging them in the timeline if you accidentally import them in the wrong place.
Please note that importing large files may take some time depending on the speed of your computer.
HUE Animation makes recording audio easy. All you need is a microphone, which many computers already have built in. If yours does not, any USB microphone will work. HUE Animation Studio owners can also use their HUE Camera as a microphone.
The HUE Animation software gives you two tracks for audio, so you can record background sounds and a spoken narrative separately.
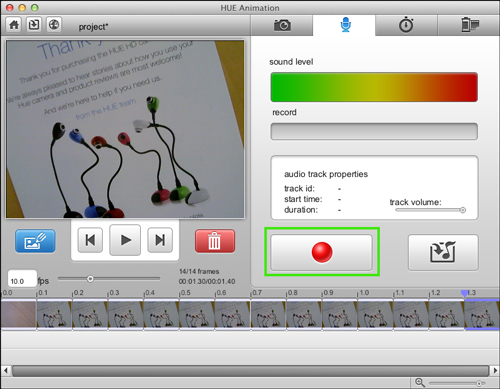
Recording Audio
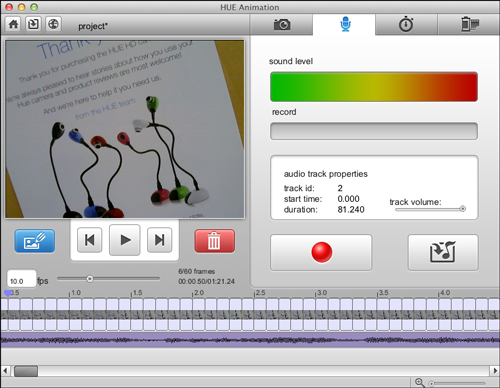
Begin by clicking on the Audio tab at the top of the screen, then select the frame where you want the audio recording to begin. Click the Record Audio button.
The Record bar will turn red, to indicate that you are recording.
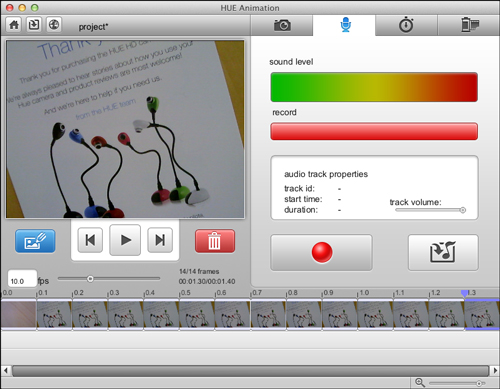
To stop recording simply press the Record Audio button again.
Importing Audio
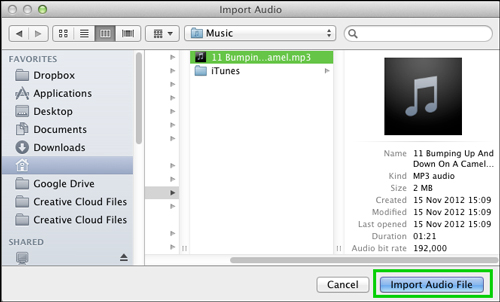
Begin by selecting the frame where you want the music to start playing. Click the Import Audio button.
Note: File -> Import can be used for videos and photos only. You must use the Add Audio tab to import audio into your animation.
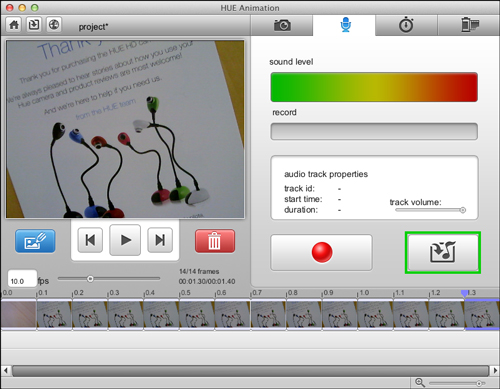
A menu will pop up and allow you to choose an audio file from anywhere on your computer. Once you have chosen the file, click the Import Audio File button in the bottom right.
The window will close, and your audio will appear in the track below your frames.
Editing Audio
Note: Audio clips can overlap, so if you already have an audio clip in the first track, they will overlap. This can make it easy to “lose” your clip, so try keeping them in separate tracks.
Cutting the length of your audio is easy. Simply place your cursor at the end or beginning of the track. Your cursor will turn into the shape pictured below.

Click and drag your cursor to cut the clip. You can use the same trick to lengthen the cut audio track if you decide to make it longer again later.
To easily match your animation frames to an audio clip, you can click on the Manage Timeline tab at the top of the screen and choose the Fit To Audio icon (a musical note with a picture and a double-ended arrow). This feature allows you to adjust the frame rate of the film to match your audio file with a single mouse-click.
For a list of supported audio file types, please see the Supported File Types FAQ.
Audio Tips
When recording your own audio, try to be in a quiet space without any background noise.
- Always speak a bit louder than you think you should (it’s easier to make tracks quieter than
it is to make them louder). - Remember that you can record many small clips or one longer one.
- Try mixing recorded audio and imported audio. Remember that you have two tracks for audio; this enables you to include background and foreground sounds simultaneously. This can be helpful if you want to use background music to give a general feel to your animation, while narrating a story over the top.
- Try looking online for free downloadable sound clips – or record your own! Family members, friends and pets can be great ‘guest’ voice actors.
- Animation focuses on movement and changes over time. So make sure that your audio adds to your animation and helps create a sense of excitement!
- The bonus sound effects from the HUE Animation Studio pack can be downloaded following these instructions if you have a registered HUE Animation license on your account.
What is ‘onionskinning’?
Onionskinning is a way to see two frames at once. One of these represents an image already captured in the timeline, and the other represents the picture you are about to take. The partially transparent image is the one you have already captured.
The onionskinning feature can be used to align objects in your animation from frame to frame; useful if you accidentally knock your model over or are resuming work on a project which had been put away.
Onionskinning also gives you greater control over the action as the “shadow” lets you see exactly how far everything has moved in between shots, as well as which elements have not moved. This allows you to coordinate and control the movement of each of your props.
The onionskinning controls are located just under the live camera view (next to the large Capture button used to take pictures).
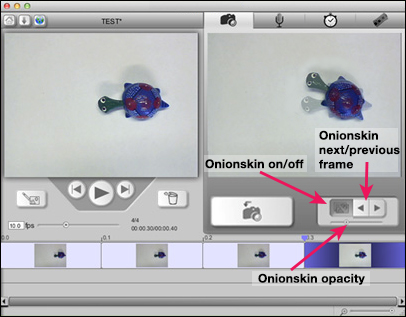
- When the Onionskin on/off button is darker, it means that onionskinning is switched on.
- If you want to use a different frame as your reference rather than the last picture you took, use the Onionskin next/previous frame controls to select the right frame from your timeline. You can also highlight the frame and choose Onionskin Current Frame from the Edit menu.
- The Onionskin opacity slider lets you control how easy it is to see the “shadow” of the other frame. You can change it at any time to enable you to check what’s going on.
Note: You can also switch onionskinning on or off by clicking once on the live camera view window.
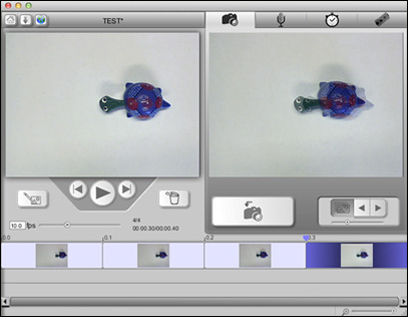
When you open HUE Animation, you will see see the video stream from your camera in the panel on the right side of the window. This is the ‘Live’ panel.

Position your character or object in front of the camera, then focus the camera using the manual focusing ring around the lens.
To take a picture, either click on the capture button or press the space bar on your keyboard. The image will now appear in the left side of the screen, and in the timeline below.
Move your character slightly and take another picture. Keep doing this until you have 20-30 pictures in the timeline.
You can play back the pictures you have taken using the Play button.
Tips and Tricks
- Make sure you have a clear idea of where you are going and what you need before you start animating.It’s a good idea to jot down a simple storyboard before you begin.
- Check your lighting and contrast early – before you invest too much time into the animation. Shoot a couple of frames then watch them, to see if anything needs to be adjusted.
- Make sure your props are large enough to be seen and recognized easily when captured.
- Use small movements to create a smooth animation flow. It is easier to eliminate extra frames than it is to insert additional ones later.
- Watch your animation often and adjust as necessary. Note if any parts seem to move too slowly or if others seem to move too quickly.
- Consider taking multiple captures of each frame in case you accidentally delete one. Again, it is easier to eliminate extra frames than it is to insert additional ones later.
- New frames are always added to the end of the animation by default. You can change this in the Settings if you would prefer to choose where new frames are inserted.
There are four different tabs on the HUE Animation window, each of which has a unique set of tools to help with the animation process.

The Capture Frames tab allows you to:
- Capture new frames
- Delete unwanted frames
- Edit individual frames
- View your animation

The Add Audio tab allows you to:
- Record audio
- Import audio from your computer
- Edit audio length
HUE Animation allows you to save images automatically on a schedule using timelapse photography. This is great for capturing an unfolding process.

The Timelapse tab allows you to:
- Control the capture interval (the amount of time between captures)
- Control the capture duration (total elapsed time over which the
- process you want to capture will be unfolding)
- Add a time stamp

The Manage Timeline tab allows you to:
- Alter the frame duration (between 30 frames per second and 1 frame per second)
- Group or ungroup frames to make editing easier
- Duplicate frames
- Reverse the order of selected frames
- Duplicate audio
- Change frame duration to match the length of your audio
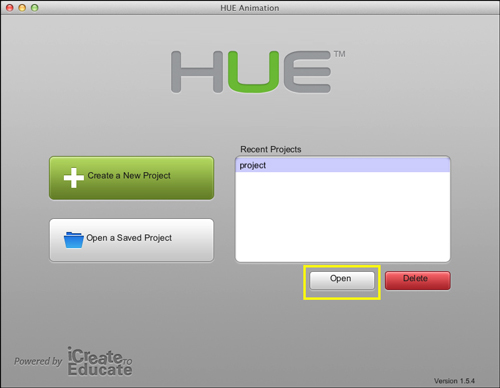
The HUE Animation start screen lists your recent opened projects on the right side of the screen under “Recent Projects.” If your project is listed, simply highlight its name and click Open below the list.
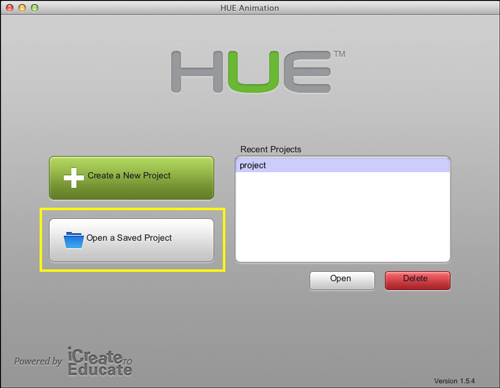
If the project you want does not automatically appear under “Recent Projects,” click the Open a Saved Project on the left side of the screen.
You will see a new window. Find the folder where your animations are saved. This will be the default “HUE Animation” workspace folder you specified during installation. Select your project and click Open Project in the bottom right.
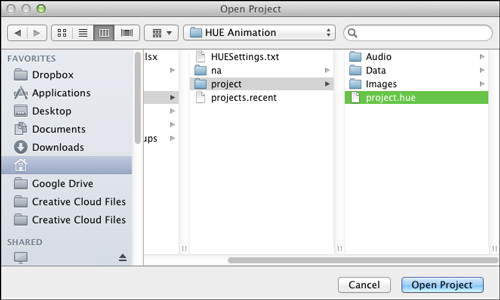
Note: If you’re not sure which is your project file, look for one with a name which ends in .hue or .sam
Once you’ve selected your saved project, the software will display the main animation screen.
Autosave
HUE Animation automatically saves your projects. If the auto saved version is more recent, a window will open asking you whether you want to open the autosave version instead. Always say yes, unless you did something before you closed the program that you don’t want to keep.
To create a new project, launch the HUE Animation software.
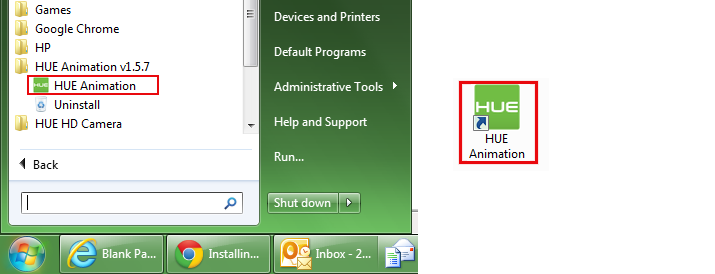
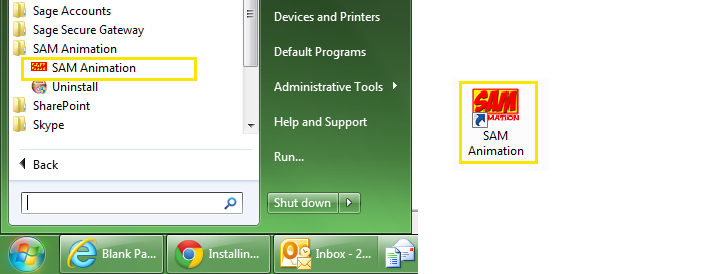
On Windows, there will be a shortcut for the software on the desktop or in the Start Menu.
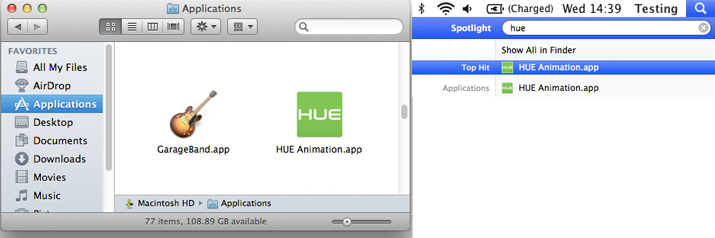
If you’re using a Mac, it will be in the Applications folder.
When the program starts, it will give you two options: “Create a New Project” or “Open a Saved Project”. Click the Create a New Project button.
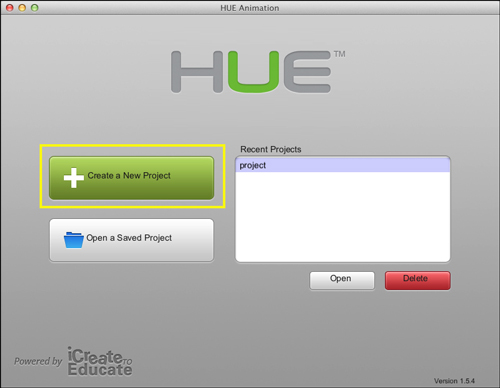
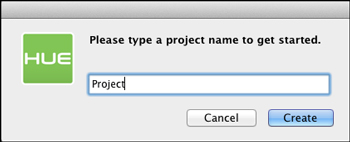
Name your project and click Create.
Note: Your project will automatically save in the Workspace folder you chose during installation unless you choose Save As… from the File menu and choose to save it elsewhere.
Next, the main screen of the software will be shown. You are now ready to start taking pictures.
Note: If you opened the software before connecting the camera, you may need to select Refresh Camera from the Camera menu when you begin.
Your HUE Animation Studio pack will contain a CD, however we recommend installing the very latest version of the software from the website where possible to ensure you have the latest version. Please choose which statement applies to you for help with installation.
1. My CD has version 1.5.9 or higher on the front.
2. I want to download and install the latest version from the website.
3. I need to install offline and my CD doesn’t have version 1.5.9 on the front.
Note: If your copy of HUE Animation Studio came with The HUE Book of Animation, the installation instructions are on page 8 and your CD is version 1.5.9 or higher.
1. My CD has ‘version 1.5.9’ or higher on the front.
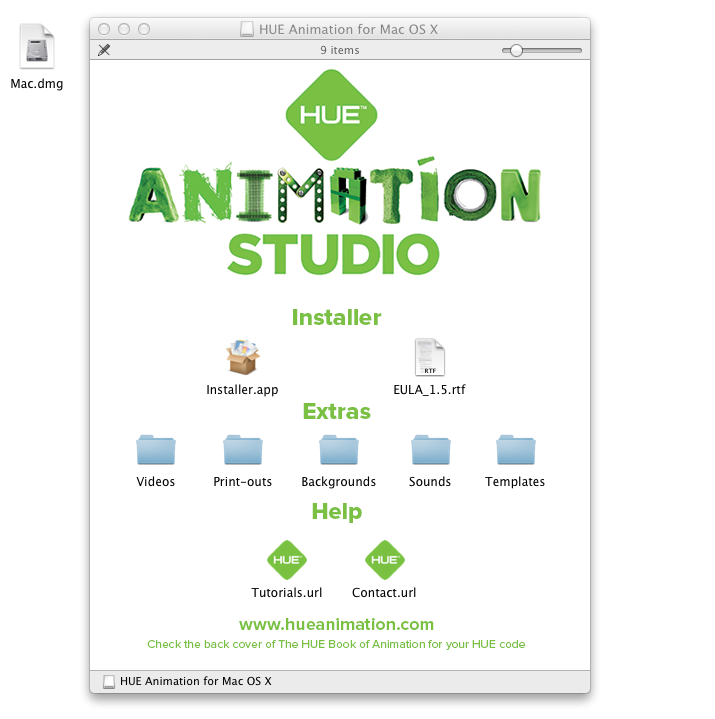
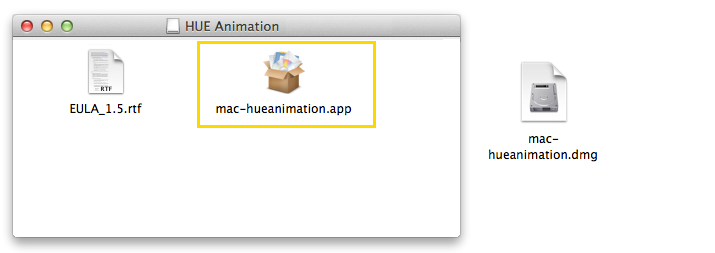
Insert your CD and open Mac.dmg. You should see a screen which looks like the one below. Double click on the .app file to begin installation.
Follow the on-screen instructions to install the software. On some versions of OS X, you may be prompted to enter your computer administrator’s name and password. You will see a confirmation screen once installation is complete.
Finally, connect your HUE camera to an available USB port on your computer.
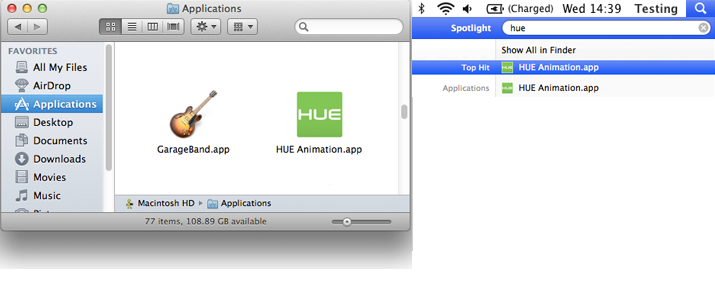
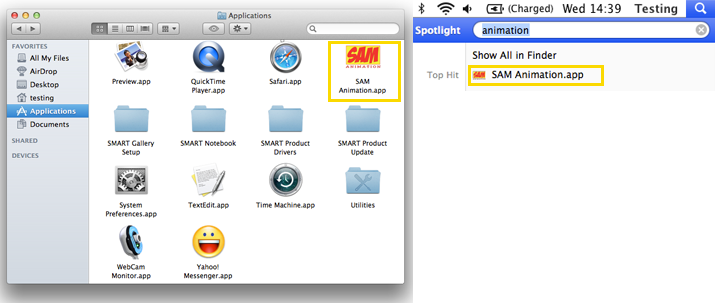
You should now be able to launch the animation software from your Applications folder, or through Spotlight.
Note: If you opened the software before connecting the camera, you may need to select Refresh Camera from the Camera menu in the animation software when you start.
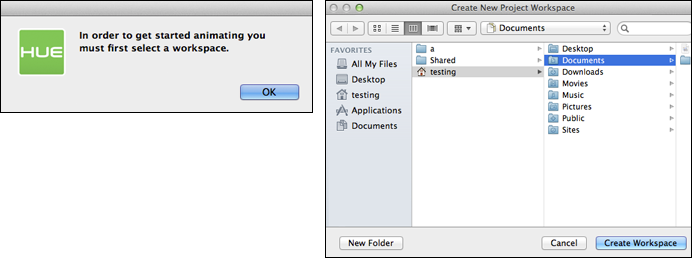
The first time you start the animation software, you’ll be asked to choose a folder where your projects will be saved. The Default location will be best for most users. Click Create Workspace to continue.
Note: If you have previously installed an older version of the software and the update doesn’t seem to work, or if you want to remove the software for some reason, you can manually remove the old version by dragging it from the Applications folder to the trash.
If you encounter any problems using the software, please download and install the latest version as a first step, then consult the FAQs for further help.
2. I want to download and install the latest version from the website.
If you haven’t used your activation code before, you can activate through our website by following these instructions.
If you have activated your software previously, simply download the latest version. Once the software has downloaded, open it and double click on the .app file to start the installation.
Note: If you see an alert warning that you that the software was downloaded from the internet, it’s safe to click Open and continue.
Follow the on-screen instructions to install the software. On some versions of OS X, you may be prompted to enter your computer administrator’s name and password. You will see a confirmation screen once installation is complete.
Finally, connect your HUE camera to an available USB port on your computer. You should now be able to launch the animation software from your Applications folder, or through Spotlight.
Note: If you opened the software before connecting the camera, you may need to select Refresh Camera from the Camera menu in the animation software when you start.
The first time you start the animation software, you’ll be asked to choose a folder where your projects will be saved. The Default location will be best for most users. Click Create Workspace to continue.
Note: If you have previously installed an older version of the software and the update doesn’t seem to work, or if you want to remove the software for some reason, you can manually remove the old version by dragging it from the Applications folder to the trash.
If you encounter any problems using the software, please check the latest version is definitely installed, then consult the FAQs for further help.
3. I need to install offline and my CD doesn’t have ‘version 1.5.9’ on the front.
We recommend using the instructions above to ensure you always have the very latest version installed. If this isn’t possible, you can install from the CD. Please note that the version of the software on older CDs is called SAM Animation. Aside from the name, it’s identical to HUE Animation and your license key will work on either version.
Once you’ve received your activation details, insert the HUE Animation Studio software CD. When it appears on the desktop, open the CD and double click the HueAnimation.dmg file.
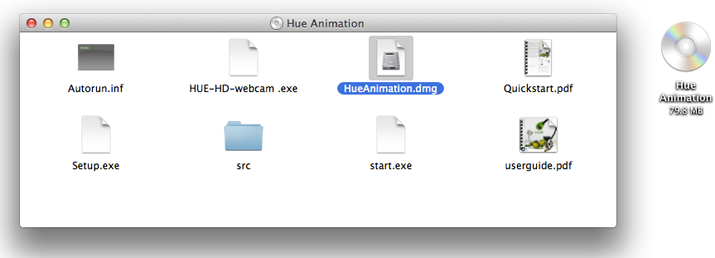
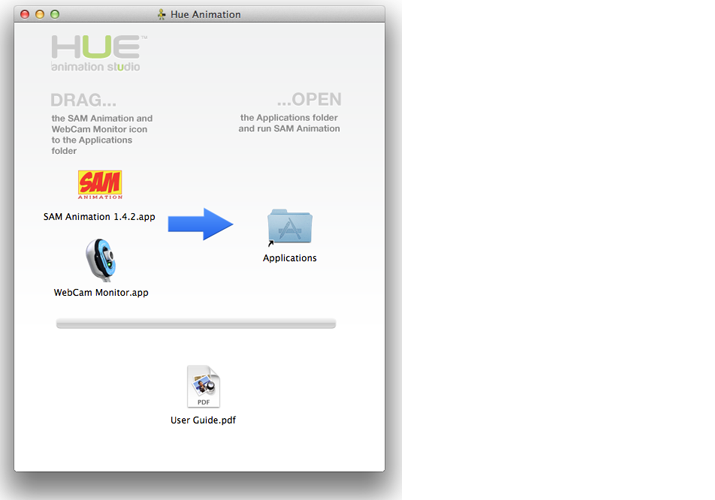
The installation screen should appear. Drag the SAM Animation and Webcam Monitor icons to the Applications folder as shown in the picture below.
Note: If your CD menu doesn’t contain the software installer, double click on the CD on your desktop again and browse to the offline folder to locate the installation files inside a compressed zip file.
Finally, connect your HUE camera to an available USB port on your computer. You should now be able to launch the animation software from your Applications folder, or through Spotlight.
Note: If you opened the software before connecting the camera, you may need to select Refresh Camera from the Camera menu in the animation software when you start.
If you encounter any problems using the software, please download and install the latest version as a first step, then consult the FAQs for further help.
Your HUE Animation Studio pack will contain a CD, however we recommend installing the very latest version of the software from the website where possible to ensure you have the latest version. Please choose which statement applies to you for help with installation.
1. My CD has version 1.5.9 or later on the front.
2. I want to download and install the latest version from the website.
3. I need to install offline and my CD doesn’t have version 1.5.9 on the front.
Note: If your copy of HUE Animation Studio came with The HUE Book of Animation, the installation instructions are on page 8 and your CD is version 1.5.9 or later.
1. My CD has ‘version 1.5.9’ or later on the front.
Insert your HUE Animation Studio software CD and wait for the installation menu to appear. If it doesn’t, you can browse to the CD in My Computer and double click on Menu.exe.
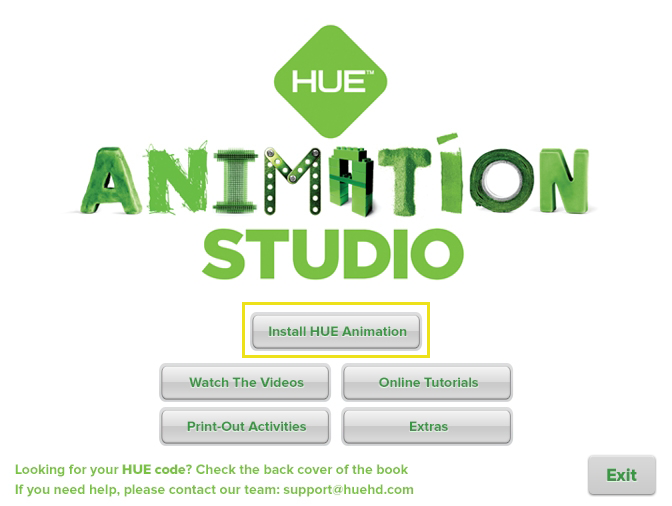
Click on Install HUE Animation to begin the installation, and follow the on-screen instructions.
Note: Old versions of HUE Animation will be removed from your computer during the installation. If an error message appears advising that another version of the software is already installed, you can remove it by following these steps. Once it has been removed, you can try the installation again.
You may be asked to install the free version of QuickTime and some files from Microsoft if they aren’t already installed on your computer. Keep clicking Next when prompted until the software installation is complete.
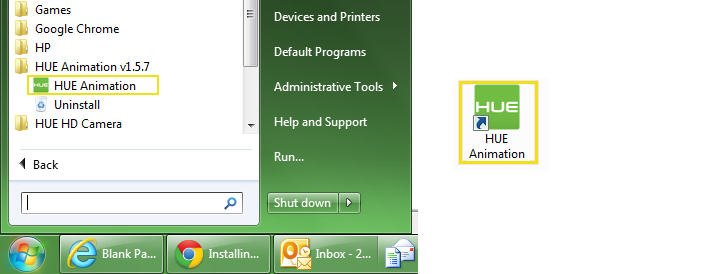
Finally, connect your HUE camera to an available USB port on your computer. You should be able to launch the animation software from the Start Menu, the Charms bar or by clicking the shortcut on your Desktop.
Note: If you opened the software before connecting the camera, you may need to select Refresh Camera from the Camera menu in the animation software when you start.
If you encounter any problems using the software, please download and install the latest version and perform a clean reinstallation as a first step, then consult the FAQs for further help.
2. I want to download and install the latest version from the website.
If you haven’t used your activation code before, you can activate through our website by following these instructions.
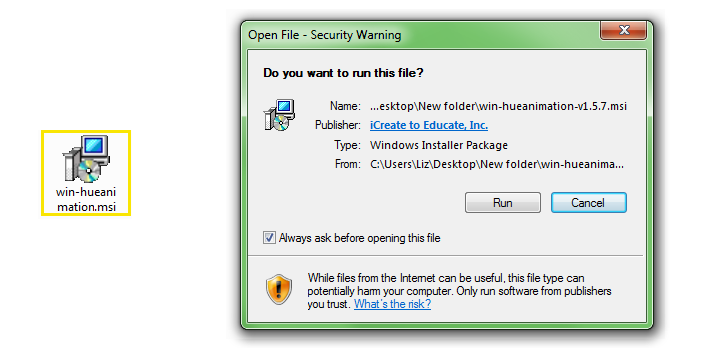
If you have activated your software previously, simply download the latest version. Once the software has downloaded, open the .msi file to start the installation.
Note: If you see an alert warning that you that software was downloaded from the internet, it’s safe to click Run.
Follow the on-screen instructions to install the software. You will be asked to tick a box to confirm acceptance of the license agreement.
Note: Old versions of HUE Animation will be removed from your computer during the installation. If an error message appears advising that another version of the software is already installed, you can remove it by following these steps. Once it has been removed, you can try the installation again.
If your computer requests permission to install the software, click Yes.
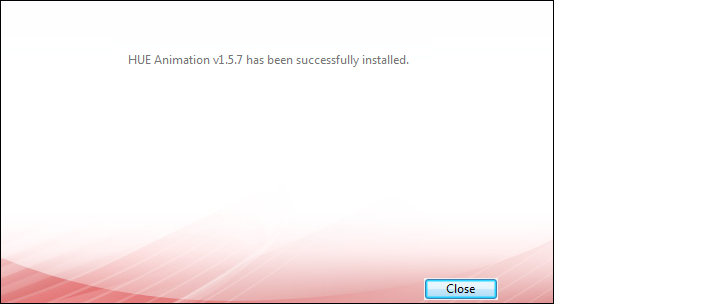
You will see a confirmation screen once installation is complete.
Finally, connect your HUE camera to an available USB port on your computer. You should now be able to launch the animation software from the Start Menu, the Charms bar or by clicking the shortcut on your Desktop.
Note: If you opened the software before connecting the camera, you may need to select Refresh Camera from the Camera menu in the animation software when you start.
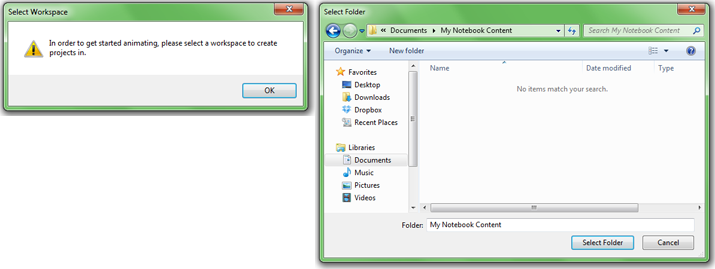
The first time you start the animation software, you’ll be asked to choose a folder where your projects will be saved. The default location will be best for most users. Click Select Folder to continue.
Note: If you have previously installed an older version of the software and the update doesn’t seem to work, or if you want to remove the software, you can follow these steps to perform a clean uninstallation of any previous versions.
If you encounter any problems using the software, please check the latest version is definitely installed, then consult the FAQs for further help.
3. I need to install offline and my CD doesn’t have ‘version 1.5.9’ on the front.
We recommend using the instructions above to ensure you always have the very latest version installed. If this isn’t possible, you can install from the CD. Please note that the version of the software on older CDs is called SAM Animation. Aside from the name, it’s identical to HUE Animation and your license key will work on either version.
Once you’ve received your activation details, insert the HUE Animation Studio software CD. The installation menu should appear. If it doesn’t, you can browse to the CD in My Computer and double click on Setup.exe.
Note: If your CD menu doesn’t contain the software installer, please go to My Computer and right click the CD. Choose to Explore the disc and browse to the offline folder to locate the installation files in a compressed zip file.
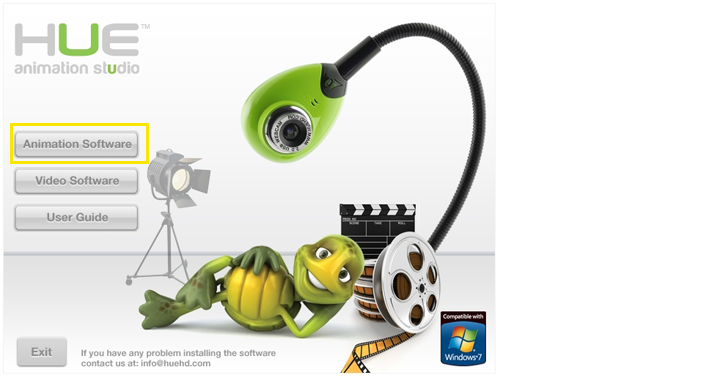
Your computer may ask you Do you want the following program from an unknown publisher to make changes to your computer? click on Yes and this will launch the main installation menu (below).
Click on Animation Software to start the installation and follow the on-screen instructions.
You may be asked to install the free version of QuickTime and some files from Microsoft if they aren’t already installed on your computer. Keep clicking Next when prompted until the software installation is complete.
Finally, connect your HUE camera to an available USB port on your computer. You should be able to launch the animation software from the Start Menu, the Charms bar or by clicking the shortcut on your Desktop.
Note: If you opened the software before connecting the camera, you may need to select Refresh Camera from the Camera menu in the animation software when you start.
If you encounter any problems using the software, please download and install the latest version and perform a clean reinstallation as a first step, then consult the FAQs for further help.
All of your registered software downloads and license details are stored in your online HUE account.
If you decide to reinstall HUE Animation or HUE Intuition, or want to update to the newest version, the steps below will show you how to find the newest download in your online account.
Note: You can also view your registered license keys through your online account.
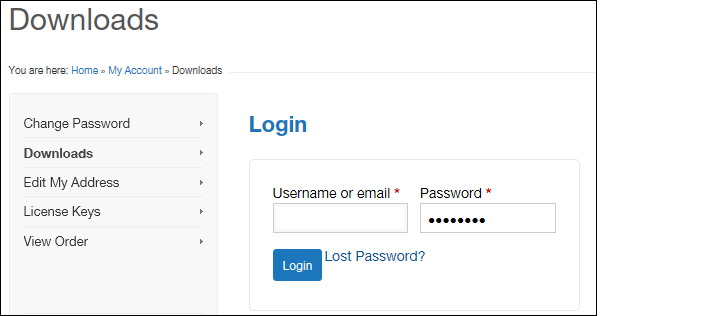
First of all, visit your account page here.
You may be prompted to log in; if so, use the email address you originally signed up with as your username and the password from your email. If you have lost your password, you can click on the Lost Password? link to reset it.
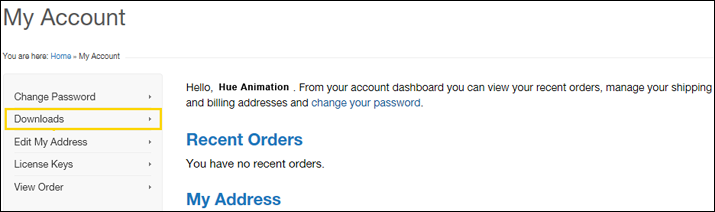
Once you are logged in you’ll be taken to your online account. Click the Downloads link on the left (highlighted in yellow).
Choose which version of the software you’d like to download by clicking on the corresponding picture.
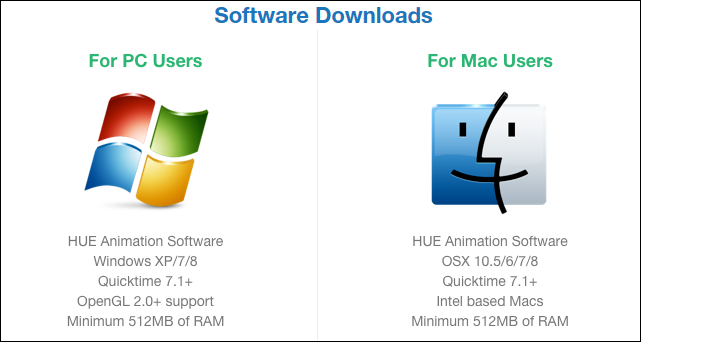
You will be prompted to either Open or Save the downloaded file, then the download will begin. We recommend saving the software somewhere on your computer. That way, if you need to install it again you won’t have to come back to the download page.
Once you’re ready to install, follow the guide for Windows or Mac OS X.
To activate your software, you will need your activation code or license key.
If you purchased HUE Animation Studio with the HUE Book of Animation, check the back cover of the book for your activation code. The book includes detailed activation instructions on page 9.
Note: Older versions of HUE Animation Studio did not include a book. If you have an older kit, check the back of your CD sleeve or paper insert for the sticker with your unique activation code.
Activating using an activation code
Once you have installed your software using the instructions for Windows or Mac OS X, then enter your email address and activation code as shown below.
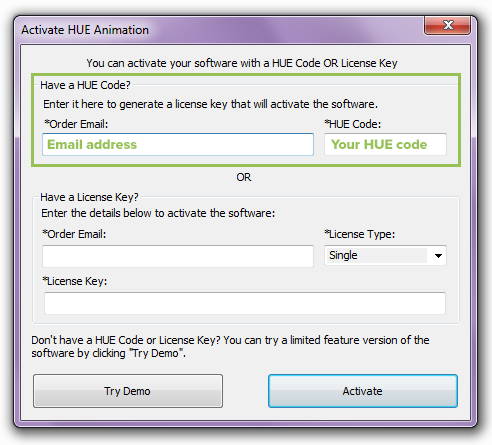
Once you click the Activate button, your software will be ready for use.
Note: If you can’t install the software from the CD and have a long activation code, you can register for a free account on our website then enter your code through the Register New Software menu option after logging in. This will add your license and entitlements to your account screen. Please note that this method will not work with the older 8-digit codes, which need to be entered through our old registration form instead.
If you have any problems, please check the Frequently Asked Questions section.
If you have previously registered your activation code, your full HUE Animation license key can be found on your license keys page. Help accessing your online account is available here.
Note: You will also need your license key if you’re trying to activate offline. Please see these instructions if you need to activate on a computer with no Internet connection.
Activating using a license key
Once you have installed your software using the instructions for Windows or Mac OS X, then enter your email address and license key as shown below. Leave the License Type box set to Single unless you purchased a multi-user license.
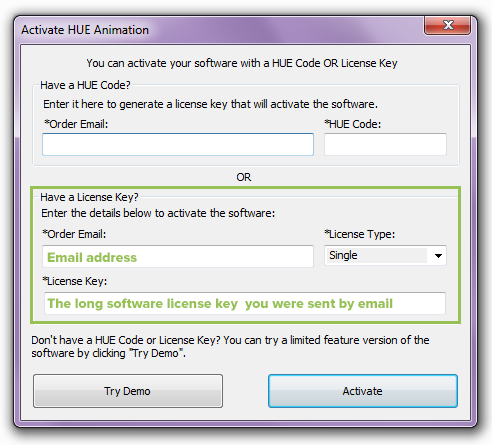
Once you click the Activate button, your software will be ready for use. If you have any problems, please check the Frequently Asked Questions section.
Note: Lost license keys can be retrieved instantly by completing this form.
Choosing a Workspace
If it’s the first time you’re using the animation software, you’ll also be asked to choose a Workspace folder. This is where your animation projects will be saved. The Default location will be best for most users.
Click Select Folder (Windows) or Create Workspace (Mac) to continue.
If you decide you want to use a different folder as your Workspace later on, you can change it in your settings.