FAQs: HUE HD Camera (General)
Google Meet applies a mirror filter to the camera feed by default. The image you see is mirrored but your call attendees will see the image the correct way around.
This is an application setting and does not have anything to do with the HUE camera. It is also not a setting that can be changed with the HUE software.
There is no way to remove the filter within Google Meet, unlike in Zoom, and if you use third party software to reverse it on your side, it will be mirrored on the attendees’ side as well.
As a workaround you can use the Present feature on Google Meet to share the camera feed from another application, such as HUE Intuition. Google Meet will not recognise the shared feed as a camera input so the mirror filter will not take effect. You can proceed to use the HUE Intuition application features in your call.
Instructions:
- Launch HUE Intuition and select your HUE camera as the video input device.
- Ensure that Google Meet is not already using your HUE camera or you will see a blank screen in HUE Intuition.
- Click on the Present button within Google Meet.
- Select the Application Window tab.
- Click on the HUE Intuition application window.
- Click Share.
For more help, please check our guide on how to use your HUE products with Google Meet.
For help with other apps, please check this alternative FAQ.
The USB cable that is supplied with our HUE cameras is a standard USB A to Mini B cable and it will fit any standard USB Type-A port on a computer.
If your computer only has USB Type-C ports, any standard USB adapter should work. If you don’t have an adapter yet, there are several options that may work for you.
USB to Type-C adapter: These are small adapters which let you convert the USB end of your regular USB cable to Type-C; they just slot right on top of your USB connector. They are a popular choice because they will let you connect the HUE base directly to the power source (computer). This will also let you connect the HUE camera directly to the computer by its flexible neck if you need to use it without the base.
Mini USB to Type-C cable: These are short cables which have a mini USB connector at one end and a USB Type-C connector at the other. Theses cable will let you connect your HUE Camera base to your PC or laptop since the camera’s base already has a mini USB port, completely replacing the USB cable which originally came with the camera. This option is not suitable for everyone since you will need to use the base every time you use the camera. It does have the benefit of offering a direct connection from the base to the computer.
Both types of adapter can be found at all good electronics stores, including Amazon.
If your USB cable is lost or damaged, it can easily be replaced by a third party alternative.
The USB cord that is supplied with your HUE camera is a standard USB A to Mini B cable and it will fit any standard USB A port on your computer.
Compatible cables can be purchased from most online hardware stores such as Amazon. We recommend choosing a cable no longer than 1.5m (5′) to avoid any latency in the video signal.
Please contact us if you have any questions about the material composition of these items.
Dimensions and weight: 22.5 x 18 x 5.9 cm (250g)
HUE HD Pro hard carry case (black)
CX0004 (EAN 5060167261749)
Do not wash.
Exterior Fabric: 100% Polyester
Interior Fabric: 100% Polyester
Mesh: 100% Polyester
Webbing: 100% Polypropylene Fiber
Zipper: 100% Polyester
HUE HD Pro hard carry case (white/multicolored)
CX0005 (EAN 5060167261732)
Do not wash.
Exterior Fabric: 100% Polyurethane
Interior Fabric: 100% Polyester
Mesh: 100% Polyester
Webbing: 100% Polypropylene Fiber
Zipper: 100% Polyester
HUE HD hard carry case (blue)
Not sold separately
Do not wash.
Exterior Fabric: 100% Polyester
Interior Fabric: 100% Polyester
Mesh: 100% Polyester
Webbing: 100% Polypropylene Fiber
Zipper: 100% Polyester
All HUE camera products include a three year manufacturer’s warranty against faults. If you purchased through a reseller, please contact your place of purchase for any issues with the order or delivery in accordance with their terms and conditions. If your HUE product develops a fault and the place of purchase is unable to help, you can contact us for support.
If you purchased directly through our online store or from the official HUE store on Amazon, please check this separate FAQ for further assistance.
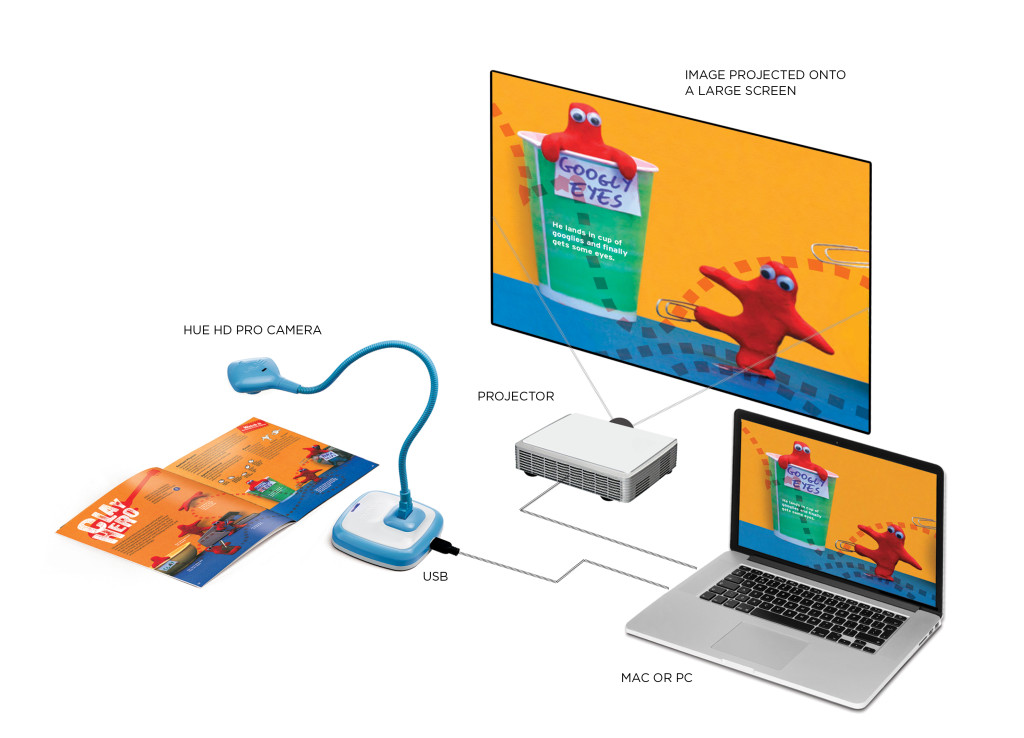
In normal use, all HUE cameras are designed to capture images in the correct orientation if they are positioned at the bottom of the document (as shown in the picture below). This is because HUE is intended to be a multipurpose camera, serving as a document camera, webcam and presentation device.
The HUE camera does not flip or mirror the video itself; what you see on-screen should normally be exactly as shown in the picture. Some versions of Skype and Google Meet (Hangouts) flip the local preview image but your callers will still see the video the correct way round. This is part of those applications’ design and not something we can override. In some cases, the ‘mirror effect’ can be disabled in settings.
Some offline applications (such as Photo Booth) always display the image mirrored and have no option to change this. We recommend avoiding these applications; Apple’s built-in QuickTime application and Microsoft’s built-in Windows 10 Camera tool will display the image correctly.
What if I need to use the camera flipped or mirrored?
If you are working locally, you can use software such as HUE Intuition or HUE Camera Viewer to flip and mirror the live video freely. HUE Intuition has options for flipping the live video in the Document Camera tab, while HUE Camera Viewer has buttons to do the same at the bottom of the Document Camera (toolbox) section located on the right side of the window.
You can also share the view from your local software in many video conferencing apps using screen sharing. Please check our tutorials for Google Meet, Microsoft Teams and Zoom for step-by-step instructions.
Otherwise, if you’re using a third party video conferencing tool to transmit your video, the controls will be part of that software. There are tutorials available for Blackboard and Zoom. At this time it appears that the rotation feature is limited to the Windows version of Zoom; please contact Zoom directly if this affects you. There are additional camera settings (‘Video Settings’) in the camera selection pop-up menu.
Some applications do not include their own flip/mirror tools. In those cases, third party applications such as ManyCam or SplitCam (Windows-only) can be installed to access additional controls.
OBS Studio works on Windows, macOS and Linux and it includes many options to configure the camera feed.
Changing the video orientation in all of your camera apps
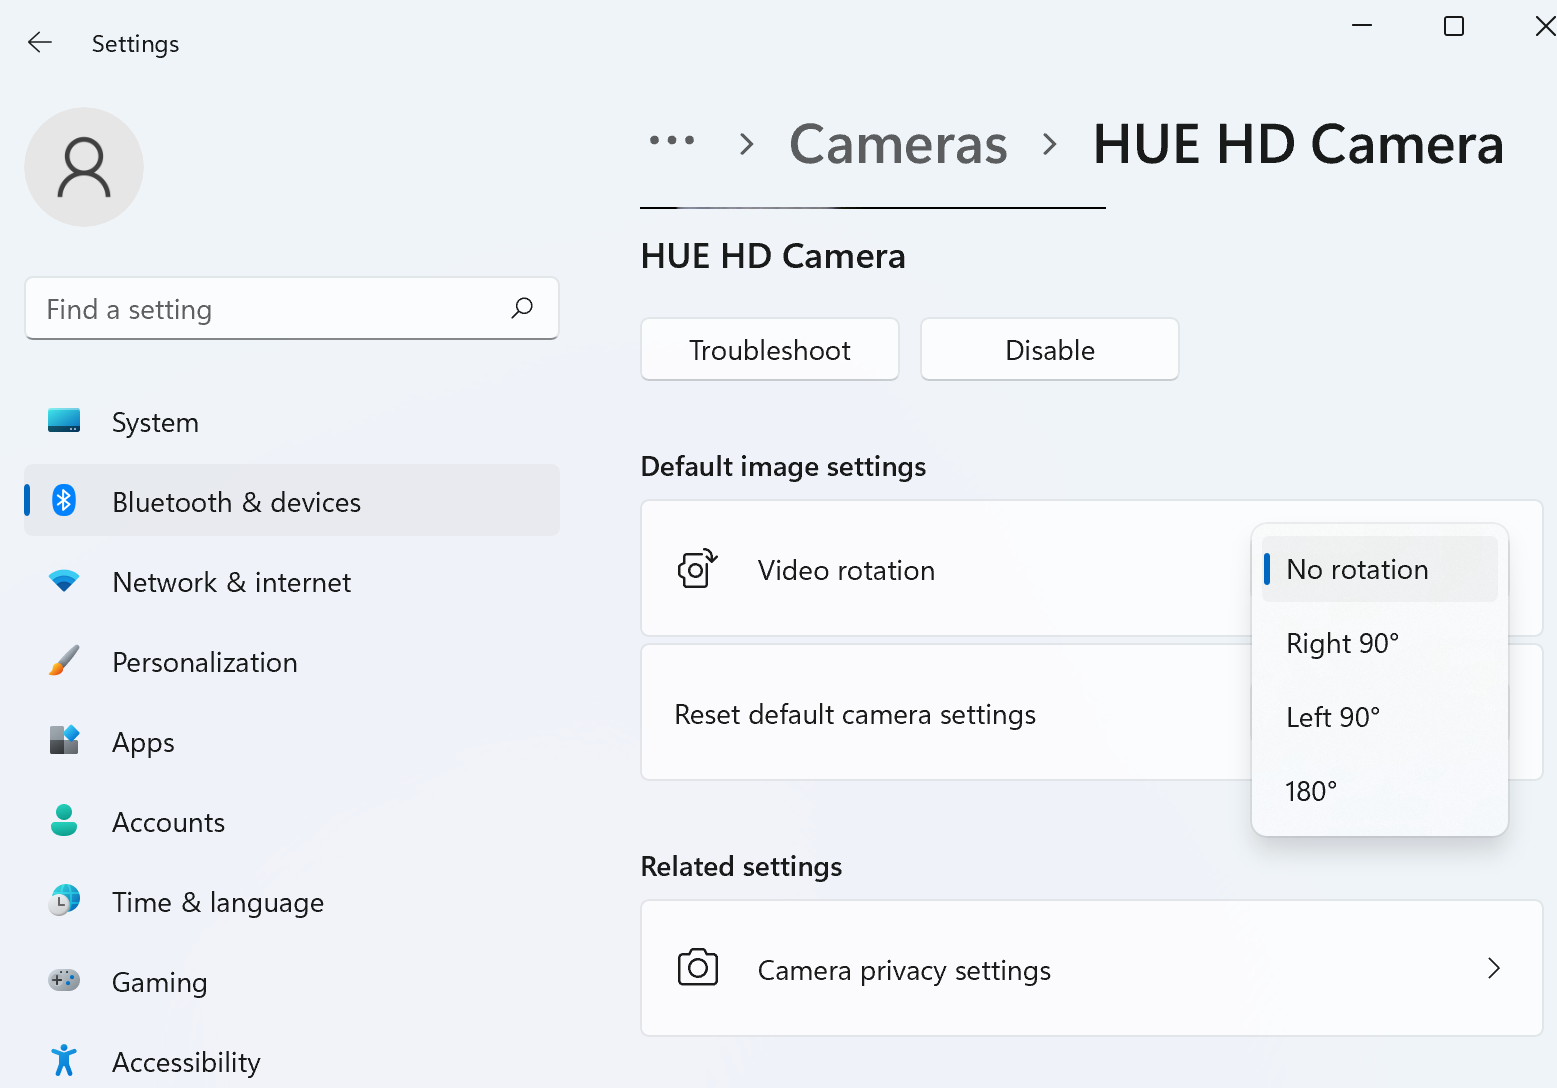
Windows 11 has introduced a new feature to change the default video orientation in all of your apps at once. If you are using an earlier version of Windows, you will need to change the video orientation in one of the third party applications listed above.
To permanently rotate the camera in Windows 11, browse to Start menu> Change Account Settings> Bluetooth & devices> Cameras> (pick your HUE)> Video rotation. You will be able to adjust your default rotation as shown in the screenshot below.
On macOS, iGlasses can also be used to flip and mirror the live video in most applications, including third party video conferencing tools. Apple have not yet added a feature to override the camera settings system-wide.
Please note that we cannot offer support for third party tools ourselves, though we can confirm that the ones listed above will work with HUE.
All HUE cameras are solely powered through their USB connection. They do not contain any rechargeable batteries (e.g. Li-ion) and do not require special handling during shipping.
This advice applies to the following products referenced by part number and EAN:
5060167261398 (PC0001) HUE HD Pro camera: Blue gloss
5060167261404 (PC0002) HUE HD Pro camera: Red gloss
5060167261411 (PC0003) HUE HD Pro camera: Green gloss
5060167261428 (PC0004) HUE HD Pro camera: Black gloss
5060167261695 (PX0001) HUE HD Pro camera: Blue
5060167261701 (PX0002) HUE HD Pro camera: Red
5060167261718 (PX0003) HUE HD Pro camera: Green
5060167261725 (PX0004) HUE HD Pro camera: Black
5060167261763 (PXC001) HUE HD Pro camera: Blue (black carry case version)
5060167261770 (PXC002) HUE HD Pro camera: Red (black carry case version)
5060167261787 (PXC003) HUE HD Pro camera: Green (black carry case version)
5060167261794 (PXC004) HUE HD Pro camera: Black (black carry case version)
5060167262197 (PX5001) HUE HD Pro camera: Blue (white carry case version)
5060167262203 (PX5002) HUE HD Pro camera: Red (white carry case version)
5060167262210 (PX5003) HUE HD Pro camera: Green (white carry case version)
5060167262227 (PX5004) HUE HD Pro camera: Black (white carry case version)
5060167260452 (HD0001) HUE HD camera: Blue
5060167260445 (HD0002) HUE HD camera: Red
5060167260476 (HD0003) HUE HD camera: Green
5060167260513 (HD0004) HUE HD camera: Black
5060167261817 (HDC001) HUE HD camera: Blue (carry case version)
5060167261824 (HDC002) HUE HD camera: Red (carry case version)
5060167261831 (HDC003) HUE HD camera: Green (carry case version)
5060167261848 (HDC004) HUE HD camera: Black (carry case version)
This also applies to the HUE cameras included in the HUE Animation Studio kits.
Your HUE camera is a plug and play device, so there are no additional drivers to install. Simply connect the camera to your computer and open your camera software to begin using HUE.
The HUE HD Pro Camera comes with an application called HUE Intuition which can be installed if you don’t already have your own camera management software.
If you have a HUE HD Camera, you can either purchase HUE Intuition or use the basic AMCap software for Windows to view your video stream. Mac users can use QuickTime to access the camera without installing any additional software.
We don’t currently provide any software for Chromebooks, but because HUE cameras are plug and play devices they will be recognized automatically as soon as they’re connected.
To start using HUE on your Chromebook, open the Chrome browser and click on Menu in the top right. Navigate to Settings, then Show Advanced Settings.
You should see a section called Privacy. Click on Content Settings (called Site Settings in some versions of Chrome) and select the HUE USB camera in the Camera dropdown list.
Once you click Done, your HUE camera will be available to stream and record video on websites such as YouTube and Ustream.
To stay up to date with news on our ChromeOS support, please check this page or send us a message.