
HUE Animation Toolbox is a finalist in the Teach Primary Awards 2025
The HUE HD Pro USB camera makes dental record-keeping easy
Hi, I’m Chris Plimmer, I make stop motion characters and animations in the stop motion industry and I’m going to be sharing some insights on how I use armatures in my claymation animations.
Claymation is a variation of stop motion that uses clay. Much like other forms of stop motion the animator needs to move the clay character and have it hold its pose as you animate it. This comes with several challenges that may interfere with the animating.
These are:
- Gravity
- Posability
- Maintaining poses over time (the character needs to stay perfectly in place as you take the photo or it will be blurry)
- Attaching the character to the animation table table (tie downs help keep the character stood up and not fall over)
- Rigging (needed if you want your character to jump or fly)
The biggest issue for animators is gravity, which will continuously apply force downwards on your clay character. This can cause them to fall over or have their arms (if stretched out) sag downwards. Having an armature inside your character can help mitigate some of the forces experienced by the clay much like the human skeleton. The armature can have additional built in features that can help, like tie downs or rigging points. Tie downs can secure the feet of the character to the animation table which avoids the character tipping over. Whilst a rigging point allows you to plug a rigged supportive arm directly into your character’s armature, allowing the character to be further supported or lifted in the air, defeating gravity!
There are many materials to choose from for making stop motion armatures. Typically multiple materials would be used, example: wood for the core body parts (head, chest, hips) and wire for the moveable limbs (such as aluminum wire).
Below are some examples of armatures I’ve made that can be shown here.
Keeping it simple
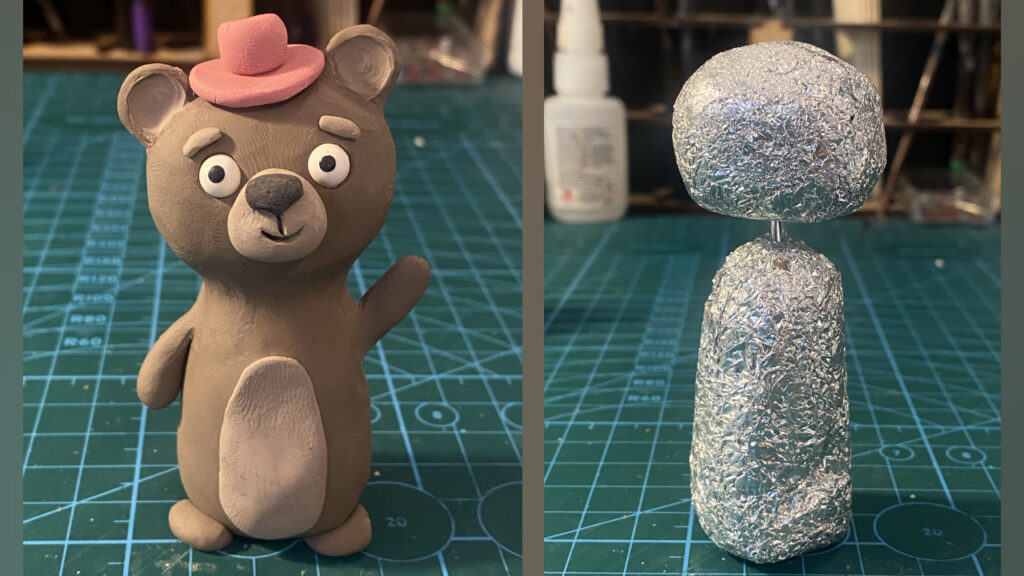
Just in case if I’ve scared anyone with the mass amount of options above, just remember to keep it simple. Not all characters need armatures or they can be made with very simple methods. The character shown below is a clay bear that has a simple design. The armature it uses is tinfoil for the main body and the head, a wire spine with a bend at either end that the foil is hot glued onto to build up the shape of the bear.
Just in case if I’ve scared anyone with the mass amount of options above, just remember to keep it simple. Not all characters need armatures or they can be made with very simple methods. The character shown below is a clay bear that has a simple design. The armature it uses is tinfoil for the main body and the head, a wire spine with a bend at either end that the foil is hot glued onto to build up the shape of the bear.
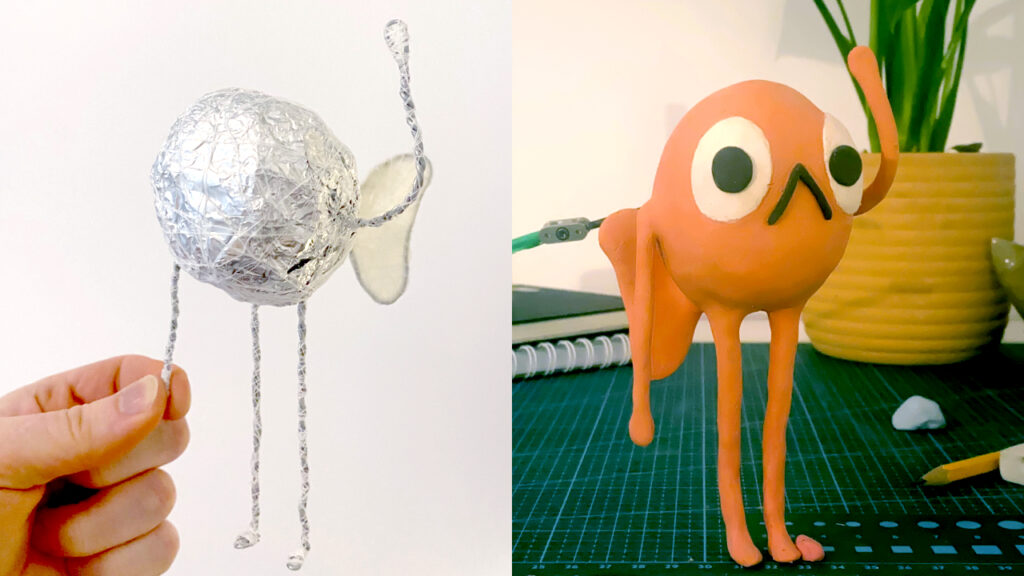
Steve the fish. Tin Foil and Wire Armature.
This was a fun personal project recreating the viral online meme of “Steve the Fish”. This recreation was made using HUE Clay, tin foil, hot glue, sewing thread and aluminum wire. You can see the making of process here:
It’s a rather simple armature but because the character is going to be claymation I added thread onto the wire parts. This is super important because wire is very smooth and doesn’t have enough texture for the clay to hold onto. Gluing thread onto the wire gives the surface plenty of texture to avoid the clay slipping off or ripping off mid animation. This allowed me to animate this character dancing for a social media animation. This worked a lot better than a different character I made where the character broke in half several times due to its lack of an armature inside.
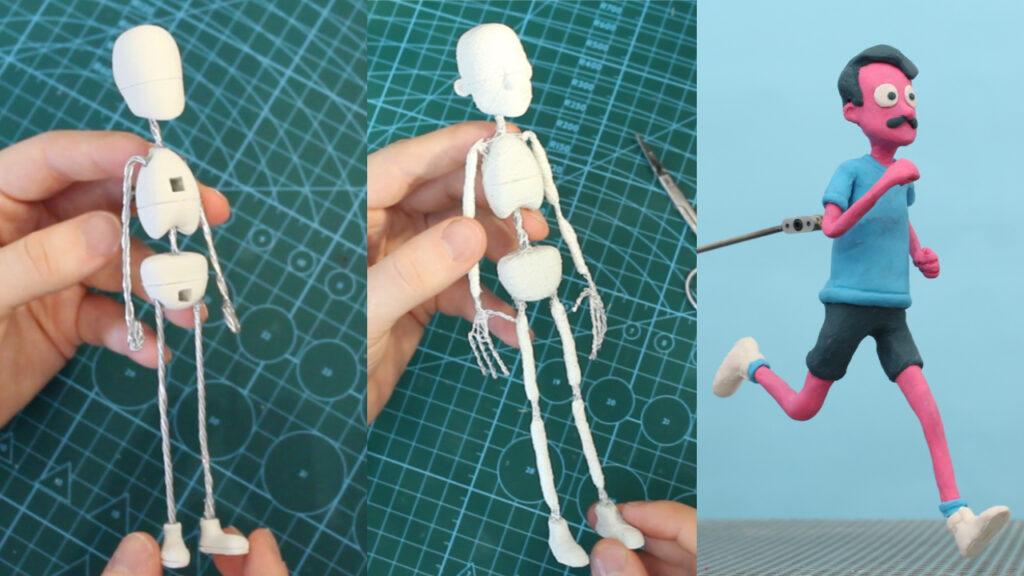
Claymation Human. 3D Printed Filament and Wire
This character uses wire like the last armature but this time it uses 3D printed core parts, which allows for the huge benefit of using rigging and tie downs in the feet. This makes animating certain actions a lot easier like walking, running and jumping. This is more advanced than just using tin foil but you could get similar results from using drilled balsa wood with K&S tubing for rigging and using hex nuts in the feet for tie downs. Importantly both of these methods need to be wrapped in thread and glue to allow for the clay to better cling onto the wire and core armature parts.
See how it was made here:
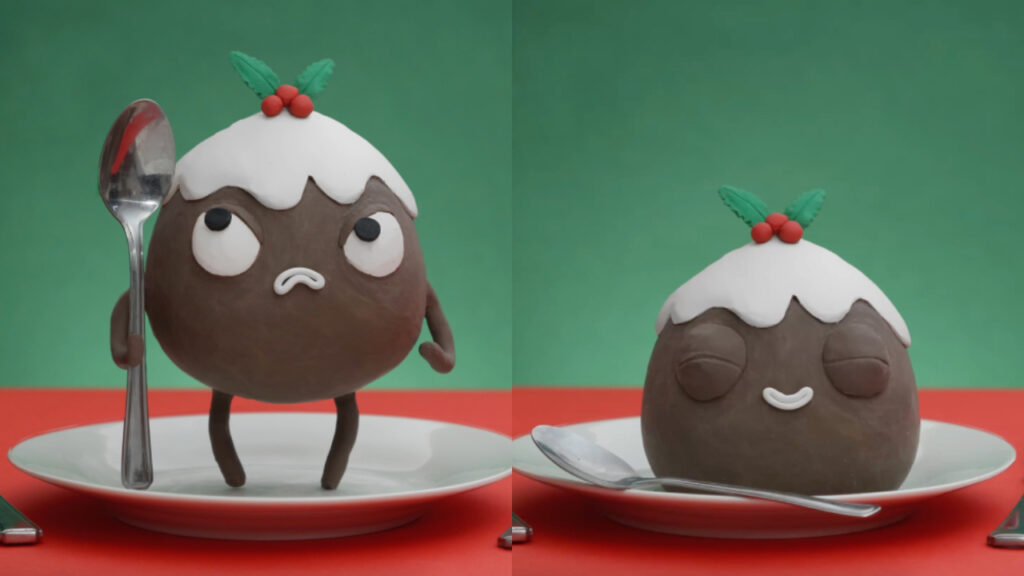
Christmas-pudding claymation
Recently I made this claymation character for HUE Animation’s socials. Due to the action of the animation I designed an armature that could split in half, this was created using 3D printing. This was so the character can stand and sit on a dinner plate. Armatures need to be designed to be practical for the animation desired, everything we make must serve the purpose of the final animation. See images of the armature and the finished character below.

I hope this was useful for making your own armatures for claymation. If you want to see more of my work you can find my work in the following links –
Youtube: youtube.com/@plim_stopmotion
Instagram: www.instagram.com/chris_plim
Tiktok: www.tiktok.com/@plim.stopmotion

Find out more, subscribe to our blog, download resources, contact us or follow us on social media.

