Using HUE Animation Studio to Showcase Classroom Learning

Using the HUE HD Pro Document Camera to Teach a Math Lesson in Kindergarten
Paco Montero Arranz, who publishes the popular blog ‘Estoy en ello’ in Spain, has been testing the HUE cameras and software. He takes a technical look screen by screen at how our products work and how he sees them in use in classrooms in Spain. It’s holiday time but we’re going back to school soon and we can’t wait to see Spanish teachers starting to use HUE for real in their classrooms!
Here is the link to Paco’s full article. Its translation in English is below but we’ve highlighted here some of his comments.
“In a matter of minutes I had made my first simple animation.”
“The software is quite intuitive and minimalist but full of features”
“The cameras take photos (Snapshot) as well as record both audio and video.
“I liked the fact that the Pro camera can detect movement ..”
“You can save your film as an MP4 or share it in Quicktime, Youtube or Creatubbles (a creative community for children which looks really good and with whom the people at HUE are partners)”
You can adjust the speed of the animation fps (frames per second). This is thus ideal for stop motion animation or modelling type films (Claymations) for example.
“It can also be useful for example to project the work or drawing of a pupil or a chart from a book and show it to the whole class using a digital whiteboard.”
“The software allows you to program the interval between camera takes as well as when to start the recording.”
“You could take a picture of a building every half an hour to show the how the light and shade changes throughout the day or you could record a group of children during an art class showing how the creative process develops.”
In September we will all be back at school and let’s see how we will use this tool in our classrooms.
For the benefit of our English-speaking readers, here’s a full translation of Paco’s review:
Testing HUE Animation. Making Magical Films
I was contacted a few weeks ago by www.huehd.com in London to try out their document camera and animation software. They had seen my blog and our work with pupils using stop motion and they felt we could help each other. We came to an agreement straight away and I was sent the cameras which I am now starting to work with. They have recently started to market HUE in Spain and want to our schools to know about their products.
Even though I haven’t made anything at all worthwhile yet, within 10 minutes I had installed both cameras (both plug and play) as well as the HUE Animation and HUE Intuition software. The software is quite intuitive and minimalist but is full of features.
In a matter of minutes, I had made my first simple animation.
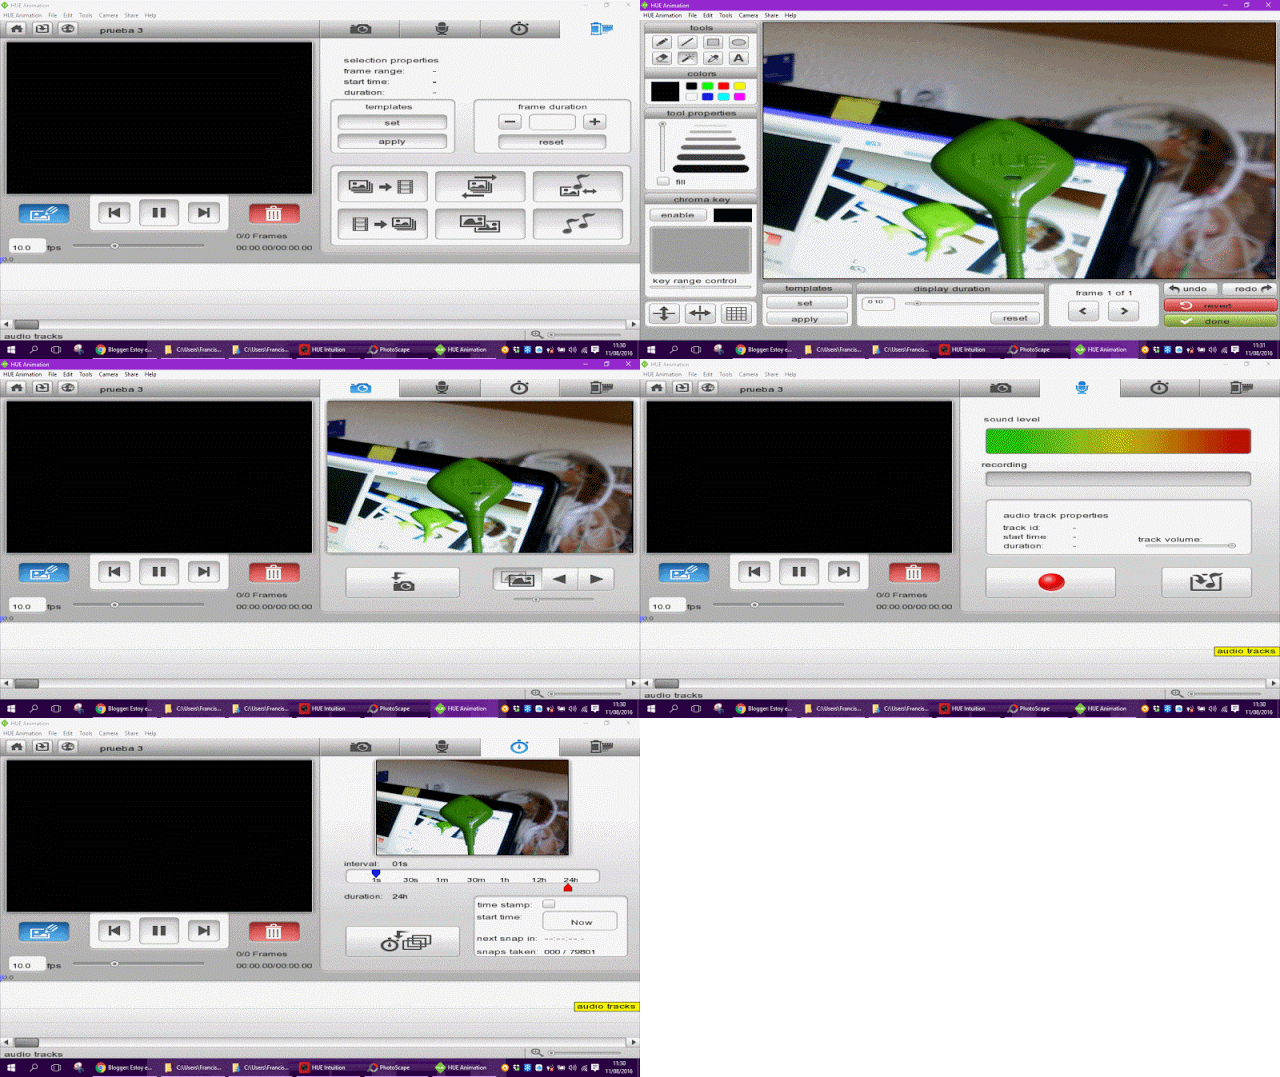
As you can see it’s not much more than a quick test. The resolution of both cameras is HD and the photos are of good quality. The software is able to do a lot from both a technical and creative point of view. The cameras can take photos (Snapshot) as well as record both audio and video. One of them has LED lights to highlight the area in front of it. They connect via USB. 2.0 and support Windows XP to Windows 10 and Mac OX from version 10.4. I liked the fact that the Pro camera can detect movement and take pictures without you having to tell it to do so via the keyboard or timer. The software will work both with the webcam and microphone on your laptop just as well as with HUE HD cameras. The following animated Gifs show you the important screens in HUE Animation.
The first tab shows how you to take photos and add them to the timeline which is where you will create your film. This can be saved as an MP4 or shared in Quicktime, Youtube or Creatubbles (a creative community for children which looks really good and with whom the people at HUE are partners). You can adjust the speed of the animation fps (frames per second). This first screen is thus ideal for stop motion animation or modelling type films (Claymations) for example. It can also be useful for example to project the work or drawing of a pupil or a chart from a book and show it to the whole class using a digital whiteboard.
The second tab shows how to record audio into the film (I haven’t tried this yet). You can record your own or incorporate a pre-recorded audio track.
The third tab shows how to make Timelapse films, a succession of photos taken at intervals. For example you could use it to show the movement in a technology classroom using 5 second intervals where all the children are working and build this up over a series of classes. The results I’m sure would be fantastic. You could also take a picture of a building every half an hour to show the how the light and shade changes throughout the day or you could record a group of children during an art class showing how the creative process develops. The software allows you to program the interval between camera takes as well as when to start the recording.
The fourth and last tab is for editing the recording and joining all the frames into a film, to reverse the order of the images, adjust the length of the film to the length of the audio track or to duplicate images and sounds.
Each image or selected group of images (frames) can be edited separately in the editor which also allows you to add straight lines, cubes or ovals with or without fill and text in different colours which allows you to explain or add subtitles to your film.
This software can be used in conjunction with other software for example Windows Live Moviemaker. In September we will all be back at school and let’s see how we will use this tool in our classrooms.


