System Requirements | Help | Upgrade | Contact | Free Resources

We’ve now added Stop Motion Studio animation software for Windows and macOS to provide you with an enhanced software offering for your HUE Animation Studio kit.
HUE Animation, our award-winning stop motion software for Windows, is still included with every HUE Animation Studio kit but now you have the choice of two amazing apps.
System Requirements
- 512MB RAM (1GB recommended)
- HUE Animation requires: Windows 11, 10, 8, 7 or XP and graphics drivers with OpenGL 2.0 support
- Stop Motion Studio requires: Windows 10 or later, or macOS 11+
Help
The following Tutorials and FAQs are for the new Stop Motion Studio software. If you have a problem with your camera or the HUE Animation software for Windows, please also check our other HUE Animation Studio Tutorials and FAQs, or contact us below.
Tutorials: Stop Motion Studio
In this short tutorial video, we will show you how to connect your HUE camera and create a simple animation to share with your friends, family, teachers or students.
Browse the full Stop Motion Studio for HUE playlist on YouTube for more tips, tricks, troubleshooting guidance and tutorials.
If there is something we have not covered in our Stop Motion Studio Tutorials that you need help with, please contact us for further assistance.
IMPORTANT: Before you can add audio to a Stop Motion Studio project, you must first have some frames on the project timeline. Audio clips can then be added to one of the captured frames in the following ways:
- Recording audio with your microphone.
- Adding a sound clip from the audio library.
- Importing sounds from your computer.
Recording audio with your microphone
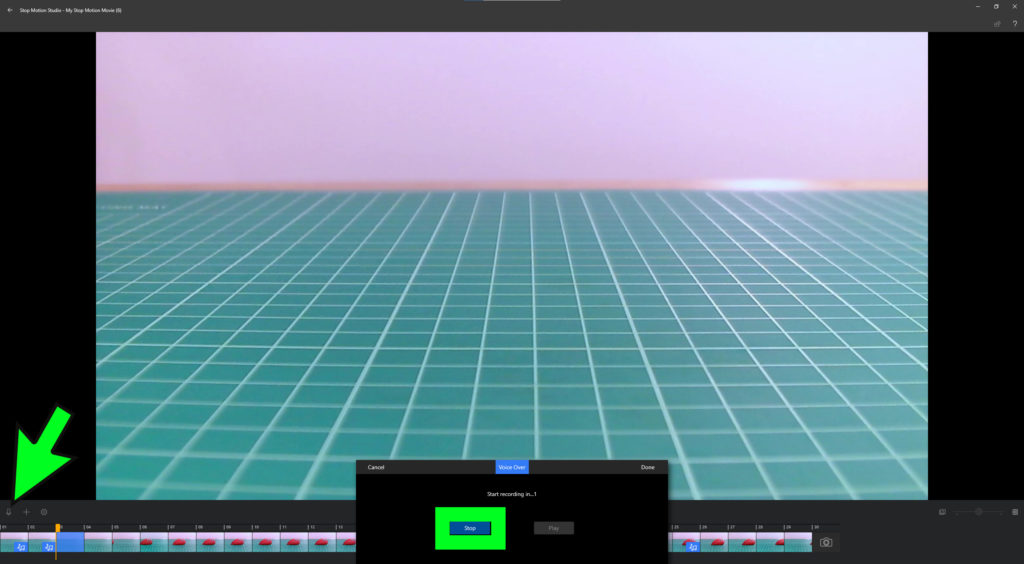
To record voice-overs or sound effects directly into your animation project, select a frame in your timeline where you want the audio to begin.
Click on the Microphone icon, to the far left of the screen, just above the timeline.
From the pop up window, click on the Record Button to start capturing audio.
Once you have recorded your audio clip, click the Play Button to review your recording.
If you are happy with your recording, click Done to close the pop up window.
Adding a sound clip from the audio library
If you don’t want to record your own audio, Stop Motion Studio also has a fantastic library of sound effects and theme music that you can use in your movies.
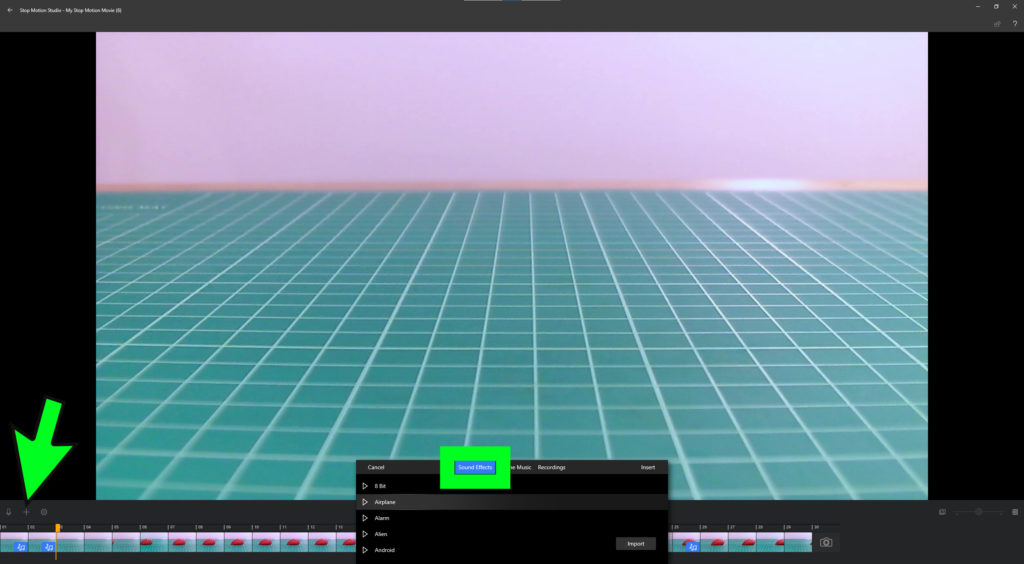
To access the library, select a frame in your timeline that does not have an audio track (adding a sound to a frame that already has a track will replace the existing track).
Click on the Add Media (+ symbol) and select the Audio option.
From the pop up box select Sound Effects or Theme Music to view the list of pre-loaded clips.
Scroll through the list to find the perfect sound effect or music clip for your project.
You can preview each audio clip by clicking on the small play buttons next to each clip.
Select an audio clip you would like to use and click Insert to add it to your project.
If the audio clip is too long, or too loud, you can make adjustments to the volume and clip length.
To do this, right click on the audio frame in your timeline and click the Audio option in the Edit Menu.
Use the volume and trim sliders to edit your sound clip.
When you are happy with your edits, click Insert to close the pop up box.
Importing sounds from your computer
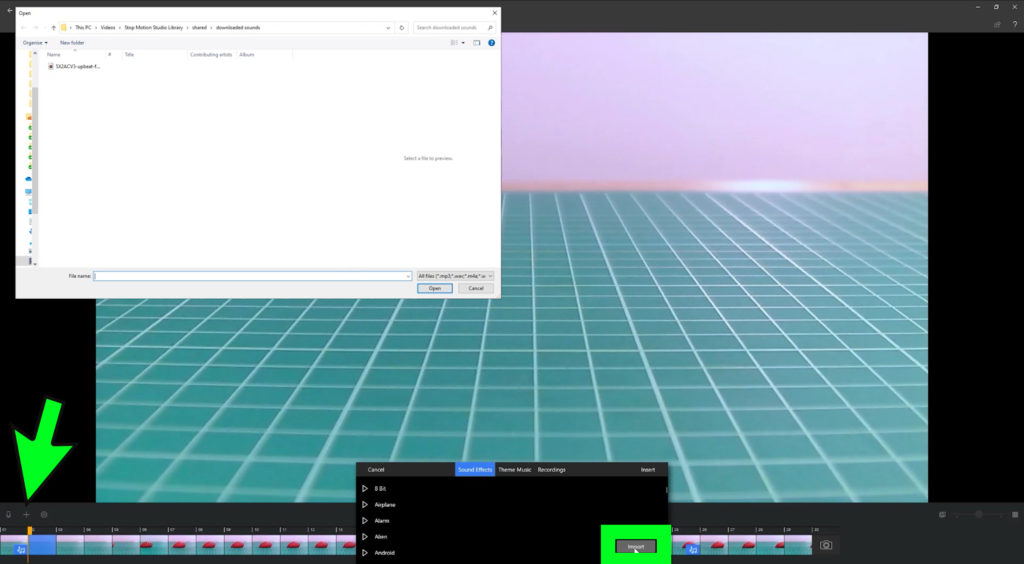
Select a frame in your timeline, click on the plus + symbol and select the Audio option.
Click the Import button.
This will open a browser window where you can search for audio files you already have on your computer.
Select the file and click open to add the audio clip into your project.
Click on the play button to hear the unedited version of your imported sound.
To edit the sound clip, right click on the audio frame in your timeline and click the Audio option in the Edit Menu.
Use the sliders to edit the volume and duration of your sound clip.
Click on the play button to preview the edited clip and adjust the sliders until you are happy with the results.
When you are satisfied with your edits, click Done to close the pop up box.
Before you can add a title or credit page to a Stop Motion Studio project, you must first capture some frames of an animation. Title pages can then be added to one of the captured frames.
Add an opening title and closing credit page to your film using different themes. You can customize elements such as the studio and movie name, the text size, color and font.
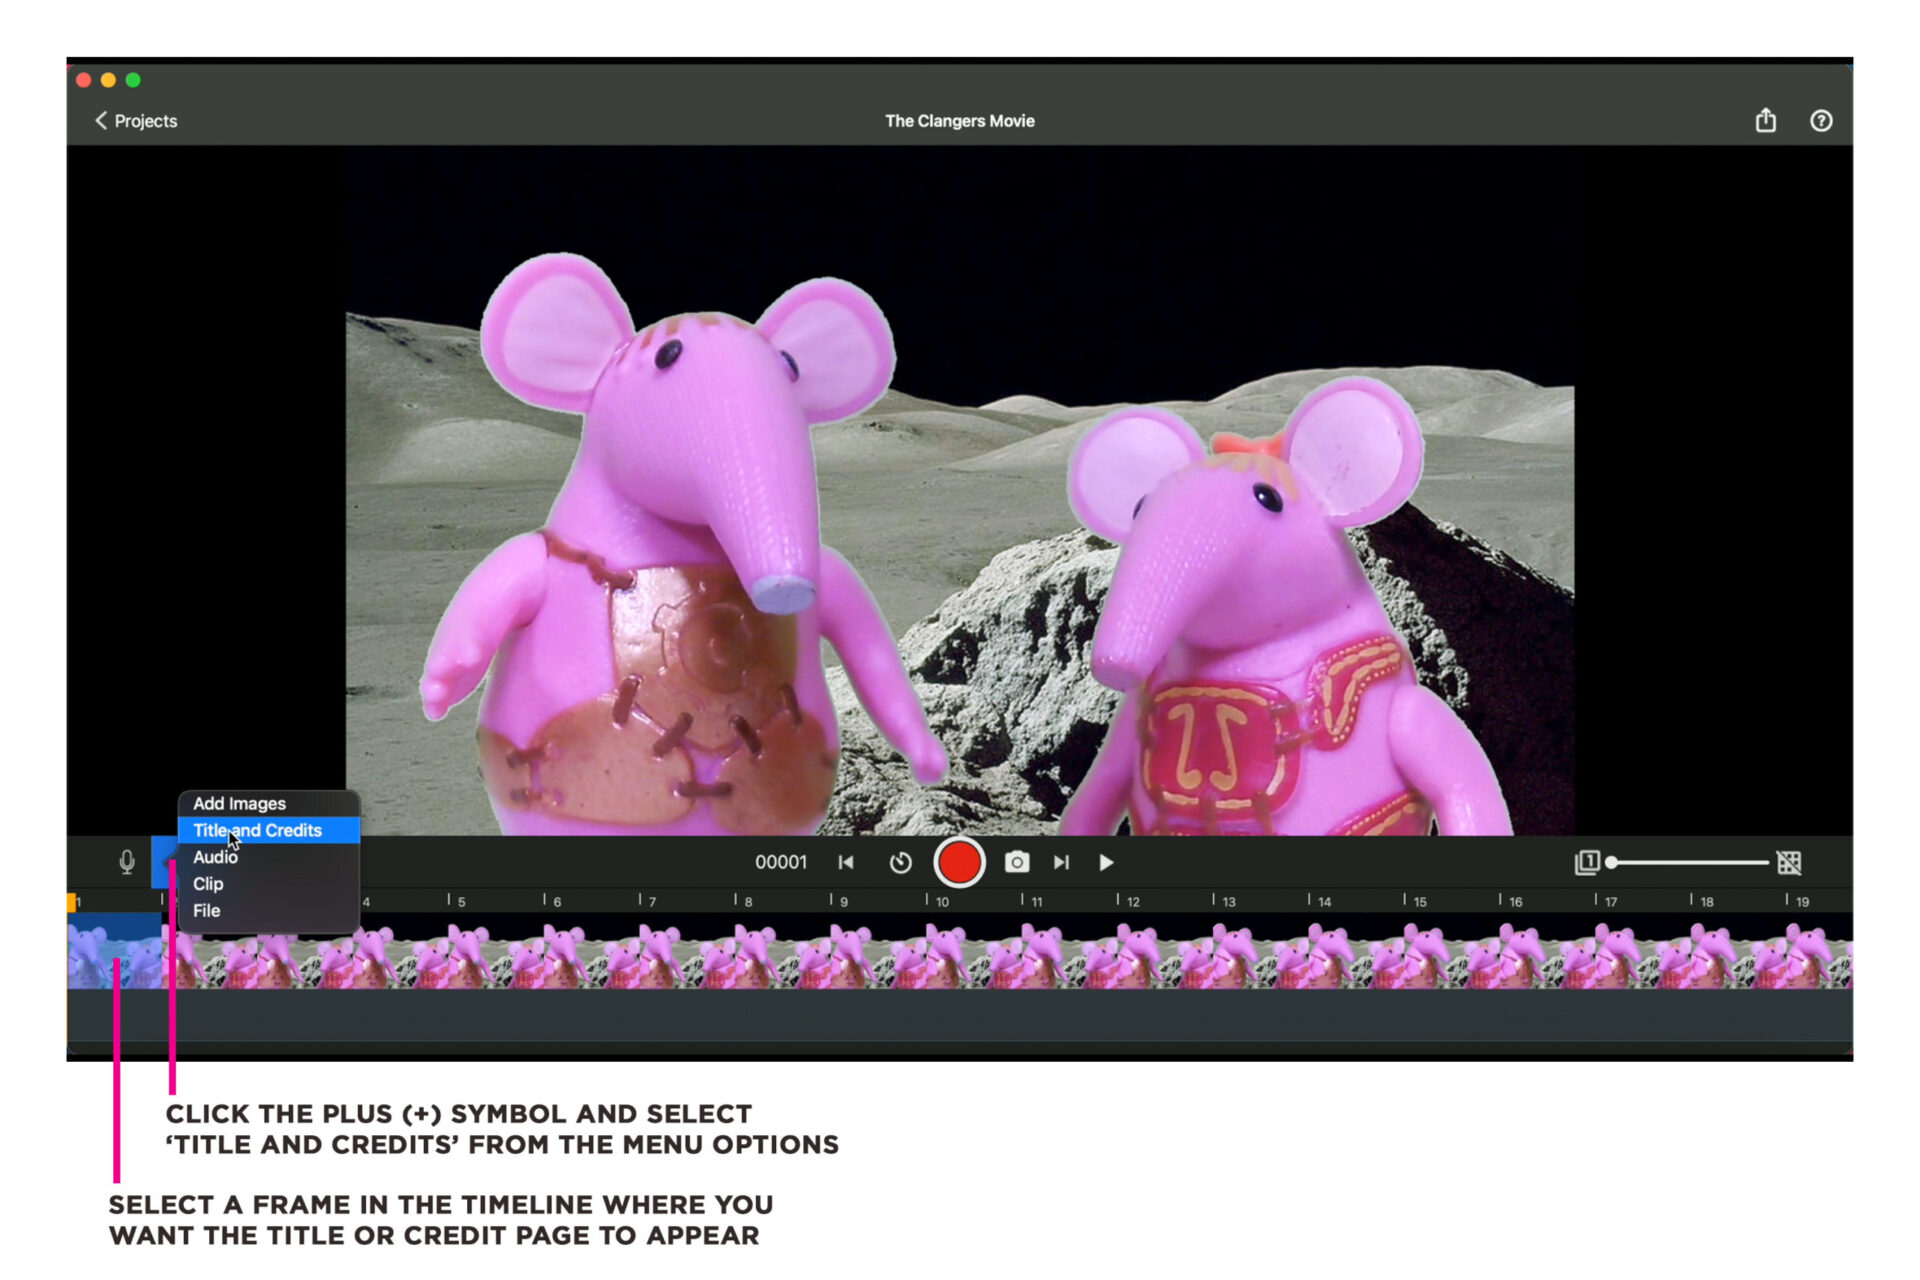
- With your project open, scroll the timeline so that the playhead appears over the place where you want to add the title or credits.
- Click the Add Media button (+ symbol), select Title and Credits.
- Click the title or credit you want to add.
- The chosen design will be opened in the image editor where you can customize the text, size, font and color of the titles.
To remove a title template from your movie, right-click the frame in your video timeline, which will open a contextual menu. Select Pause and move the slider to adjust the length of time your title appears on screen. Select Delete from the right-click menu options to completely remove your title clip.
IMPORTANT: The Green Screen effect cannot be applied to existing frames. The feature needs to be turned on BEFORE you capture any frames.
The Chroma Key function lets you select a color from your scene (green or blue) and replace it with an image.
Set up your animation scene with a bright green or blue background and make sure your characters are a different color from the background you have chosen.
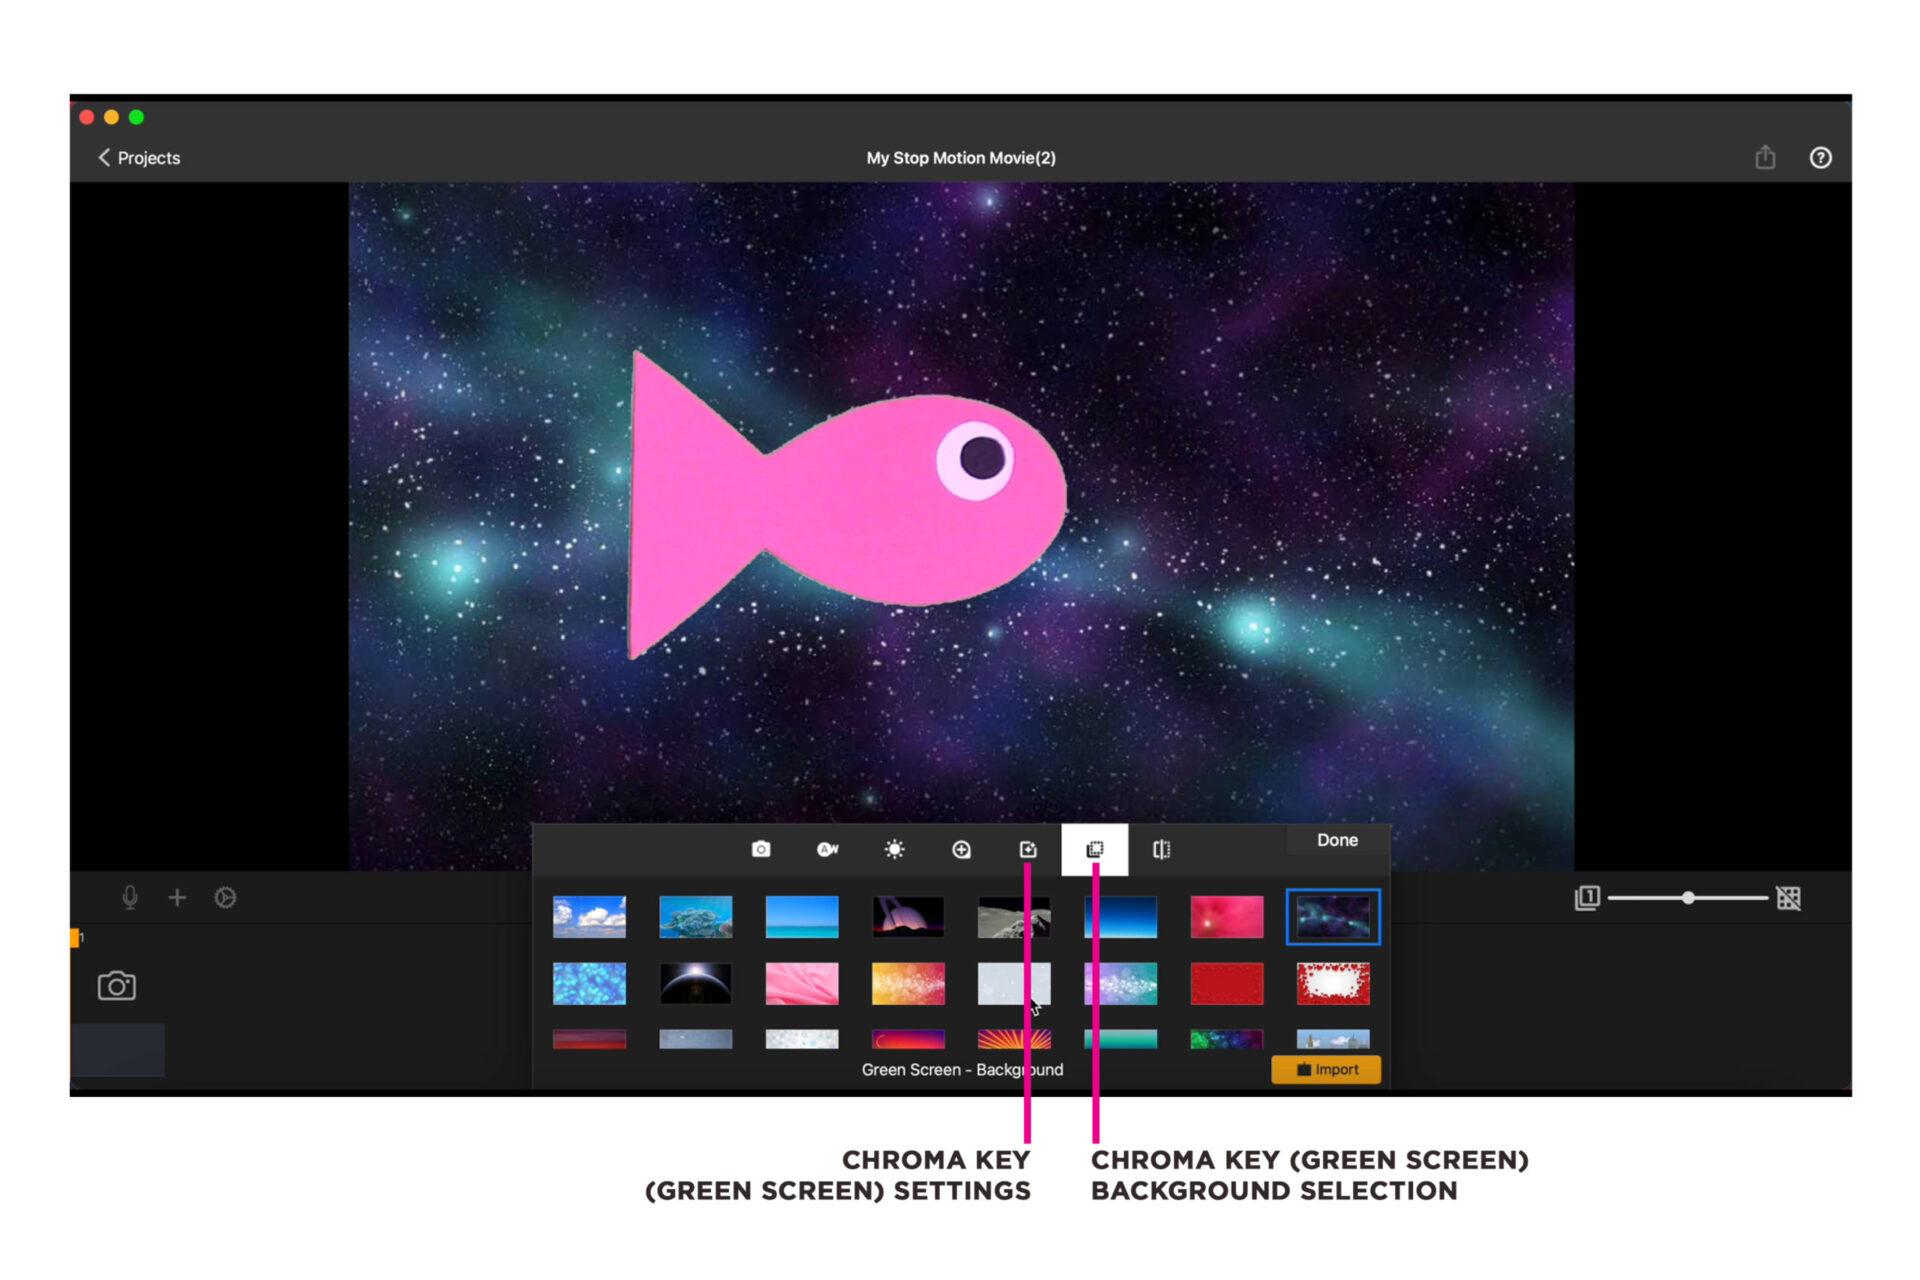
It is important to illuminate your background with bright, even light. The better lighting you have, the better chroma result you will get.
- From the movie editor, click the capture settings symbol
 .
. - Select the green screen and pick a color to remove from the image.
- Toggle the sensitivity slider to adjust the strength of the color key.
Click DONE when you are happy with your settings and start animating.
Time-lapse is a technique used in film-making to record processes that take place over long periods of time.
By capturing images at set intervals, we can see a high-speed version of reality when the footage is played back as a movie.

To create a time-lapse sequence in Stop Motion Studio for HUE:
- Click on the TIMER icon to the left-hand side of the red CAPTURE BUTTON.
- Use the slider to choose the number of seconds you want to set between captured frames.
For things that move slowly, such as plants growing, set a longer interval between frame captures. For faster moving activities, such as drawing or LEGO® building, set a shorter interval.
- Once you have set the interval, click DONE to close the time-lapse setting window.
- When you are ready to begin your time-lapse, click the red CAPTURE BUTTON to start auto-capturing images.
- When you have finished your time-lapse, click the red CAPTURE BUTTON once more to stop capturing images.
If you want to capture frames manually, don’t forget to return the auto-capture interval slider to the OFF position.
You can slow your animation down in two ways, either by capturing more pictures, or by lowering the frame rate of your animation project.
To lower the frame rate, click on the Project Settings icon to the left-hand side of your screen.
From the project settings window, click on the frames per second (fps) icon and drag the slider to select a lower frame rate. The lower the number the slower your animation will move.
Once you have selected a lower frame rate, click Done to close the window.
As we all know from Shrek, onions have layers.
Back in the olden days of animation, cartoons were drawn on semi-translucent paper called onionskin. This enabled animators to layer keyframe drawings on top of each other so they could draw inbetween frames to create smooth animated sequences.
This age-old technique still helps animators nowadays and the feature is available in Stop Motion Studio for HUE.
Whether you are animating on paper, with clay, LEGO®, or with found objects, the onion skin feature will show you ghost-like images of the previous frames of your animation and help you to line up your next shot.
You can use the onion skin slider in Stop Motion Studio to toggle the opacity between previously captured frames and the live camera view.
To apply the onion skin effect to more layers, click on the small numbered square to the left of the opacity slider.
When you are animating it can sometimes be helpful to copy and paste, and reverse, frames of your animation to create a loop of your footage.
To do this, you first need to select all the frames you want to copy In the project timeline.

When you have selected your frames, right click on any of the selected frames to open the editing box.
Select COPY from the menu options, right click where you want to paste your frames and select PASTE from the editing box.
Animating LEGO® characters is lots of fun, but it can be tricky to change their facial expressions by replacing their tiny heads.
Thankfully, Stop Motion Studio has a fantastic feature that enables you to add digital faces to your LEGO® characters after you have animated them.
You will need to turn your LEGO® Minifugure’s head all the way round so that you can animate your character with a blank face.


To add faces to your character:
- Right-click on the first frame in the timeline and select Edit.
- Click on the plus (+) symbol at the top right hand side of the screen and select Face.
- Use your mouse to resize and position the LEGO face so it fits perfectly onto your character.
- Copy the face by hitting Command – or Control for PC users – plus the C key on your keyboard. Alternatively, right-click the face layer on the sidebar and select Copy.
- Click on the small arrow at the top of the screen to display the next frame (you can also use the arrow keys on your keyboard).
- Hit command – or control for PC users – plus the V key on your keyboard, to paste the face from the previous frame.
Repeat this process for all of the frames that will be using the selected face.
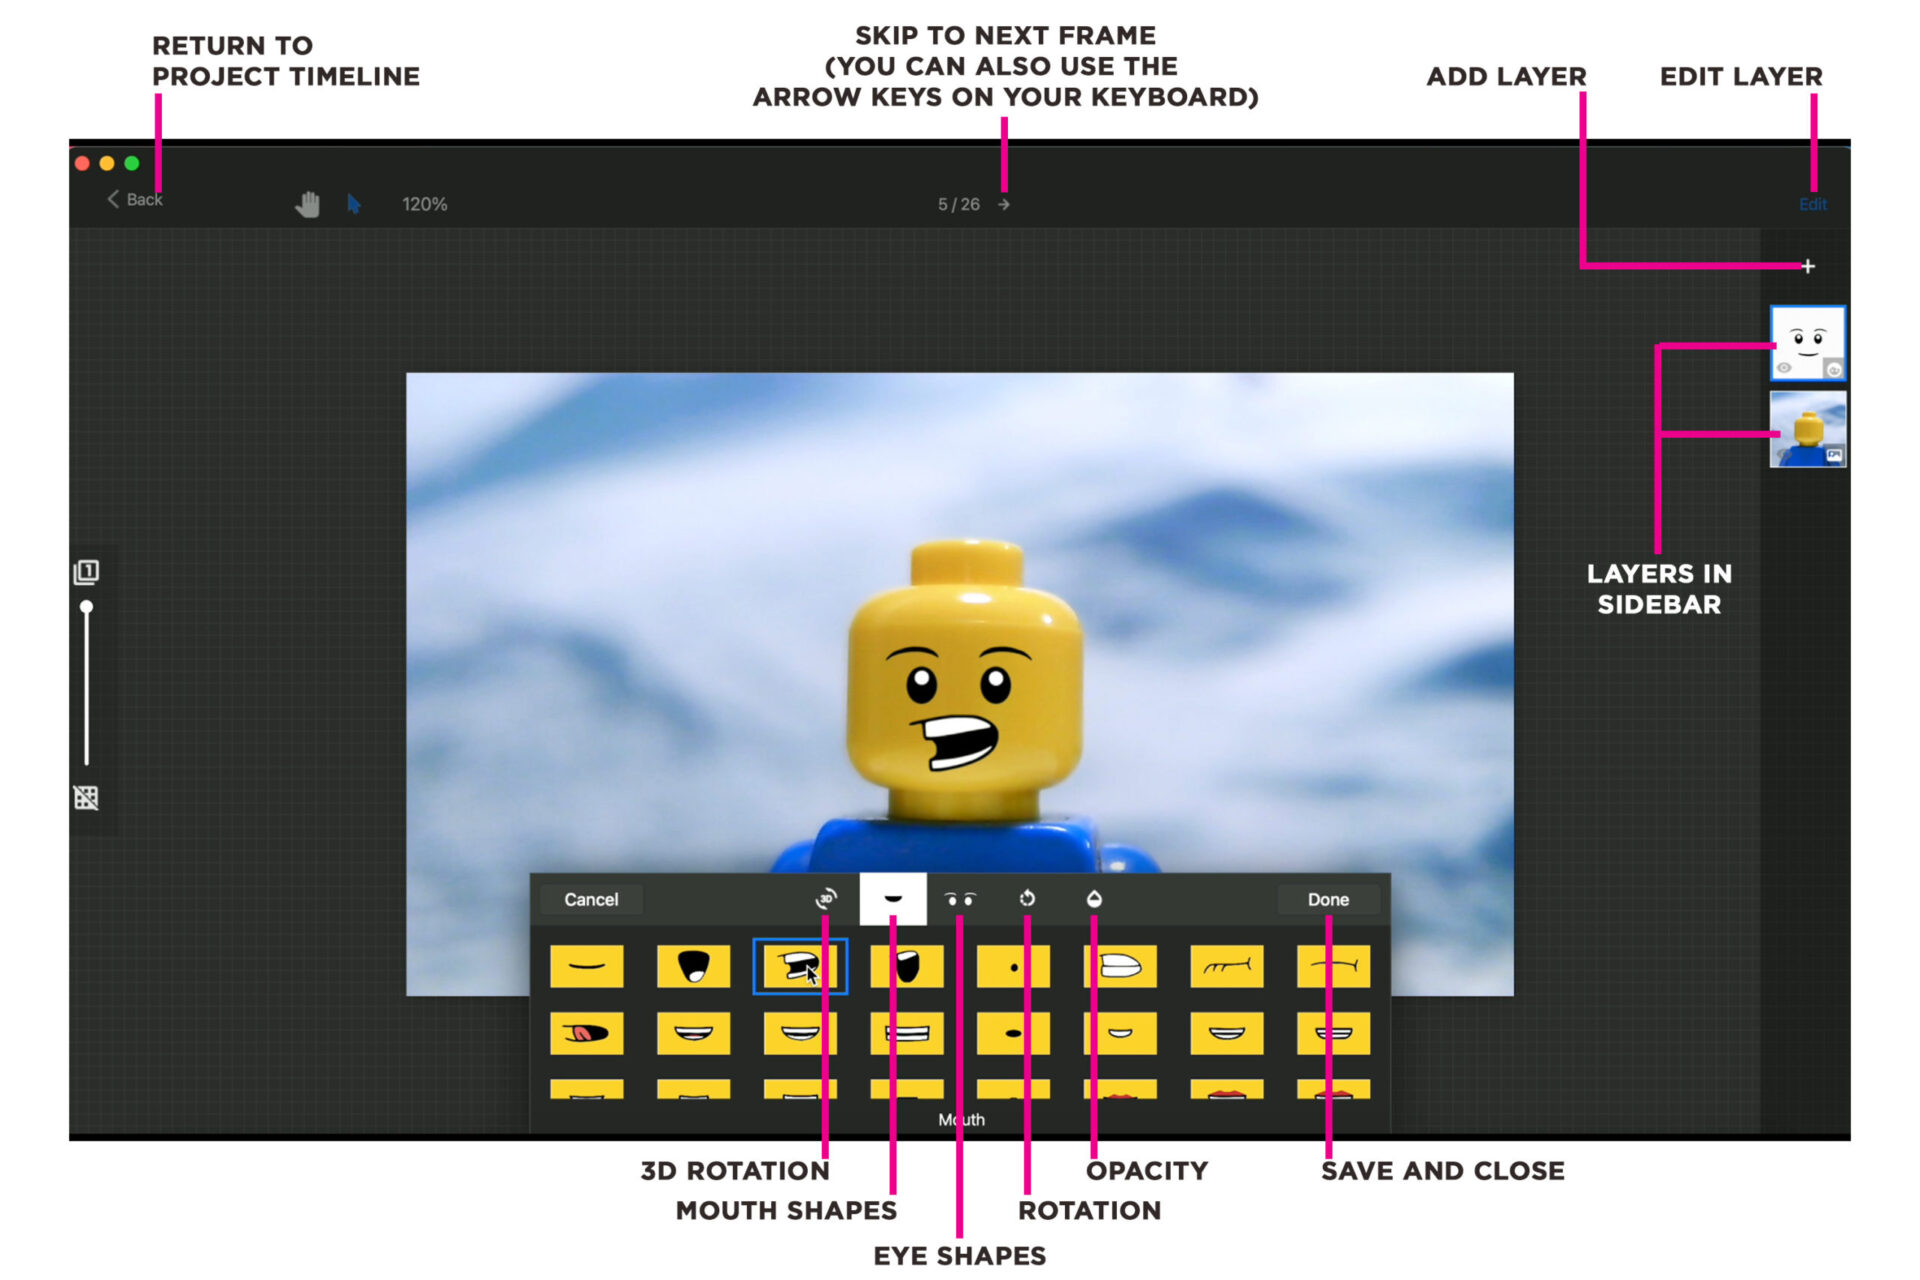
To edit the face:
- Select the face layer in the sidebar.
- Click on Edit at the top right hand side of the screen.
Here you will find lots of fun options such as changing your character’s eye and mouth shape, opacity and rotation.
Once you have finished editing the face, click Done.
To return to your project timeline, click the Back button.
FAQs: Stop Motion Studio
A perpetual single-user license of the Stop Motion Studio software is now included with every purchase of HUE Animation Studio.
To access your software, log into or create an account on the HUE website by entering your email address and choosing a password.

Once you have logged in, click on Register New Software.
Enter your activation code, which can be found on the back cover of The HUE Book of Animation, in the box provided to upgrade to the desktop version of Stop Motion Studio.
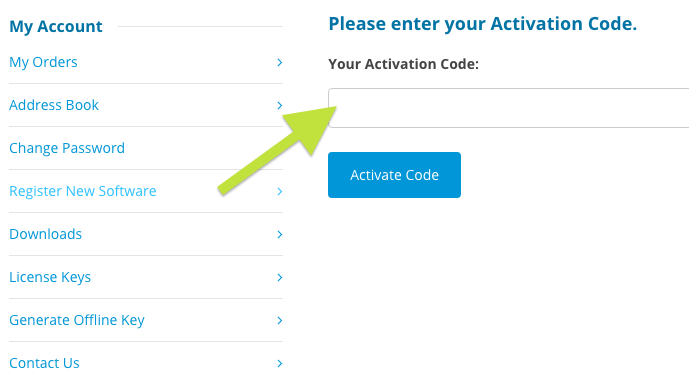
This will permanently add your software and license keys to your online account.
To access your copy of Stop Motion Studio software again in future, click the Downloads link in your account. The license key will be stored in License Keys.
When downloading, you will be prompted to either Open or Save the downloaded file then the download will begin.
For macOS users, if you are unable to install the Stop Motion Studio software because your macOS device cannot be upgraded past a certain version (e.g cannot upgrade past macOS 12), please download the version of Stop Motion Studio at the bottom of the download page from the link below.
Download Stop Motion Studio: https://www.stopmotionstudio.com/download/
HUE Animation Studio now comes with Stop Motion Studio for Windows/macOS, which requires a HUE camera. Please ensure that you have given the software permission to connect to cameras in your computer’s Privacy/Security settings.
The following information only applies to the older ‘HUE Animation’ software.
HUE Animation only works with cameras without flash memory, so it’s not compatible with digital SLR (DSLR) cameras, camcorders which store videos internally, or flip cameras.
HUE Animation is designed to work with webcams and some document cameras with a USB connection. These cameras are capable of real time video streaming. If you are testing a camera on your computer, make sure that your computer has the correct driver software to run the camera.
We recommend using ‘plug and play’ webcams as these will not require any additional driver installation.
The code on the back of the HUE Book of Animation is your unique activation code, which unlocks all of your HUE Animation Studio benefits such as the software, the translated digital editions of the book and the downloadable extras included with the kit.
The code can be registered instantly in My Account (free account registration is required). You will then receive download links for the software and your Stop Motion Studio for HUE software license key.
If you need more help with registration, please check this detailed activation guide.

From the project window, click the question mark symbol top right of the screen.
I still can’t see the tooltips! What do I do now?
From the project browser / home page, click the settings cog, bottom left of the screen. When the settings box opens, click on Tooltips and then click on Show tooltips.
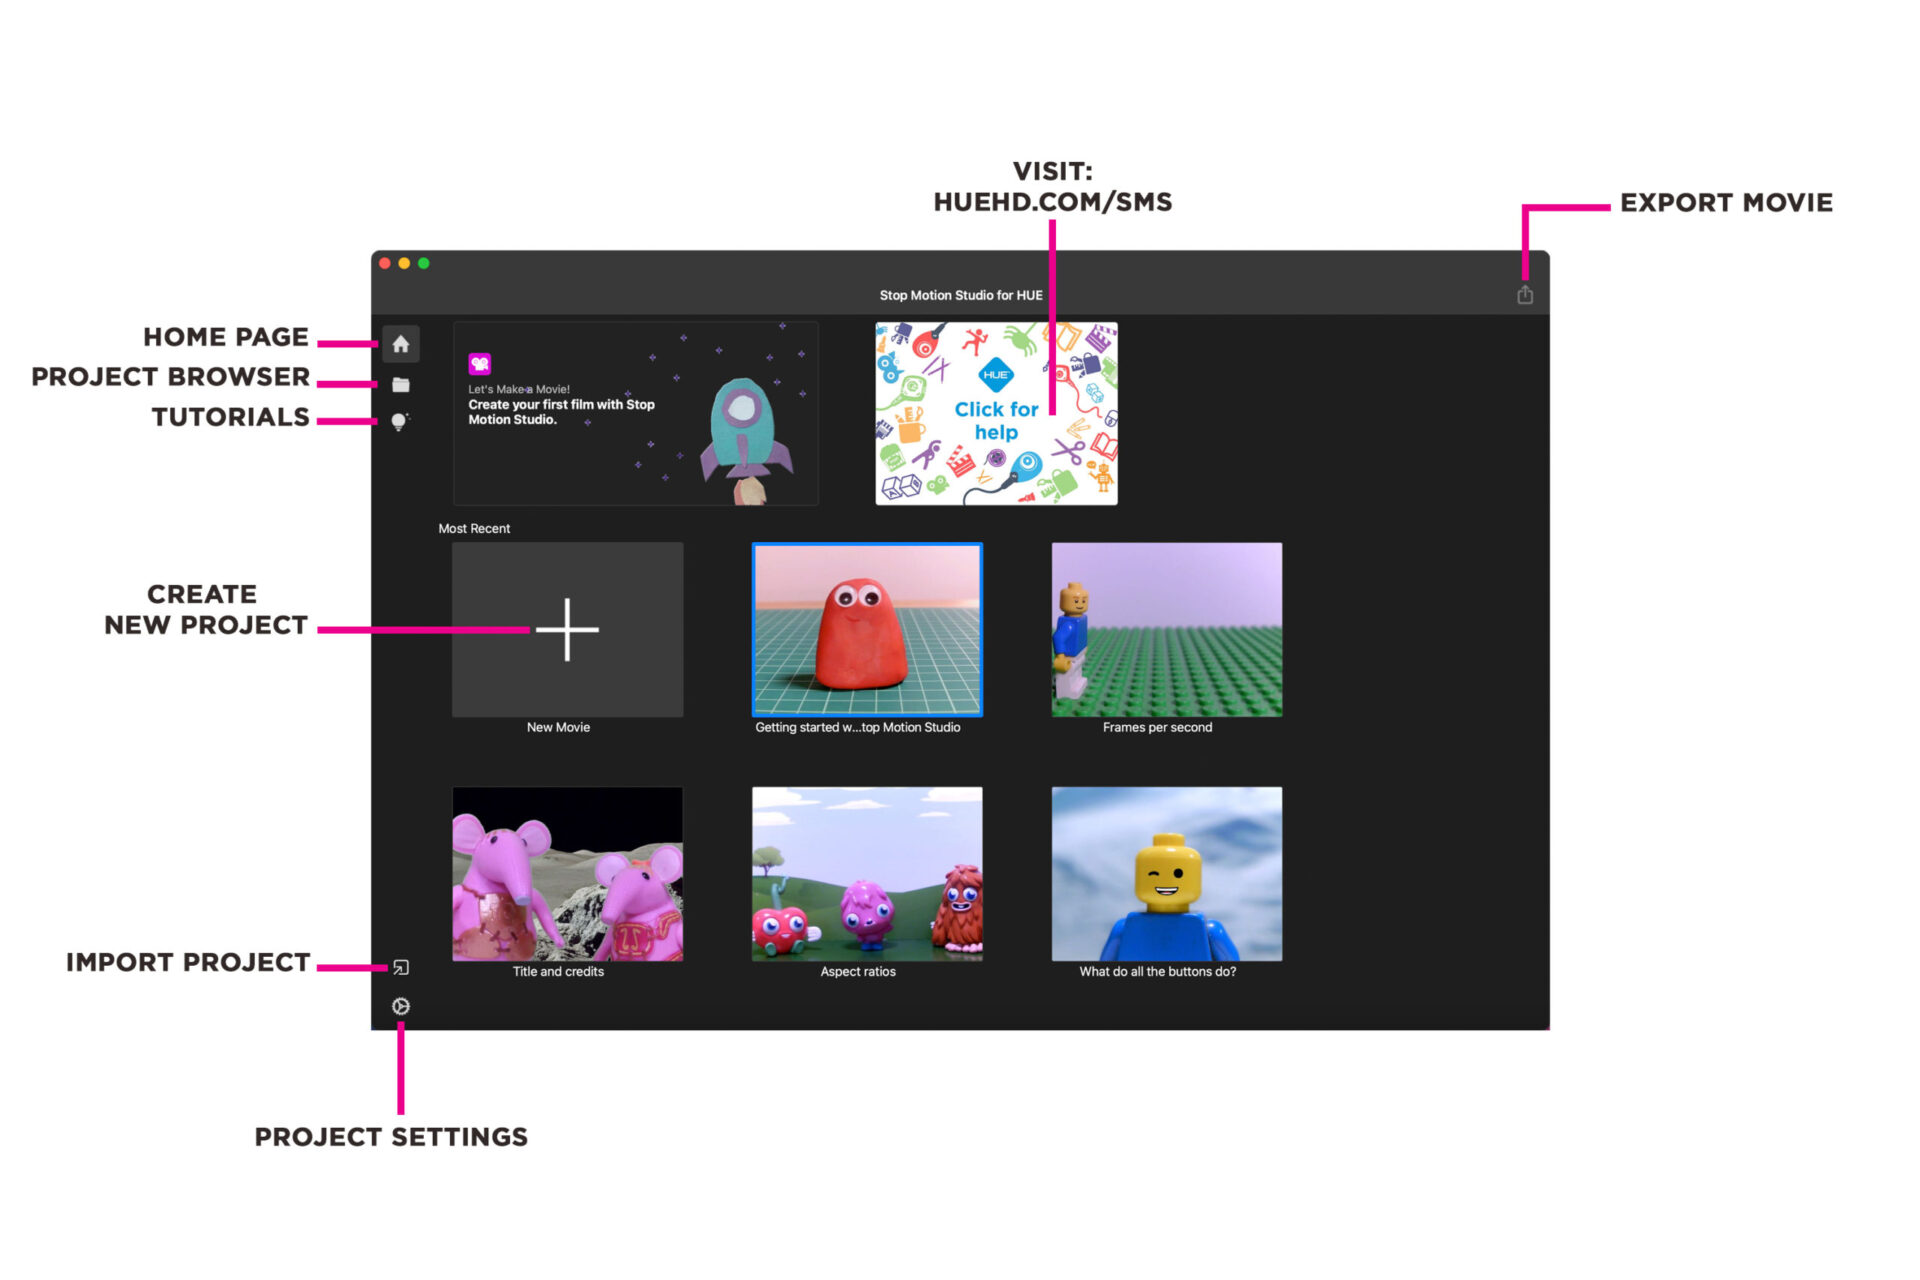
The Stop Motion Studio app HOME PAGE is where you can start a new project, access tutorials and import and export projects.
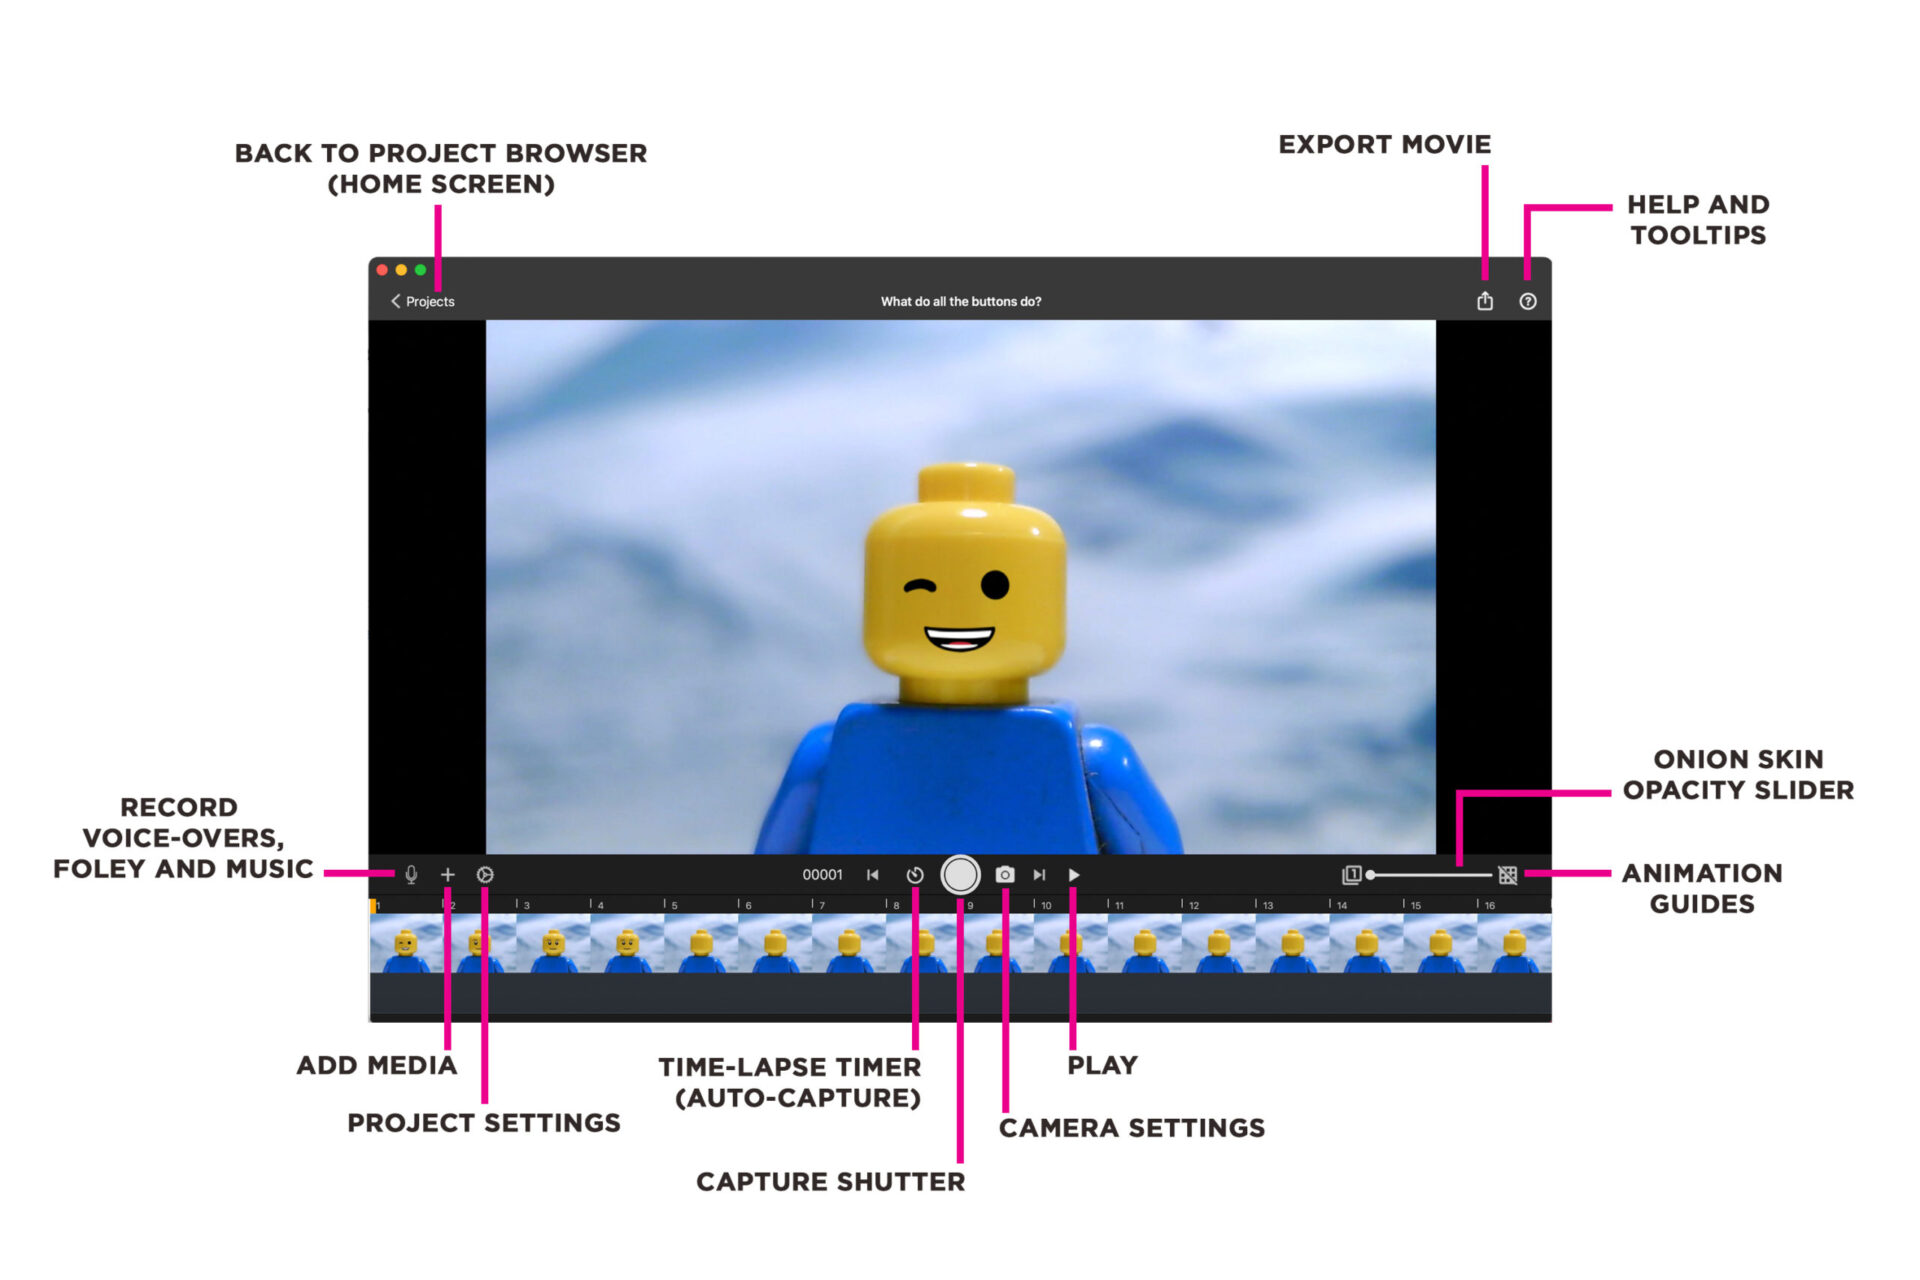
In the PROJECT TIMELINE window, you can access camera and project settings, add media and audio, capture frames, preview your animation and export your movie.
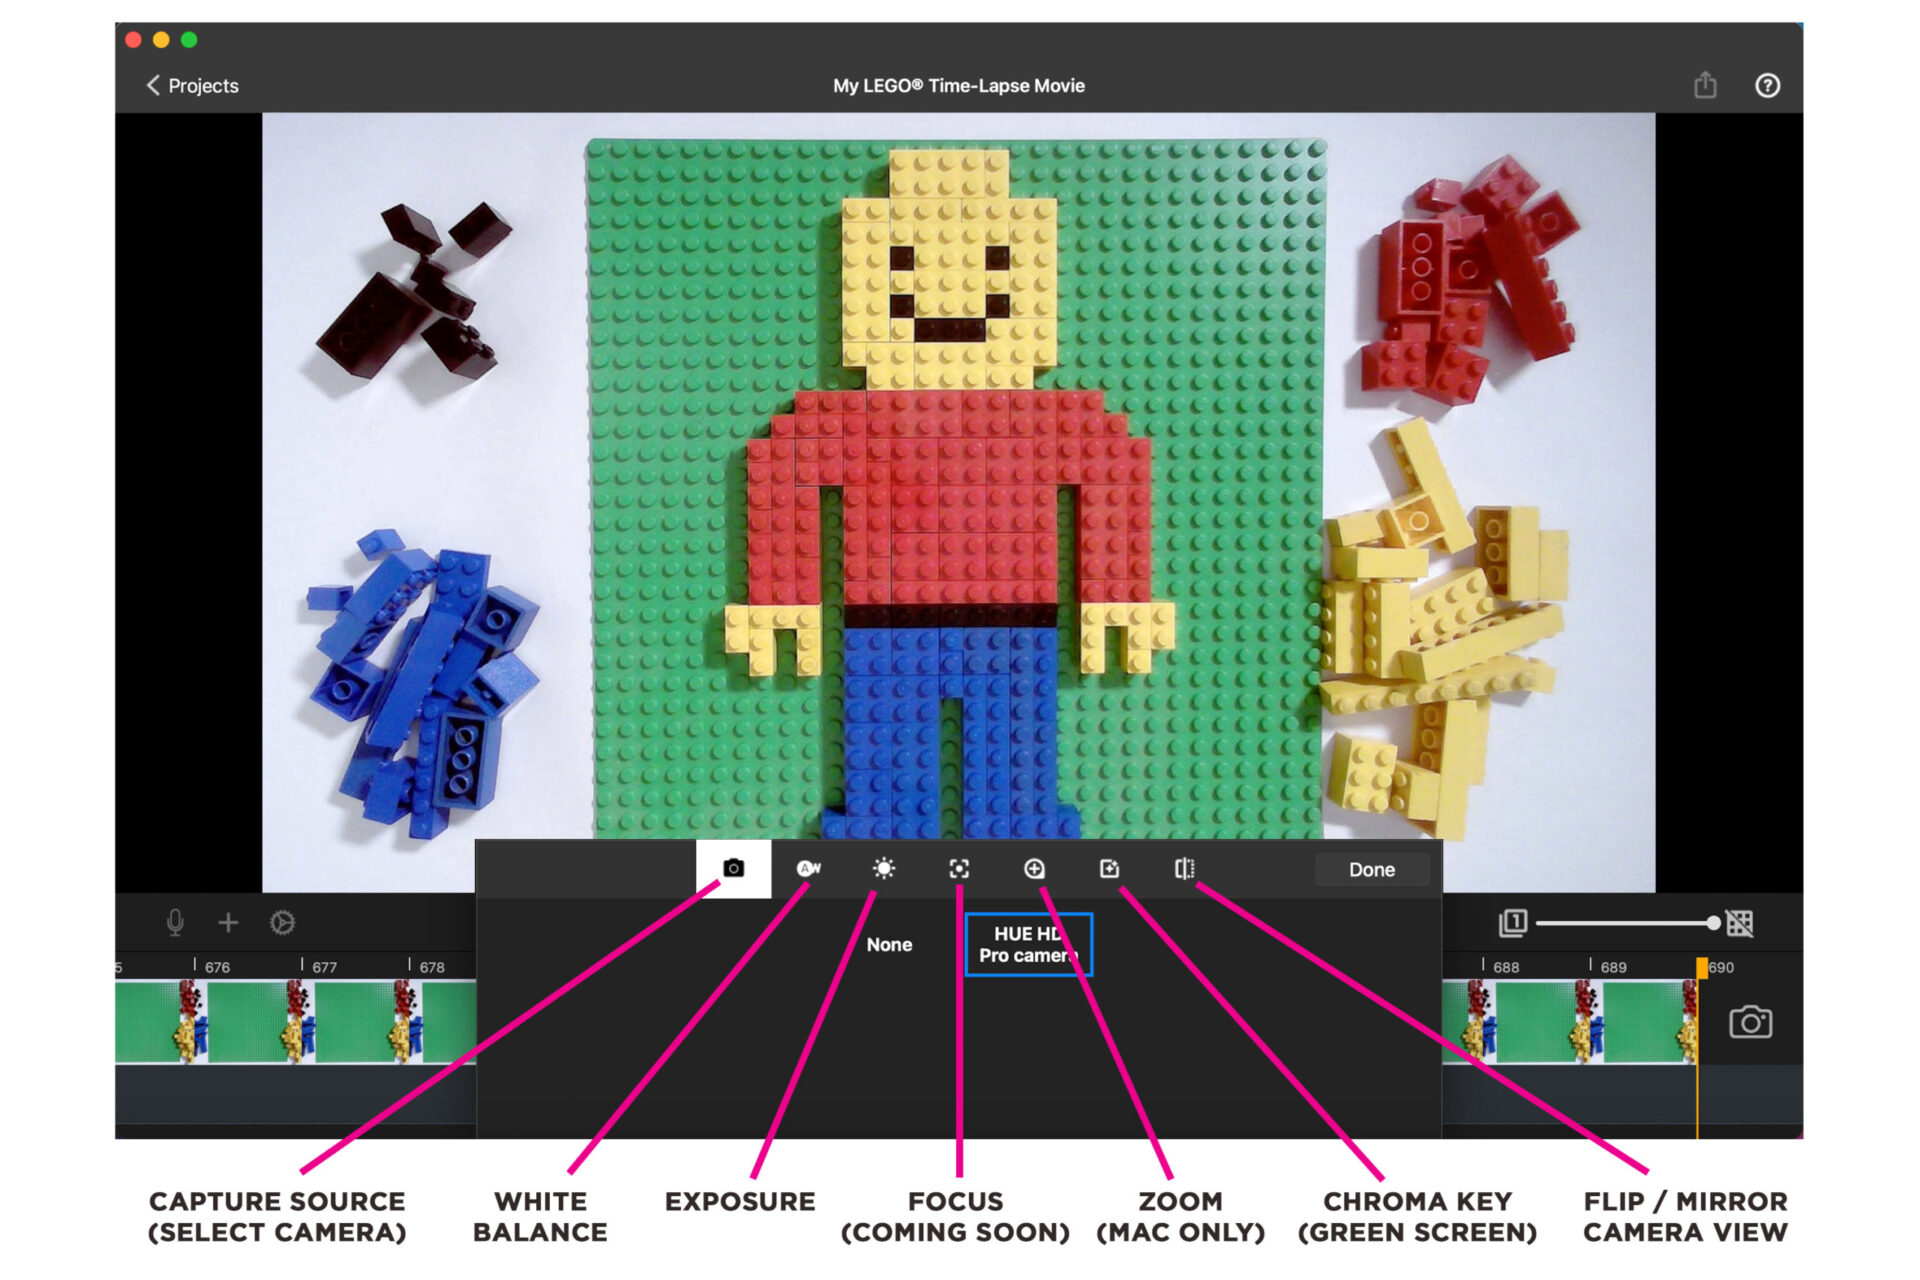
In the CAMERA SETTINGS menu you can select your camera (capture source), make adjustments to the white balance, exposure and orientation of your scene, and access the chroma key (green screen) feature.
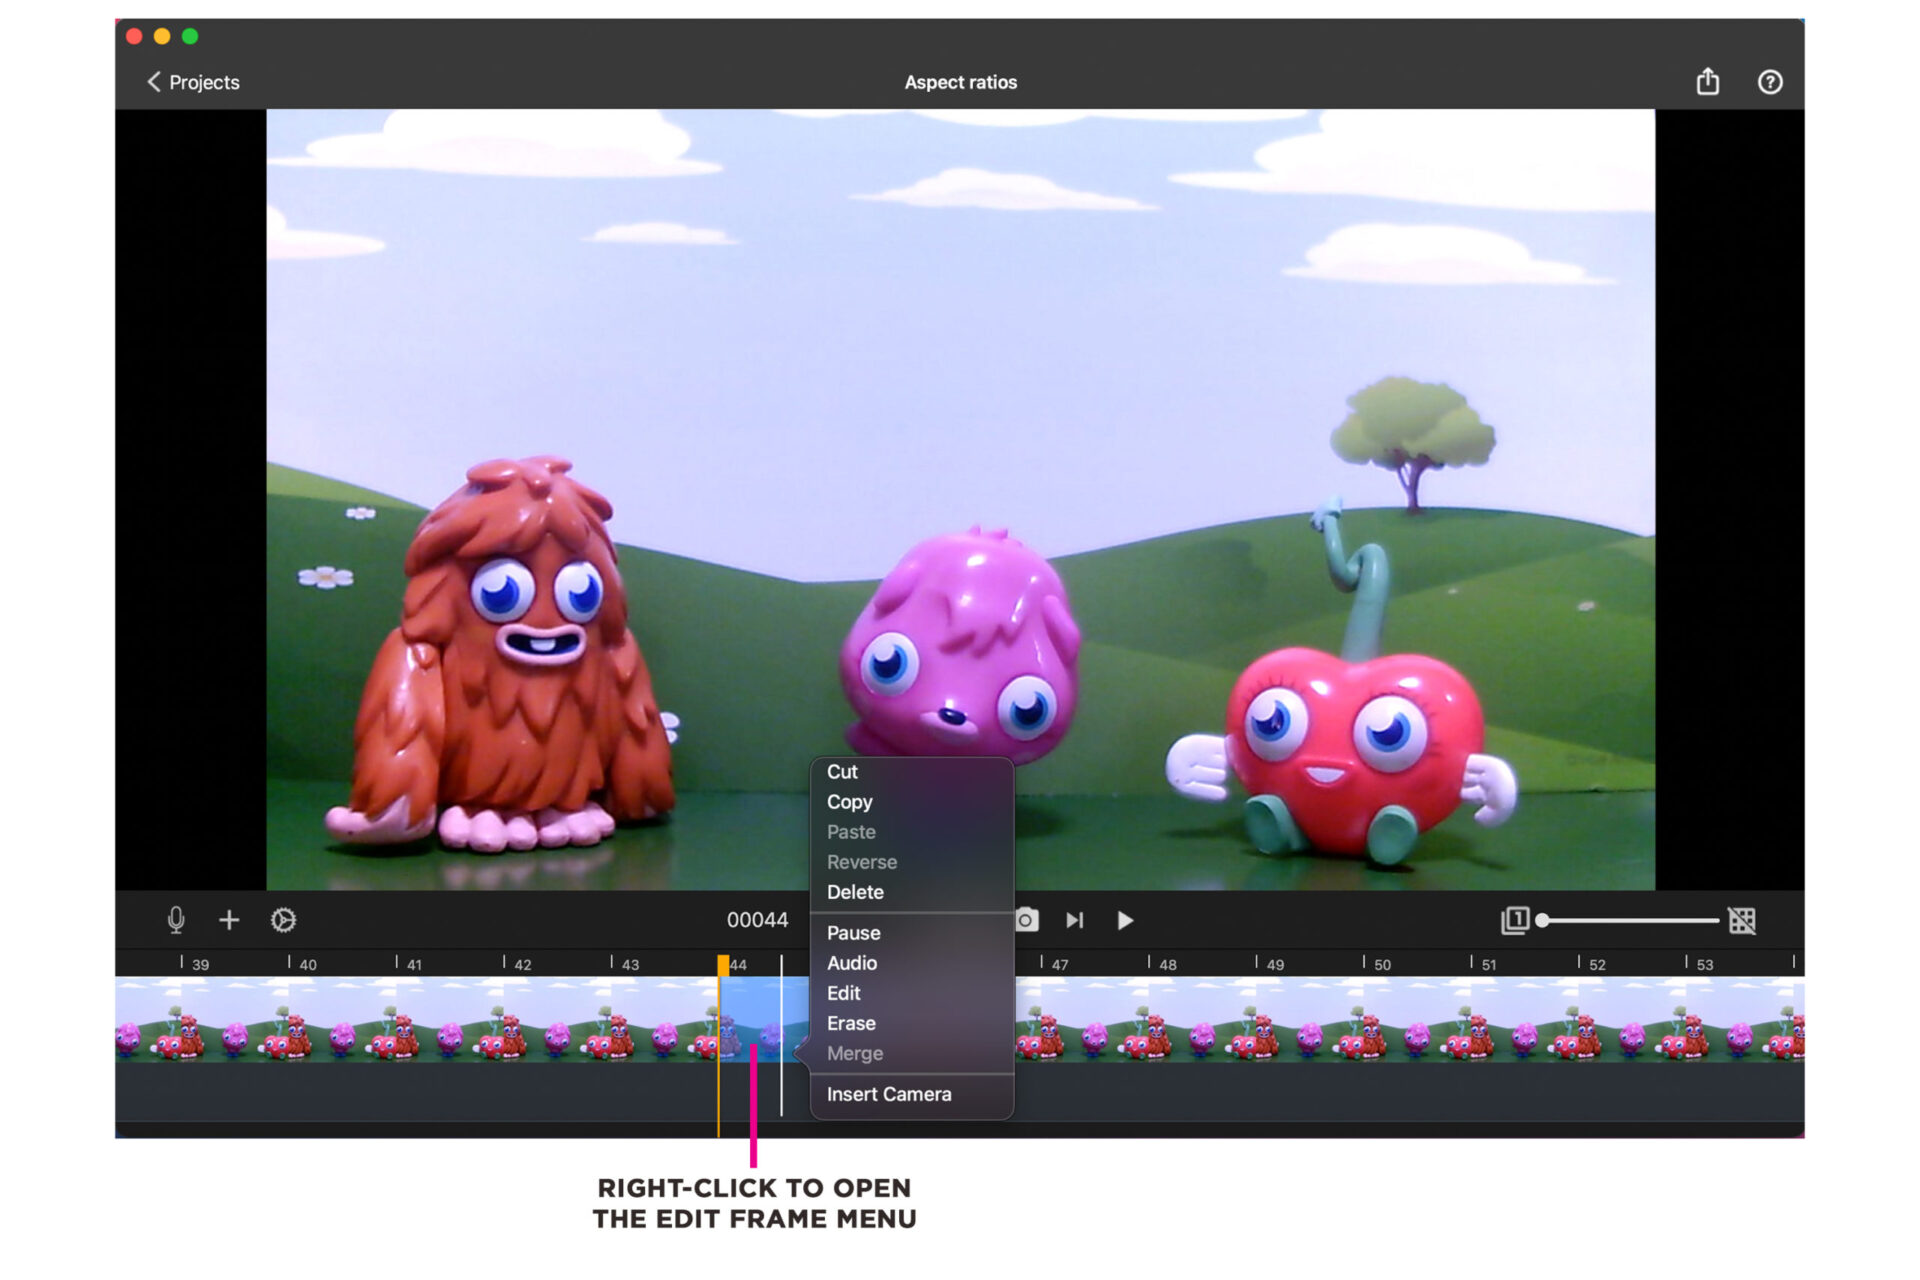
To view the EDIT FRAME menu, right-click on a frame (or multiple frames) in your animation timeline.
In the menu you have options to cut, copy, paste, reverse, delete and pause the duration of the selected frame/s.
Additionally there are options to add audio, edit the frame with drawings, text or shapes, erase drawings, and merge multiple frames.
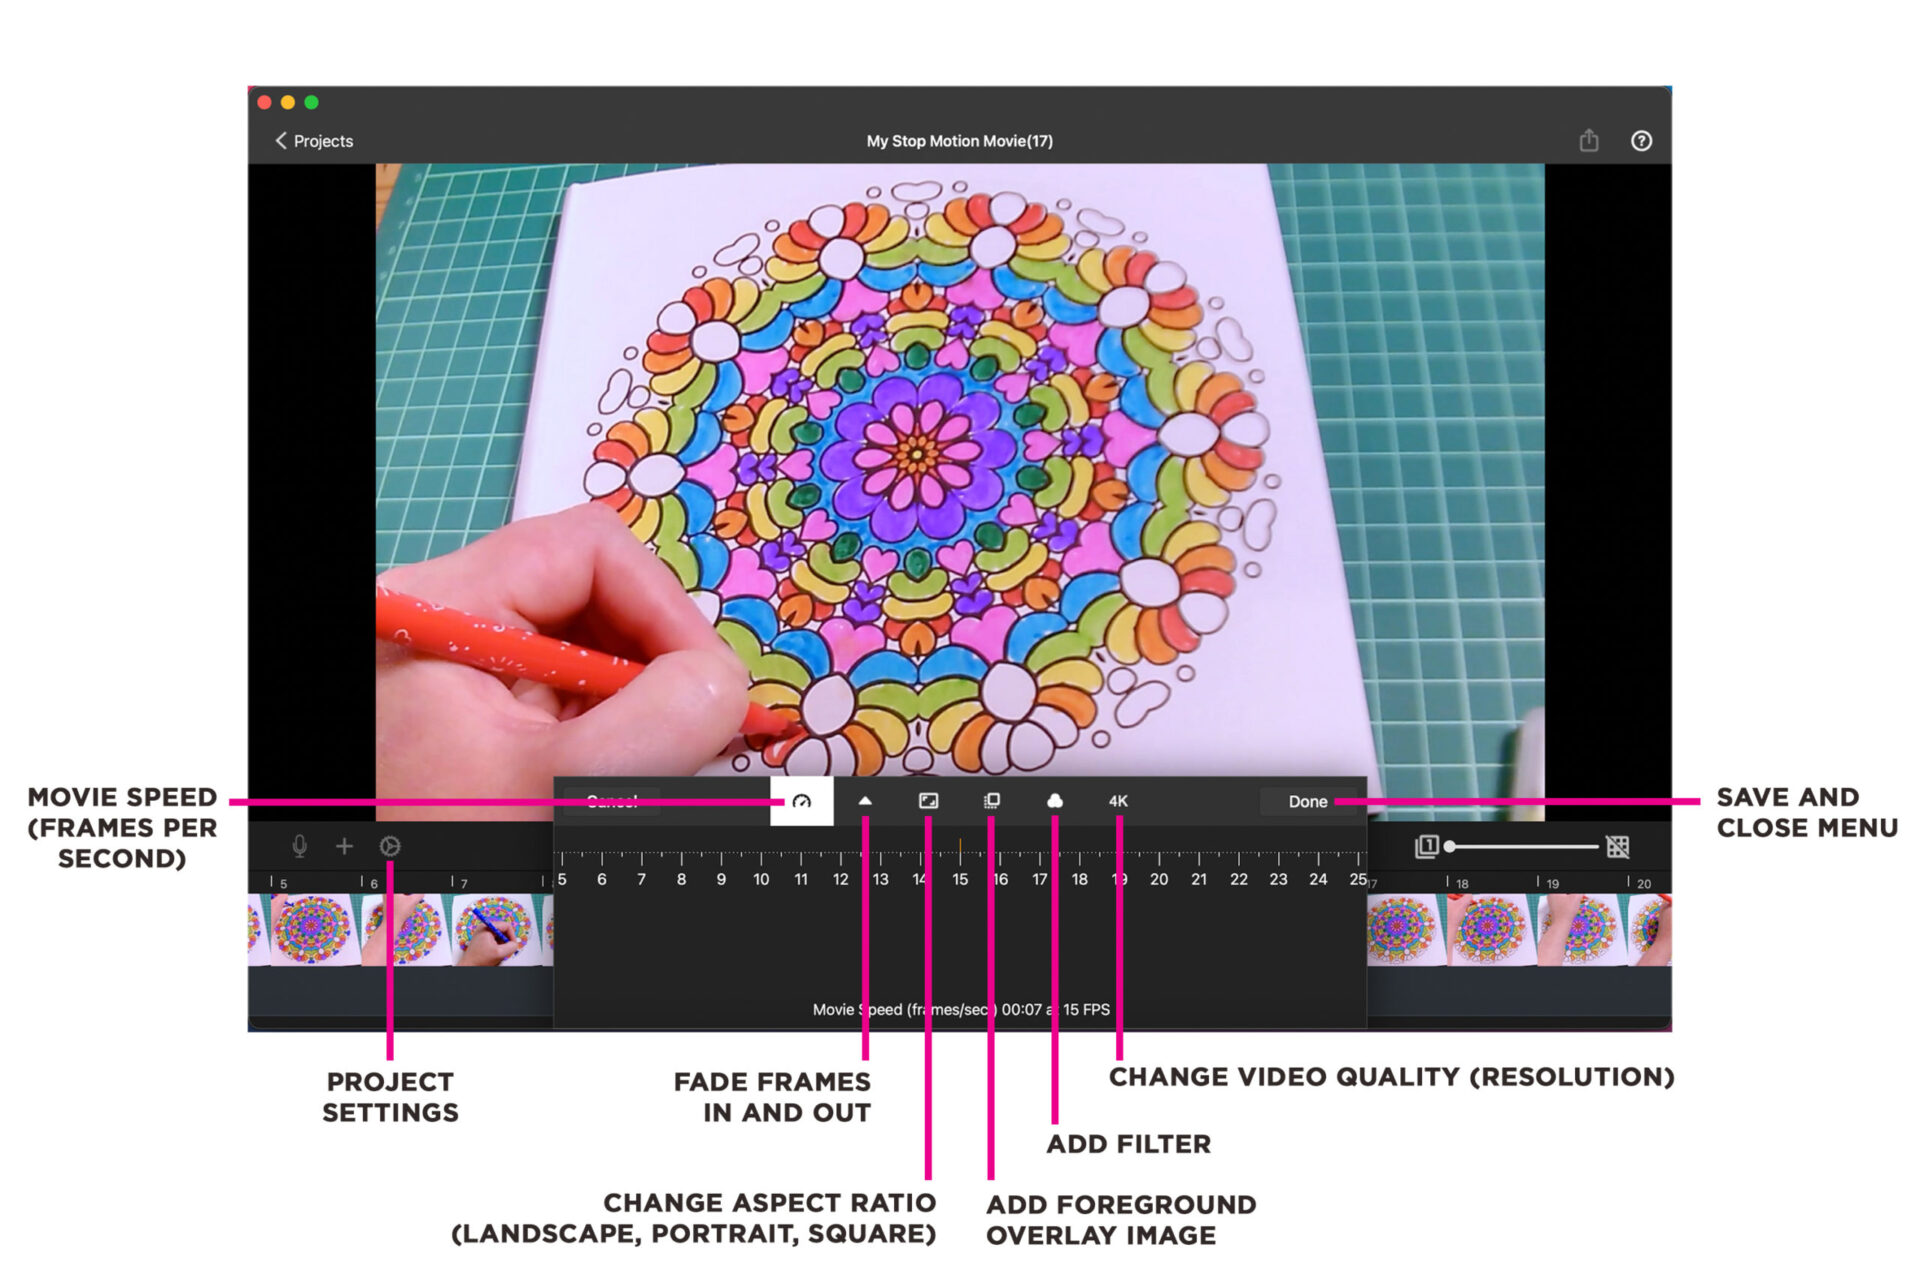
Click the small cog wheel icon to open the PROJECT SETTINGS menu.
Here you will find options to:
- Change the speed of your movie by adjusting the frames per second (fps).
- Fade your movie in or out with a black video overlay.
- Change the aspect ratio of your movie to landscape, portrait or square.
- Add a foreground image over your animation.
- Add a filter effect such as black & white, neon, mirrored and pixelated.
- Change the video quality/resolution of your animation (allowed by the camera you are using).
If your HUE camera isn’t listed as a capture source in Stop Motion Studio software, checking your computer’s Privacy settings could solve the issue quickly and easily.
In this FAQ you will find written instructions and images – for macOS and Windows – to show you how to allow the Stop Motion Studio app to access your HUE camera.
Instructions for macOS
The Privacy tab will have options to block or allow applications to access your Camera and Microphone. Please ensure that the HUE software you want to use has permission to access both the camera and the microphone; this should unlock the video and audio features in the software.
If the software is missing from the list, removing it and then reinstalling it to the Applications folder should cause macOS to detect it properly. Please contact us if you are having any additional trouble.
Some non-Apple antivirus and security applications also block camera connections by default. Checking your security software settings should help with most connectivity problems.
To allow the Stop Motion Studio app to access your camera:
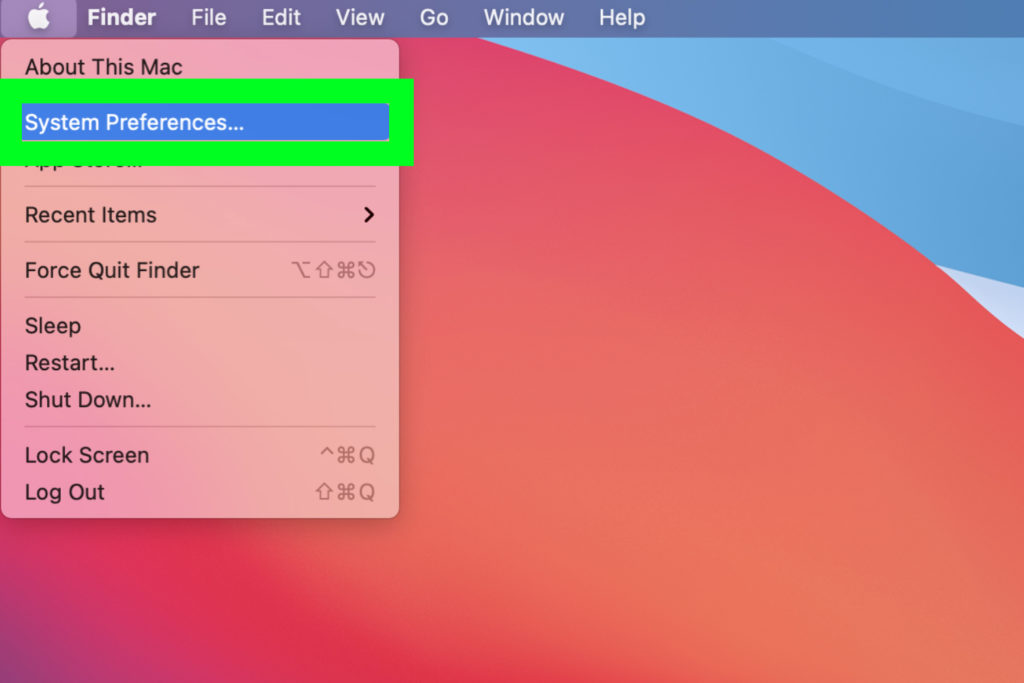
- Go to the Apple menu.
- Choose System Preferences.
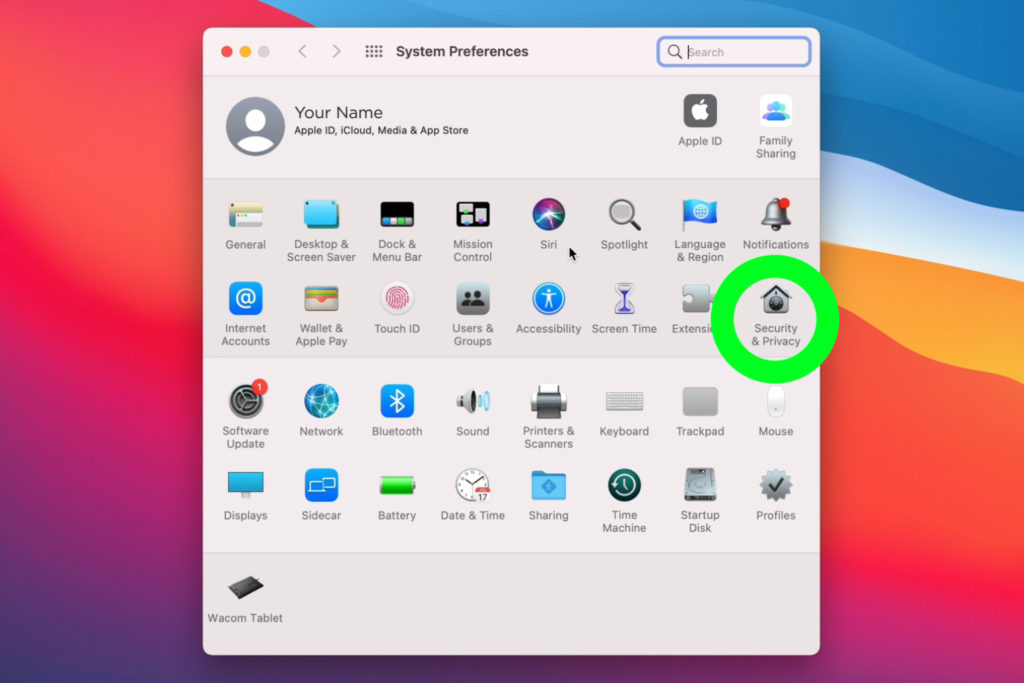
- Click Security & Privacy (also called Privacy & Security in some versions of macOS).
- Choose Camera from the menu.
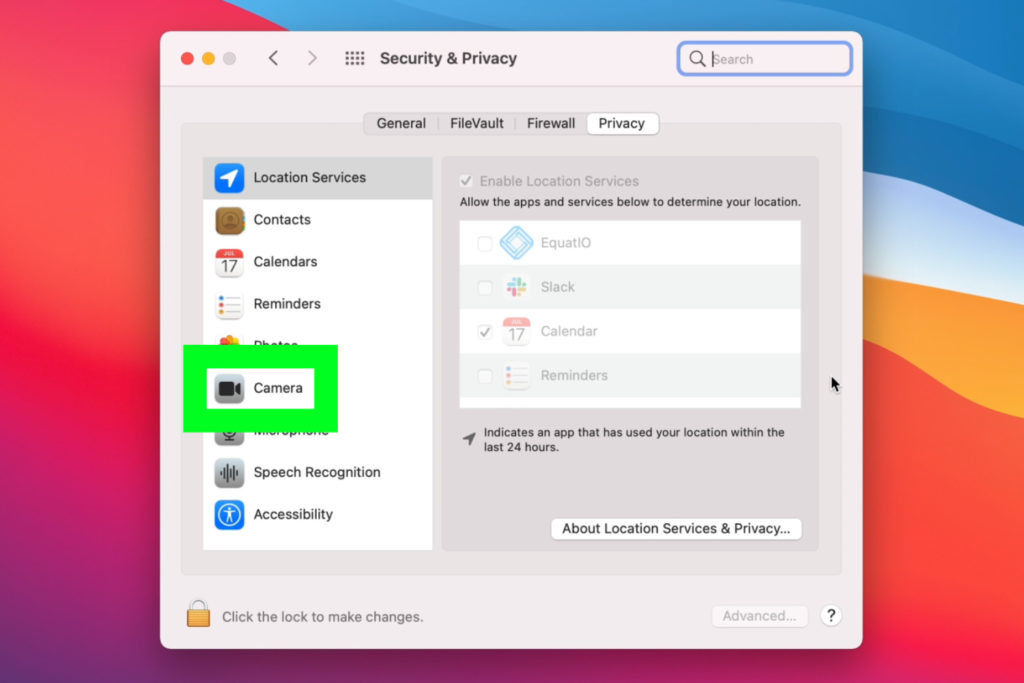
- Allow the Stop Motion Studio app to access your camera.


Instructions for Windows
To prepare your HUE camera for Stop Motion Studio on Windows PCs:
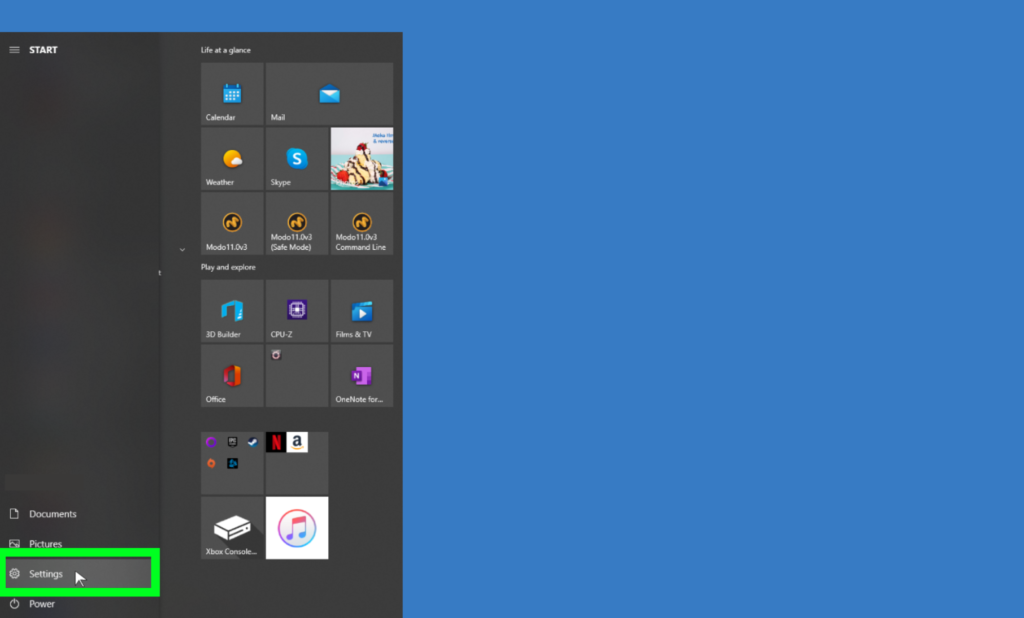
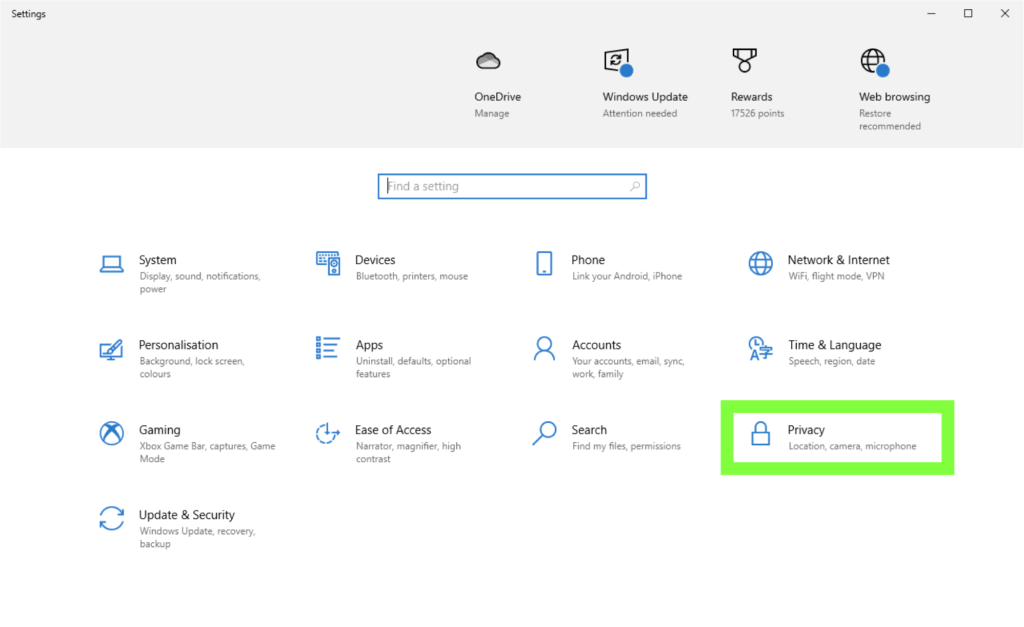
- Open the Settings page and click on the Privacy button. You can also locate the Privacy setting using Windows’ built-in search feature.
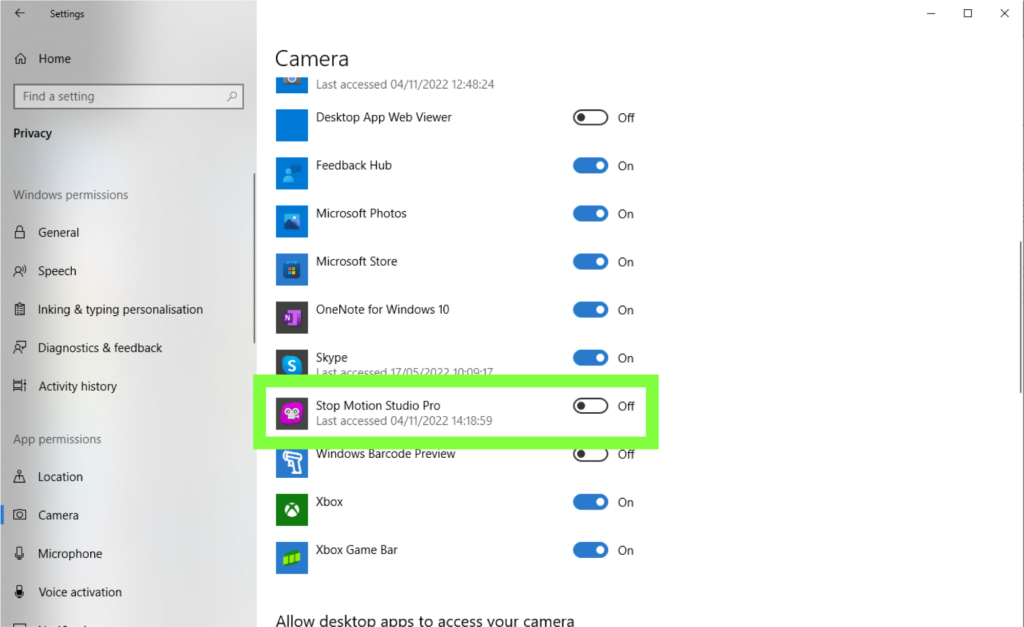
- Click on the Camera option on the left side then toggle the button under Allow apps to access your camera.
- Scroll down and toggle the button next to Stop Motion Studio.
- Click on the Microphone option on the left side to reveal the microphone privacy settings.
- Follow the same steps as you did with the Camera privacy settings by toggling the relevant options.
Stop Motion Studio system requirements:
- 512MB RAM (1GB recommended)
- Windows 10 or later, or macOS 11+
If your system is not compatible with Stop Motion Studio, you might be able to use HUE Animation software instead.
HUE Animation system requirements:
- PC: Windows 11, 10, 8, 7 or XP and graphics drivers with OpenGL 2.0 support
- Mac: OS X 10.5 (Leopard) to macOS 10.14 (Mojave) * Please note that the HUE Animation software is not compatible with macOS 10.15 (Catalina) or later.
- 512MB RAM (1GB recommended)
Stop Motion Studio uses the default microphone on your computer for recording audio. In this FAQ we cover the steps you need to follow to change the default microphone input on macOS and Windows computers.
Instructions for macOS
To enable Stop Motion Studio to use your HUE camera’s integrated microphone on macOS:
- Plug your HUE camera into a USB port on your computer.
- Go to the Apple menu.
- Choose System Preferences.
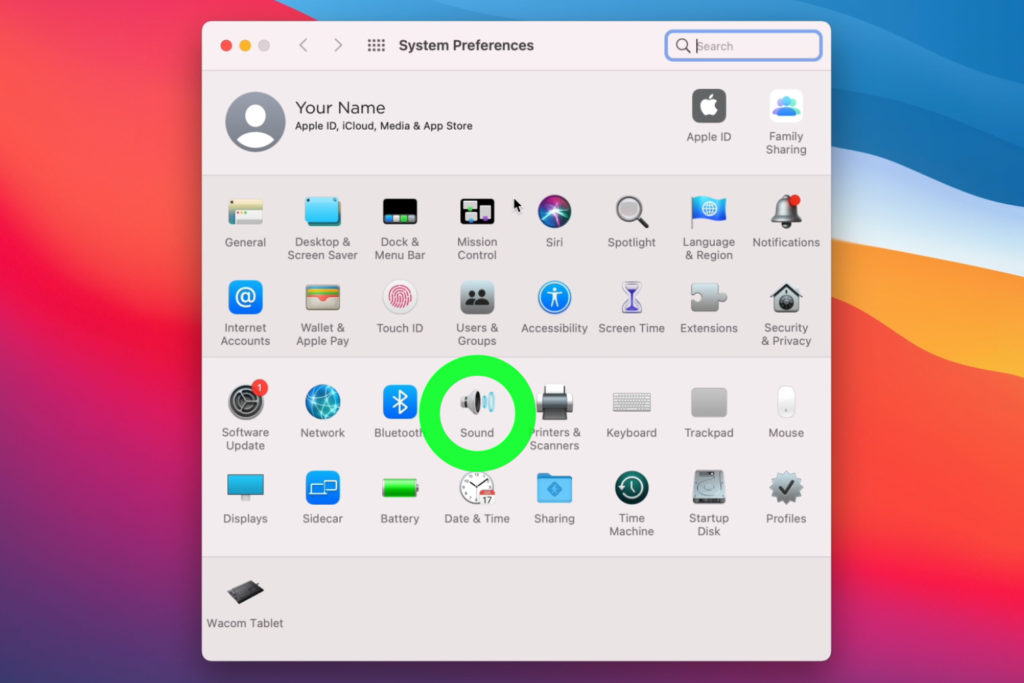
- Click on the Sound icon.
- Select Input from the menu options.
- Choose your HUE camera from the device list.


Instructions for Windows
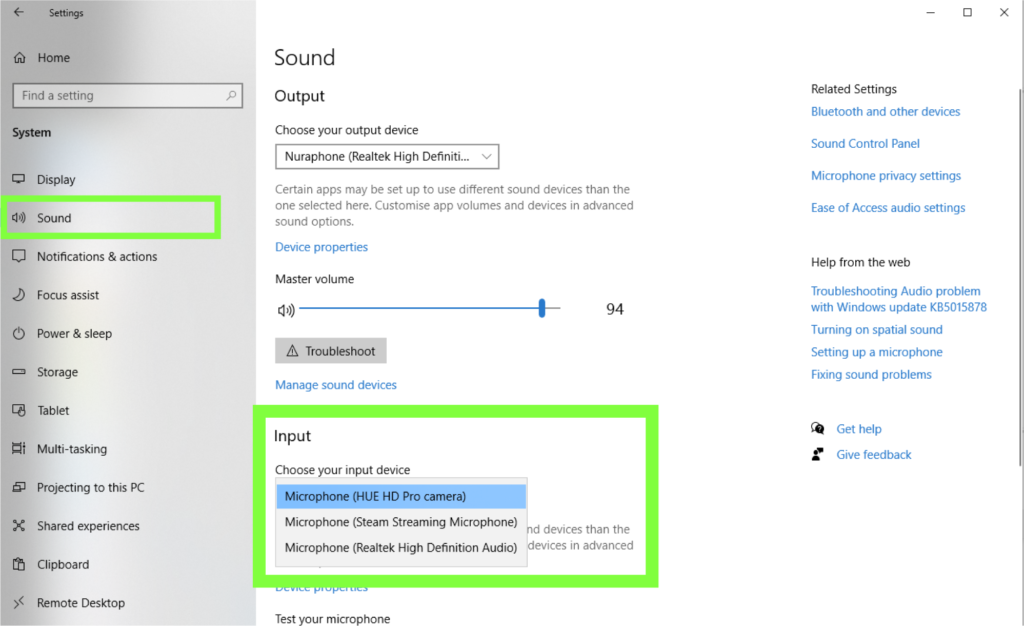
To select your microphone in the PC’s System settings:
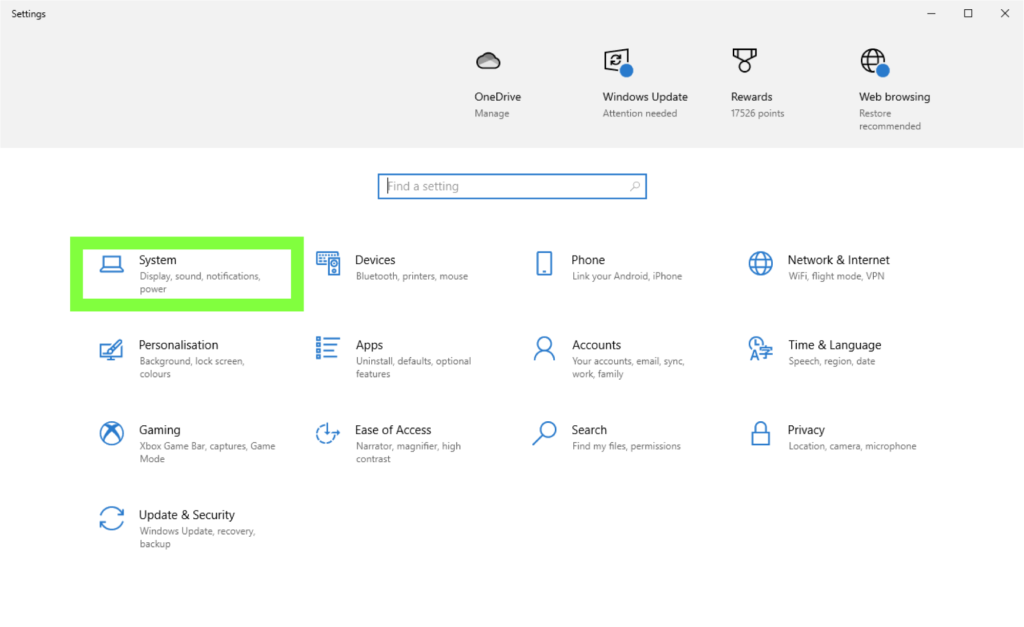
- Click on the System button to open the System settings page. You can also search for the Sound settings using the built-in search feature.
- Click on the Sound option on the left side to reveal the Sound settings.
- At the Input section menu, click on the box below Choose your input device and select your preferred microphone.
The Stop Motion Studio software included in HUE Animation Studio has been translated into US English, Czech, Danish, Dutch, French, German, Italian, Japanese, Korean, Polish, Portuguese (Portugal), Russian, Simplified Chinese, Spanish (Spain), Swedish, Turkish and Ukrainian. If your computer is set to use one of these supported languages, Stop Motion Studio will be fully localized.
Contact
If you can’t find an answer to your question in the FAQs or Tutorials, you can contact our support team here. We’ll usually respond within 24 hours, and often much sooner. Please include as much detail as possible with your message so that we can find the problem without delay.
Free Resources
Did someone say free stuff?
- Download the free storyboards, sound effects, activities and resources that come with HUE Animation Studio.
- Animate the curriculum with our growing library of educational activity guides.
- Follow HUE cameras on TeachersPayTeachers.com for even more freebies and worksheets.

Share your creations with the HUE Community
Want your movie masterpiece to appear on HUE’s YouTube and social media channels?
Get in touch to send us your films or share your creations on social media @HUEcameras with #SMSforHUE and #HUEAnimation! We can’t wait to see your marvelous movies!