You can check the most common questions regarding our HUE products.
We also have a Tutorials section with more information about popular topics. If your question is not answered below, please contact us for support.
To search the FAQs, please click here.
HUE Animation
Click here for the full list of HUE Animation (General) FAQs
Stop Motion Studio
Click here for the full list of Stop Motion Studio FAQs
HUE Clay
HUE Cameras
Click here for the full list of HUE HD Camera FAQs
FAQs: HUE HD Camera (Windows)
If you notice a whistling noise in the background of your recordings in HUE Intuition and other apps, you may need to adjust your Windows sound settings to optimize them for your microphone.
If you open your Windows Control Panel and select Sound, then the Recording tab, you will be able to select the Properties of your USB microphone. The Advanced tab will allow you to adjust the default format for microphone recordings. Adjusting this setting should allow you to eliminate any background sounds. If you are hearing a whistling sound, choosing Radio quality/Tape recorder from the dropdown menu should eliminate the problem.
The same steps apply when using any other USB microphones which exhibit a similar problem.
In some cases, recent versions of Kaspersky and Avast antivirus/security software might block video devices and webcams by default until the user manually grants permission within the Kaspersky/Avast preferences. Please carefully check your settings within Kaspersky/Avast to ensure that access to the camera is permitted, and also ensure that none of the following applications are not being blocked:
HUE Animation (HUE Animation.exe)
HUE Intuition (HUE Camera Manager.exe, HUE Camera Manager.vshost.exe, ffmpeg.exe)
We are unable to assist directly with finding the correct settings as there are many versions of these security suites and they are constantly being updated. Please contact the makers for direct support if you’re experiencing problems running USB cameras while their software is active.
Check with your computer’s manufacturer and make sure you are running the most up to date version of the SigmaTel drivers. You should be able to download the newest version from your computer or motherboard manufacturer directly. If the most recent ones still do not work, uninstalling and reinstalling the existing drivers then disconnecting, uninstalling and reinstalling the camera might fix the problem.
If you have a control panel in your computer settings called Sigma Tel, please check that it is set to “allow reconfiguration pop-ups”. You can then try disconnecting the camera and uninstalling/reinstalling that; if the sound card is struggling with anything it should pop up a window asking you to confirm how the microphone is connected.
Finally you can try going to Control Panel, then System, then Hardware, then Device Manager. Under the Sound category please right click and uninstall any sound card drivers then restart your computer. Windows should automatically reinstall the drivers or you can go through your computer manufacturer’s website to get the latest versions.
For further support with this issue please speak to your computer manufacturer.
An update to Windows 10 released in April 2018 added new Privacy options to the computer’s system Settings. If these are configured incorrectly it is possible that they will block any applications from accessing cameras. Both internal webcams and USB cameras such as HUE are affected by these settings. If you updated from an earlier version of Windows 10, you may have been asked to choose your settings immediately after the update was installed. It is important that these settings allow camera and microphone access, otherwise the software will be unable to connect to the camera and microphone.
If you want to unblock the camera, press the Start button and open the Settings screen, or alternatively press Windows Key + I. You will see an option called Privacy in the list.
There will be sections on this page for your Camera and Microphone settings. Please ensure that the applications you want to use with your HUE have full access to both the camera and the microphone.
You may need to switch on the option to Allow apps to access your camera before the individual applications appear in the list.
For Microsoft’s help page about the new camera settings, please click here. You can learn more about their privacy settings in this Microsoft FAQ. This information also applies to Windows 11.
Another common cause of video not appearing in this way is third party security software. This separate FAQ includes advice if you believe that this may be the problem.
This is an issue with some older versions of the Skype software rather than the camera itself. We suggest updating your video drivers from your computer manufacturer’s website and making sure your Skype software is always up to date as this problem was fixed in later versions.
If you’d like to install the drivers, a technical limitation of Windows means that the camera must be connected to each individual computer at the time of installation so there’s no network-deployable version. However, HUE is completely plug and play so the drivers are completely optional.
If you find you need the camera viewing tool from the driver package but not the drivers, you can download a standalone executable for this which can be copied across your network silently. Silent network installation is also planned for our HUE Intuition software (sold separately).
Our animation software (available separately or as part of HUE Animation Studio) can be installed over a network as required. Please contact us if you need any additional information.
We have been made aware of a problem with Windows Live Movie Maker (2012) detecting external webcams on certain laptop models. We have reported the issue to Microsoft; in the meantime, older versions of Movie Maker and alternative camera software should work. If your laptop is affected you can record movies using the camera software here or our HUE Intuition application.
We have recently been made aware of a problem with the very latest version of Skype clashing with various webcam drivers. The problem is under urgent investigation. We expect this issue to be fixed in the next Skype update but our engineers are looking at whether a workaround is possible in the meantime, so please continue to check the HUE website as we’ll release any updates there as soon as they’re ready.
In the meantime, you should be able to solve the problem by downgrading to an earlier version of Skype for Windows. Another solution is to uninstall the camera drivers (you can still use the camera in Skype without drivers installed) until the problem is fixed.
If Skype is installed, it doesn’t have to be connected and online to trigger the blue screen issue. If you definitely don’t have Skype installed on the computer, please let us know.
If you’re using Windows, please download the latest camera drivers here.
Please note that the special effects and software interpolated higher resolutions are only available on Windows. In plug and play mode without any drivers installed, the current HUE cameras should use a resolution of 1280×720 by default.
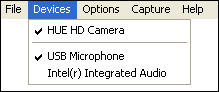
Please open the camera software and check that the correct camera is selected in the Devices menu. If your camera isn’t shown in the list, run Windows Update and check that your computer’s software is fully up to date.
If the message persists, please try a different USB port on the computer and test whether the camera works without its base in case there’s a problem with the connection.
Please uninstall and reinstall the camera driver software, ensuring the camera is disconnected until the installation is complete. There may have been a problem with the original installation.
The recorded video will be in raw format (uncompressed) and can take up a lot of disk space; you may wish to change the resolution of the movie clip in AMCap by selecting Video Capture Pin… from the Options menu and adjusting the Output Size. You can also edit and compress your movie clip using Windows Movie Maker or other video editing suites, or record using a different program directly from the camera.
Make sure all other webcam software is closed, then open AMCap. Select HUE as both camera and microphone in the Devices menu (you should be able to tick both). Before recording a video, select Set Capture File… from the File menu and choose a location on your computer where your recorded video will be saved. Enter a file name (we recommend putting .avi at the end) and click Open to confirm. On the next window, if you are not sure, set the size to 0 to avoid setting limitations on what you can record. You can then record a video using the Capture menu in AMCap. Make sure that Capture Audio is ticked, then click Start Capture to begin recording and Stop Capture to finish.
You should be able to view your AMCap recordings in software such as Windows Media Player and VLC.
If your AMCap recordings are not recognized, try adding .avi to the end of the file name.
Our current HUE HD cameras use the built-in Windows camera driver so if you’re seeing this message, you might have an older model.
The easiest way to check is to look at the silver focusing ring around the camera’s lens. There will be some text printed on that ring.
If the text includes the number ‘2.0’ or our website address, you have one of the newer models and it should be automatically detected on Windows, Mac OS X and Linux. If it’s not working, please contact our technical support team for assistance.
If you can see the number ‘1.3’ on the ring, you might have an older camera. If that’s the case, please disconnect the camera from the computer and install this driver software, then reconnect the camera once the installation is complete.
Note: The HUE HD Pro camera does not require any drivers and does not have text printed around the focusing ring.
Please make sure that AMCap (or the HUE HD Camera application) is completely closed before starting up any other camera applications. USB cameras will only stream their video to one program at a time.
If connecting the camera to your system produces a USB error, please contact your retailer with the details. Your hardware may be defective.
If other cameras were previously installed on the computer and you are receiving a Code 39 error when you plug in the HUE camera, do the following:
- Start Menu > Run and type in “regedit” (without quote marks).
- File >Export and save a copy of your current registry. Always save a copy before making changes to the registry settings.
- Find the key: HKEY_LOCAL_MACHINE\SYSTEM\CurrentControlSet\Control\Class\{6BDD1FC6-810F-11D0-BEC7-08002BE2092F}
- In the right hand panel, find and delete the UpperFilters and LowerFilters values.
- Disconnect and reconnect the camera from the computer.
The error should be gone.
Please download the correct software from our website, then close AMCap and disconnect the camera from the computer. Uninstall the drivers and install the downloaded software, then reconnect the camera. HUE should be available for selection in the Devices menu.
If you have a plug and play HUE camera, the drivers aren’t necessary. Please check that the camera is securely connected and the camera is selected in the Devices menu, then contact our technical support team for further assistance if the error persists.
Check that there are no new USB 2.0 drivers for your computer in Windows Update. If updates are available please install them and try again.
If there are no updates, this error can also be caused by a problem with the computer’s power supply. It can usually be cleared with no side effects by shutting down the computer, physically unplugging the computer’s power cable from the mains socket and leaving it for at least 30 minutes to allow any remaining electrical charges to disperse. After that you can reconnect the computer and start it up again; the error should be gone. If this happens more than once it may be advisable to replace the computer’s power supply and mains cable.
One other cause of this problem could be that the system’s USB drivers have stopped working. You can uninstall them in the Device Manager control panel. Windows should reinstall them when you next restart or you can install them manually from the computer manufacturer’s website. If you try this please be careful to have a non-USB keyboard/mouse plugged in so that you can still use your keyboard/mouse in between.
Please ensure that you have Windows XP Service Pack 2 (or later) installed. This is a free major update from Microsoft which should be available in Windows Update as an optional item. Service Pack 2 (or later) is required if you want to use USB cameras on Windows XP.
“Cannot install this hardware. Error occured during installation of the device. Driver installation file for this device is missing a necessary entry. May be because the INF was written for Win 95 or Later. Contact your hardware vendor.”
This error message refers to a problem with your computer’s configuration and should be investigated with your computer’s manufacturer if none of the other tips help. In your Windows INF directory (usually Windows\INF on your C drive) there should be three files installed with Windows called usb.inf, wdmaudio.inf and wdma_usb.inf. If any of these is missing you may encounter the error message. To restore one of the missing files, you can try reinstalling Windows, repairing Windows from the original installation CD or copying it from another computer running the same version of Windows as yours. We are unable to provide copies of working INF files; please contact your computer manufacturer for further help with this problem.
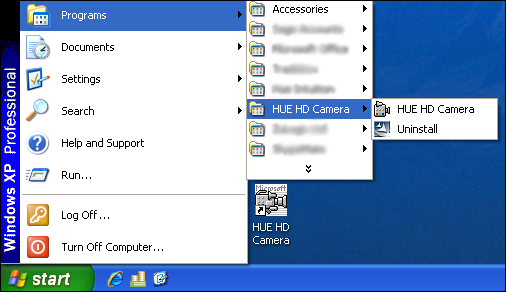
Go to Programs in the Start Menu and select HUE HD Camera, then open the HUE HD Camera application (AMCap in older versions of the software). If any error messages appear, clear them with OK. In the Devices menu, look for the camera and its microphone. If both of these devices are present, then the system is recognising the camera. Make sure that the HUE is selected in the Devices menu. Show Preview should also be checked from the menu bar.
If either the camera or its microphone is missing from the list of Devices, please check that the camera is properly connected to the computer. If the camera is connected through the base station, check that the neck was firmly pushed into the base to make a good connection. You can also try to reboot you computer, then go back to the software and check the devices again.
Try plugging the camera into a different USB port. If the camera is plugged into one of the ports in the front try one of the ports in the rear of the computer. Try to uninstall the driver and do a fresh install with any antivirus software temporarily disabled. As HUE can be used without drivers, we recommend trying with and without the drivers installed to see whether this solves the problem.
Note: If you see a preview window with video from the camera, then the installation was successful. If you are still having problems when trying to use particular programs, please make sure that all other applications are closed before you test the camera, then contact the vendor of the software you are attempting to use for further support.
If you’ve installed the optional camera software from our website, you can access its digital zoom feature.
1. Launching the software
First, open the software from the Start Menu. You might have to click All Programs first. Windows 8 (and later) users can search for the application by name: HUE HD Camera.
When the software opens it should show a live preview from your camera. If it’s missing, select the camera from the Devices menu first.
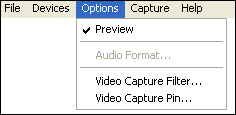
If the window is still blank, check that the camera isn’t open in any other software at the same time and ensure that Preview is selected in the Options menu.
2. Activating the zoom feature
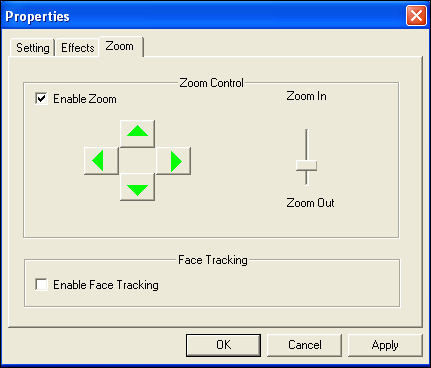
Select Video Capture Filter from the Options menu and go to the third tab: Zoom.
By checking the Enable Zoom box, you can use the slider and arrow keys to zoom in and pan around the live video image.
If the options are greyed out, the system may be streaming the video in MJPG format which blocks the extra controls. To check, click Cancel and select Video Capture Pin from the Options menu.
Locate the Color Space/Compression setting as pictured below. Change it to YUY2 mode and ensure the Output Size is set lower than the camera’s maximum resolution.
Once you’ve made the changes, click OK. The additional options in the Video Capture Filter screen will become available and allow you to tune the image.

3. Using digital zoom
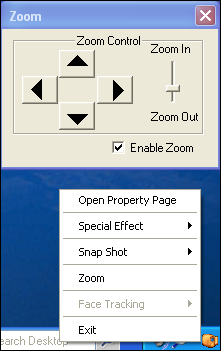
Another way to access the zoom controls is by right-clicking the small camera icon in your System Tray, near the clock.
Clicking on Zoom will produce a smaller version of the controls so that you can zoom and pan across the image even when out of the configuration window.
The zoom option will be unavailable if the camera is capturing in MJPG mode or the video software is closed.
Note: If you’re using Mac OS X, there’s no built-in digital zoom so you will either have to move the camera closer and turn the focusing ring to refocus, or install a third party application such as iGlasses.
These instructions apply to AMCap, the optional camera software available with the original HUE HD Camera. If you’re using different software, please check the publisher’s website for instructions. Our HUE Animation and HUE Intuition software packages (sold separately) have built-in flip/mirror features.
1. Launching the software
First, open the software from the Start Menu. You might have to click All Programs first. Windows 8 (or later) users can search for the application by name: HUE HD Camera.
When the software opens it should show a live preview from your camera. If it’s missing, select the camera from the Devices menu first.
If the window is still blank, check that the camera isn’t open in any other software at the same time and ensure that Preview is selected in the Options menu.
2. Accessing the camera settings
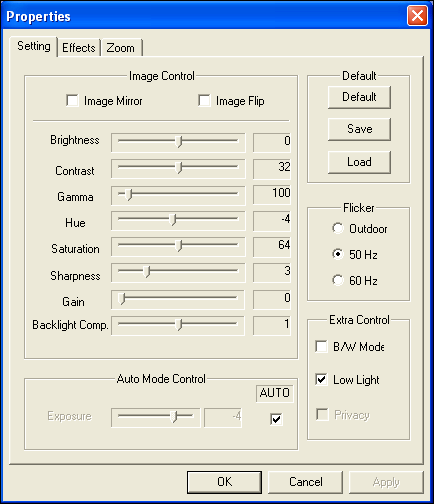
Select Video Capture Filter from the Options menu. You’ll be taken straight to the screen you need with the camera settings.
There are two boxes at the top of the screen: Image Mirror (horizontal flip) and Image Flip (vertical flip). Select the options you’d like to use and click OK. The live video feed will automatically refresh and start using your new settings.
If the options are greyed out, the system may be streaming the video in MJPG format which blocks the extra controls. To check, click Cancel and select Video Capture Pin from the Options menu.
Locate the Color Space/Compression setting as pictured below. If you change that to YUY2 mode and click OK, the additional options in the Video Capture Filter screen will become available and allow you to tune the image.
Note for Mac users
If you’re using Mac OS X, the only way to access additional controls for the camera at this time is to install a third party application such as iGlasses.
Some Apple software automatically flips the image to make live chat more intuitive. For recording videos where it’s important that the image isn’t flipped, we recommend the free version of QuickTime included in OS X 10.6 and later.
If the options in the Video Capture Filter screen are greyed out, the system may be streaming the video in MJPG format which blocks the extra controls. To check, go to Video Capture Pin in the Options menu and locate the Color Space/Compression dropdown. If you change that to YUY2 mode, the flip/mirror boxes should start working in Video Capture Filter and allow you to tune the image.
This FAQ only applies to older HUE HD Camera models, which had an integrated Snapshot button. The current models do not include this feature.
For the Snapshot button to work, the camera needs to be running and the drivers must have been installed. If no program or website is using the HUE camera, pressing the Snapshot button on the back of the camera will appear to do nothing. By default the first click of the Snapshot button will start AMCap so that you can take pictures. You can also take pictures using the camera icon in your system tray.
If the Snapshot button is not functioning at all, make sure that the process “vsnp2std.exe” is running in the Windows Task Manager’s Processes tab. If that process is missing, another program must be blocking it or the camera’s installation may have been unsuccessful.
To run this process, go to your Windows Directory (usually on your C: drive in My Computer) and double click the vsnp2std.exe file. If it still does not appear in the process list, another program – usually antivirus software – may be preventing the software from running. If you suspect that the problem is with the HUE software you can uninstall and reinstall the driver from the Downloads page.
Please note that the Snapshot button has no effect on Macs, or on Windows computers which don’t have the optional driver software installed.
AMCap is a program which can be installed with HUE on Windows systems. You may use it to take still pictures or record video using HUE. AMCap is not required to use HUE and it can be uninstalled or deleted without affecting the use of HUE with other applications.
To remove the software from your system:
- Delete the AMCap shortcut from your desktop
- Go to your Windows install drive (the C: drive by default) and delete the program called amcap.exe in the Windows folder
Please note that you will need to first close HUE Animation or HUE Intuition to use AMCap, and vice versa. Only one application can be using the camera stream at a time.
After installing the optional drivers, open AMCap and select Video Capture Filter… from the Options menu to adjust the settings to your personal preferences.
HUE will be installed automatically a few seconds after it’s connected, and it will be available for selection in your chosen software such as HUE Animation, Skype™ or HUE Intuition. If you want to install the extra drivers on your CD you can begin installation as soon as the computer has recognized the camera.
If you have an older model, insert the Install CD into your computer before connecting your HUE. Follow the Installshield Wizard. After you have completed installing the camera software, connect HUE to an available USB port on your computer and you’re ready to go. Please contact your retailer if you need more instructions or help with your older HUE.
This solution does not apply to newer versions of Windows.
We have received some reports of users running Windows 7 or 8 seeing a greyscale or distorted picture in Skype when the camera is working perfectly in other applications. The cause seems to be a recent Skype update on computer running certain graphics hardware.
From initial testing, the problem appears to be limited to Skype’s preview window (in Tools, Options, Video Settings) and the video displays normally during actual calls.
If the problem also seems to be affecting your video calls, we suggest taking the following steps:
- Ensure that you are using the very latest version of Skype. However, if the problem appeared recently, consider downgrading to a previous version of Skype.
- If you previously installed the HUE camera drivers, uninstall them through your Control Panel (Programs and Features). The camera will work in Skype and other applications without any drivers installed.
- Run Windows Update and check that all of your computer’s software is up to date.
- Visit your computer manufacturer’s website and check for any graphics card or video updates specific to your computer.
- Try updating DirectX from Microsoft’s website. If you’re using Windows 8, you can skip this step; Windows 8 comes with a later version built-in.
If none of this helps, please contact our technical support team so that they can assist further. If you can include plenty of details about your computer’s configuration it will help us find the solution as quickly as possible.
Many Surface devices use Windows RT, which is different to standard desktop operating systems such as Windows XP and Windows 10.
Our cameras use Windows’ built-in UVC drivers and the animation software requires OpenGL. Unfortunately, Windows RT does not include any of these drivers as standard so the kit wouldn’t be compatible. If this changes in a future software update and Microsoft choose to add UVC drivers and OpenGL support for Windows RT, the camera will work out of the box.
If you use a Surface with a desktop version of Windows installed and driver support for OpenGL, it should work with our products. Please contact us if you need any assistance.
FAQs: HUE HD Pro Camera
If you notice a whistling noise in the background of your recordings in HUE Intuition and other apps, you may need to adjust your Windows sound settings to optimize them for your microphone.
If you open your Windows Control Panel and select Sound, then the Recording tab, you will be able to select the Properties of your USB microphone. The Advanced tab will allow you to adjust the default format for microphone recordings. Adjusting this setting should allow you to eliminate any background sounds. If you are hearing a whistling sound, choosing Radio quality/Tape recorder from the dropdown menu should eliminate the problem.
The same steps apply when using any other USB microphones which exhibit a similar problem.
An update to Windows 10 released in April 2018 added new Privacy options to the computer’s system Settings. If these are configured incorrectly it is possible that they will block any applications from accessing cameras. Both internal webcams and USB cameras such as HUE are affected by these settings. If you updated from an earlier version of Windows 10, you may have been asked to choose your settings immediately after the update was installed. It is important that these settings allow camera and microphone access, otherwise the software will be unable to connect to the camera and microphone.
If you want to unblock the camera, press the Start button and open the Settings screen, or alternatively press Windows Key + I. You will see an option called Privacy in the list.
There will be sections on this page for your Camera and Microphone settings. Please ensure that the applications you want to use with your HUE have full access to both the camera and the microphone.
You may need to switch on the option to Allow apps to access your camera before the individual applications appear in the list.
For Microsoft’s help page about the new camera settings, please click here. You can learn more about their privacy settings in this Microsoft FAQ. This information also applies to Windows 11.
Another common cause of video not appearing in this way is third party security software. This separate FAQ includes advice if you believe that this may be the problem.
Click here for the full list of HUE HD Pro Camera FAQs
HUE Software
FAQs: HUE Intuition
If you notice a whistling noise in the background of your recordings in HUE Intuition and other apps, you may need to adjust your Windows sound settings to optimize them for your microphone.
If you open your Windows Control Panel and select Sound, then the Recording tab, you will be able to select the Properties of your USB microphone. The Advanced tab will allow you to adjust the default format for microphone recordings. Adjusting this setting should allow you to eliminate any background sounds. If you are hearing a whistling sound, choosing Radio quality/Tape recorder from the dropdown menu should eliminate the problem.
The same steps apply when using any other USB microphones which exhibit a similar problem.
An update to Windows 10 released in April 2018 added new Privacy options to the computer’s system Settings. If these are configured incorrectly it is possible that they will block any applications from accessing cameras. Both internal webcams and USB cameras such as HUE are affected by these settings. If you updated from an earlier version of Windows 10, you may have been asked to choose your settings immediately after the update was installed. It is important that these settings allow camera and microphone access, otherwise the software will be unable to connect to the camera and microphone.
If you want to unblock the camera, press the Start button and open the Settings screen, or alternatively press Windows Key + I. You will see an option called Privacy in the list.
There will be sections on this page for your Camera and Microphone settings. Please ensure that the applications you want to use with your HUE have full access to both the camera and the microphone.
You may need to switch on the option to Allow apps to access your camera before the individual applications appear in the list.
For Microsoft’s help page about the new camera settings, please click here. You can learn more about their privacy settings in this Microsoft FAQ. This information also applies to Windows 11.
Another common cause of video not appearing in this way is third party security software. This separate FAQ includes advice if you believe that this may be the problem.
Click here for the full list of HUE Intuition FAQs