You can check the most common questions regarding our HUE products.
We also have a Tutorials section with more information about popular topics. If your question is not answered below, please contact us for support.
To search the FAQs, please click here.
HUE Animation
FAQs: HUE Animation (General)
The instructions below are for the older version of HUE Animation which came with a CD. Newer versions can be registered instantly in My Account (free account registration is required).
If you have a newer version of HUE Animation Studio and need more help, please check this detailed activation guide.
If you just need to download the digital version of the HUE Animation software, it can be accessed here.
If you’re unable to install your HUE Animation or HUE Intuition software from your CD, please read the instructions below.
1. I haven’t registered my activation code before, and it’s a longer code (e.g. HUE1234567890123).
Please register an account on our site and choose Register New Software from the account screen to convert your activation code to a license key and add your software to your account. You can then download the software from the Downloads page.
If you need help activating offline you can find detailed instructions here.
Long activation codes are printed on the back of The HUE Book of Animation (HUE Animation) or on the back of the instruction booklet (HUE Intuition). Activation keys for bulk license orders are often sent by email.
2. I haven’t registered my activation code before, and it’s a short code (e.g. HUE12345).
Please visit this page to register your older code. This will convert it to a license key, give you access to the downloadable version of the HUE Animation software and add all of the details to your HUE website account for future reference.
The short HUE activation codes are printed on the back of The HUE Book of Animation. If you have an older kit without the book, check the activation instruction sheet for a sticker with your code.
3. I originally purchased my license digitally and never had an activation code.
Your downloads and license details will be stored on your online HUE account already. You can request a password reset from the login page if you have forgotten your password.
4. I have registered my activation code before, but I don’t know my license key or how to access my downloads.
All of your software updates and license details will be stored on your online HUE account.
If you have registered your activation code before but you don’t know your license key or how to download the latest version of the software, please note that all of your software updates and license details are always stored on your online HUE account. If you have forgotten your login details, you can request a password reset or lost license reminder.
If you’re having any other trouble accessing your software, please contact us with all of the relevant details (order number, activation details, error message etc.) and we’ll be able to help.
Download the software and register the code from the back of the animation book to claim your license. Detailed instructions are in the Quickstart Guide and Tutorials.
The kit includes a perpetual single user license of Stop Motion Studio for HUE, which requires Windows 10 or later, or macOS 11+.
Alternative ‘HUE Animation’ software is available for older computers (see the system requirements for a full list of supported operating systems).
Turn the silver focus wheel around the camera’s lens until the image is pin-sharp. The camera’s manual focus gives you complete control at all times.
This issue might be caused by having an older YouTube account.
One side effect of Google merging its system with YouTube was that it transitioned from account names to email addresses a few years ago. Some users consequently have accounts with multiple logins, all of which Google accepts through its website.
However, the YouTube interface used in our software only accepts the newer-style email address logins instead of the account names for some user accounts. We are currently in the process of updating the software to accommodate both types of login.
If you’re logging in with a username and password combination, please try using your YouTube email address (and the same password) instead.
You can check the registered account details by going to your YouTube account page and clicking on Advanced. It should say ‘Signed in as’ in the Account Information area. If it gives your email address after the text ‘Signed in as’, then you may need to use your email address to upload through the HUE software – even if the YouTube website accepts either your account name or email address.
If this advice doesn’t help please contact us (with screenshots or photographs if possible). However, please do not share your YouTube/Yahoo login password. We do not require these details to assist.
If you need to upload your video immediately, you can upload it manually as a temporary workaround. Save the video file by clicking on the ‘save the video to my computer‘ button in the Playback tab (HUE Intuition) or export it to your desktop using HUE Animation. This creates a compressed video file from the larger raw footage that is generated immediately after recording.
Longer videos can take minutes to be converted so you would need to press the button and then wait for the video compression to be completed before closing the application. You will know that the compression is still in progress because you will not be able to switch tabs or click anything else within the software.
Once you have saved your video, you can upload it to YouTube via the website upload page.
Click here for the full list of HUE Animation (General) FAQs
FAQs: HUE Animation (Mac OS)
With the release of macOS 10.15 (Catalina), Apple have completely dropped support for all classic 32-bit applications including HUE Animation. Unfortunately, updating HUE Animation for 64-bit systems has proven to be a major project and we have been unable to produce a timely update for those users who are affected.
To provide a solution for Mac users, we have now added Stop Motion Studio software to HUE Animation Studio. The new software is compatible with later versions of macOS and available to customers who have recently purchased the HUE Animation Studio kit. Please visit huehd.com/sms for more information and to claim your software upgrade.
If you have not yet updated to macOS 10.15 and wish to continue using the original HUE Animation software, we recommend staying on macOS 10.14 (Mojave) if possible. The software can be moved to another Mac or transferred to a Windows PC if you have already installed the update, and your Workspace folder can be copied along with it.
In the meantime, please contact us if you are affected by this problem. Our support team will do their best to assist.
Please open System Preferences on your Mac and go into the Security & Privacy pane (renamed Privacy & Security in macOS Ventura and later).
The Privacy settings will have options to block or allow applications to access your Camera and Microphone. Please ensure that the HUE software you want to use has permission to access both the camera and the microphone; this should unlock the video and audio features in the software.
For more help, please see this separate FAQ on locating the Privacy settings in macOS.
If the software is missing from the list, removing it and then reinstalling it to the Applications folder should cause macOS to detect it properly. Please contact us if you are having any additional trouble.
Some non-Apple antivirus and security applications also block camera connections by default. Checking your security software settings should help with most connectivity problems.
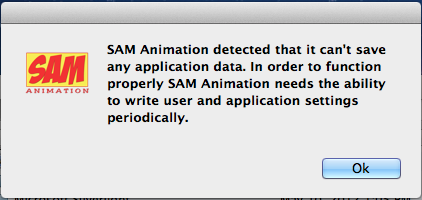
Please ensure that the settings file in the following location can be accessed by all users:
/Users/Shared/HUE Animation/hueanimation-app.config
If you have the older SAM Animation software, the path to the file is /Users/Shared/SAM Animation/samanimation-app.config
The most likely cause of crashes on Mac OS X is a plugin conflict. Please ensure that there are no outdated webcam drivers installed on your computer, and try disabling camera plugins such as iGlasses.
The old DIVX and 3vix video plugins can also cause this issue. To remove them, browse to the Library folder on your Macintosh HD and go into the QuickTime folder. Drag any files with ‘divx’ or ‘3vix’ in the name to the trash, then try relaunching the software.
This message can sometimes appear for users of Mac OS X 10.9 or later when the computer’s security settings are blocking all software installation outside the Mac App Store.
To resolve the issue, open System Preferences and go to the General tab in the Security & Privacy panel.
There will be some settings at the bottom advising which kinds of applications your computer is permitted to install. If it’s set to ‘Mac App Store’ only, you can try a lower security setting (temporarily, if preferred) to clear the error. You may also see a message about your HUE application with the option to grant it permission to run without changing any settings.
If the software will only open when you pick the lowest security setting please contact us. It should be classified under ‘identified developers’ since the software has been signed by Apple.
Please ensure all other camera software has been Quit, including WebCam Monitor and any messengers or web browsers which might be trying to access the camera. Once this has been done, select Refresh Camera from the Camera menu within the animation software.
If it’s still not detected try disconnecting the camera and then reconnecting it, carefully checking that there’s a good connection between the base, cable and flexible neck.
Please make sure that WebCam Monitor is completely closed before starting up the animation software. You have to close the application with Quit from the WebCam Monitor menu, not just by closing the window. Once this is done, select ‘Refresh Camera’ from the Camera menu in the animation software to reactivate the camera.
The software license in the HUE Animation Studio pack will work on either Windows or Mac OS X. You can choose which version to install or download to suit your computer.
If you have an old version of the kit which states that it is for Windows only, please contact us with your order details for help.
WebCam Monitor is the Mac software which is sometimes installed with the HUE HD Camera. You can use it to record real time videos using HUE. If you’d prefer not to use it, WebCam Monitor can be deleted from your Applications folder at any time without affecting your animation software.
Please note that you will need to first quit HUE Animation Studio to use WebCam Monitor, and vice versa. Only one application can be using the camera stream at a time.
HUE Animation Studio defaults to using your system microphone. You can set the camera as your default system microphone at any time.
To do this, Quit out of HUE Animation and go to System Preferences, then the Sound pane, then the Input tab. Make sure that the camera is selected in the list and the input volume is set high enough. You should see the Input level gauge register sound if you tap on the camera’s head.
When all of this is set up correctly, close the Sound panel and reopen HUE Animation. It should register your microphone properly once it’s been set as the default in your Sound panel.
This can sometimes happen on Macs running Mavericks or Yosemite. This page from Apple gives instructions for safely granting access to new applications. Please first of all check that you are using the very newest version of your HUE software as we are a registered developer and the error shouldn’t be appearing.
If you want to permanently change your settings (you can reverse this at any time), you can go to System Preferences> Security & Privacy and adjust your security settings in the General tab. For peace of mind, we would recommend keeping them set to the default if possible and using the workaround on the Apple page to open new applications.
If you’re seeing this error with the newest version of the software, please let us know.
There is a problem with an Apple system file in Mac OS X 10.6.3 on some systems which can be fixed by upgrading to OS X 10.6.4 or later through Software Update.
Both the camera and software are fully compatible with Leopard (OS X 10.5), Snow Leopard (OS X 10.6), Lion (OS X 10.7), Mountain Lion (OS X 10.8), Mavericks (OS X 10.9), Yosemite (OS X 10.10), El Capitan (OS X 10.11), Sierra (MacOS 10.12), High Sierra (MacOS 10.13) and Mojave (macOS 10.14). The HUE Animation software is not compatible with macOS 10.15 (Catalina) or later. Please read this page for further details.
HUE Animation Studio is only compatible with Mac OS X 10.5 (Leopard) or later. Most earlier versions of Mac OS X are not able to use plug and play video devices and no longer receive updates from Apple.
The latest updates to the HUE Animation software are for Intel Macs only.
The HUE camera will work on PowerPC Macs running OS X 10.4.3 or later in plug and play mode.
FAQs: HUE Animation (Windows)
On some systems, using a Microsoft OneDrive folder for your Workspace (HUE Animation) or default save/temporary video location (HUE Intution) can have unpredictable results. For the best performance we recommend using a local drive on your computer and copying files to your OneDrive as part of your backup routine.
You can change your default save locations using these instructions for HUE Animation, or in the Settings tab for HUE Intuition.
If your camera preview is working correctly but when you press the Capture button, nothing happens, there may be a problem with your Workspace folder.
The Workspace folder is where all of your project information is stored. We have received reports that folders which are shared with cloud services such as Google Drive or Microsoft OneDrive can sometimes block the software from saving to them correctly. Some versions of Windows automatically synchronize the Documents folders with OneDrive without notifying the user.
You will have been prompted to select your Workspace folder the first time you installed and activated HUE Animation. To change it, go to the HUE Animation menu and into your Preferences. You will see an option to reset the Workspace folder.
Once you have done this, confirm your changes and close HUE Animation. The next time you launch the software you will be asked to choose a new location for your Workspace; please choose a new folder on your Desktop as a test.
If the problem persists, please contact us for further assistance.
AMCap is a program which can be installed with HUE on Windows systems. You may use it to take still pictures or record video using HUE. AMCap is not required to use HUE and it can be uninstalled or deleted without affecting the use of HUE with other applications.
To remove the software from your system:
- Delete the AMCap shortcut from your desktop
- Go to your Windows install drive (the C: drive by default) and delete the program called amcap.exe in the Windows folder
Please note that you will need to first close HUE Animation or HUE Intuition to use AMCap, and vice versa. Only one application can be using the camera stream at a time.
If you’re affected, please update HUE Animation to version 1.6.5 or later to clear this error, which can be caused by Internet problems or a local network restriction. If you don’t receive the automatic update prompt, you can download the latest version manually by following these instructions.
This error means that you need to update your computer’s video card drivers.
1. Open your Control Panel and browse to Display Settings> Appearance> Advanced. One of the tabs in this window should show the name of your video card manufacturer.
You can also download and run a tool that will identify your card type and prompt you where you can download the latest update here.
2. The video card will usually be made by either Intel, AMD (ATI/Radeon), or nVidia. Each of these manufacturers have websites where it’s easy to detect and download the right driver update for free.
Once you’ve installed the latest drivers, the error should disappear.
This message can indicate that a Windows system file is missing or not working properly.
If you are using an older version of Windows, you can fix the problem by downloading and installing this update.
Some Windows 7 users are unable to record new sound clips to their HUE Animation projects when their projects are stored in a Workspace folder on a mapped network drive. If you are affected please contact us with the details.
In the meantime, saving to the local drive where the software is installed or to a USB drive should allow you to add sound as normal. You can change the Workspace folder location in the software’s Preferences.
If you’ve already registered and need to reinstall your software, it’s always best to use the very latest version of the software from your online account. Your login password will have been sent to you by email when you first registered. If you no longer have the email, you can reset your password on the login screen.
You can find help for installing on Windows and Mac OS X elsewhere in these tutorials.
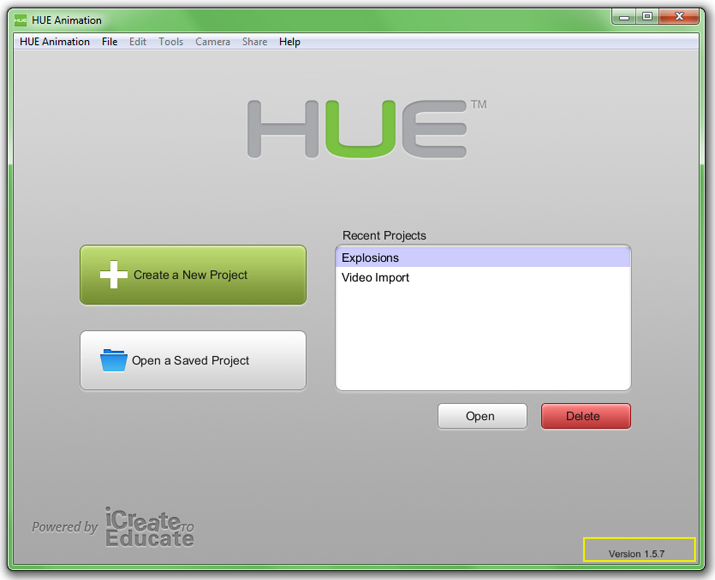
If you’re not sure which version is installed, it will be shown in the bottom right corner of the startup screen and also in the ‘About’ menu option when you’re working on a project.
Clean installation (Windows)
If you’re using Windows and there was a problem during installation, it might be best to perform a clean installation. This will delete any old copies of the animation software on your computer which might not have installed correctly. Your saved projects won’t be deleted.
To perform the clean installation, open your Control Panel and go to Programs, then choose Uninstall a Program. On newer versions of Windows, the settings can be found in Settings > Apps > Apps & features.
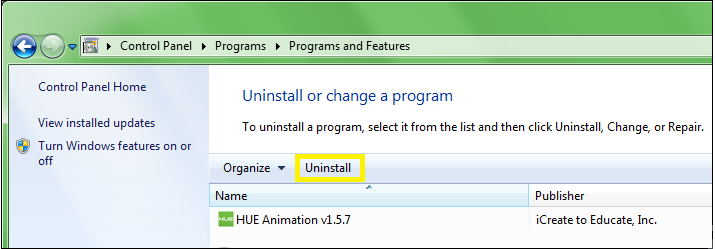
Look down the alphabetical list of programs installed on your computer and click on “HUE Animation”, then click the Uninstall button (highlighted in yellow above). There might be more than one “HUE Animation” in the list, so check that all of them have been removed. If you installed a long time ago, check the list for “SAM Animation” too.
Once all of the old files have been deleted, please try installing the software again.
Due to Microsoft not supporting some video features on Windows Vista, we cannot guarantee full compatibility with our HUE Animation software and do not list it in our system requirements. If you have already purchased HUE Animation and need help with Vista, you can contact us as we may be able to assist.
Please note that the HUE camera is fully supported on Windows Vista as a standalone USB video camera; the limitations only apply to the HUE Animation software.
The software license in the HUE Animation Studio pack will work on either Windows or Mac OS X, even if you have an older kit which only listed Mac OS X in the system requirements. You can choose which version to install or download to suit your computer.
HUE Animation Studio is only compatible with Windows XP (Service Pack 2) or later. Earlier versions of Windows are not able to use plug and play video devices, and are no longer supported by Microsoft.
Yes, but you may need to complete an extra step if you might see the following error message when you install the software on some early versions of Windows 8.

The software works on Windows 8 but on some computers an additional step is required before installation. In many cases this can be avoided by downloading the very latest installer from your online account. If this doesn’t help you can install using these extra instructions:
Please go to your Control Panel, which can be accessed from the Start screen by typing “Control Panel”, or through the Charms menu (Windows key + C).
Click Programs, then the link to “Turn Windows features on or off“. In the window which appears check the box next to “.NET Framework 3.5 (includes .NET 2.0 and 3.0)” then click OK.
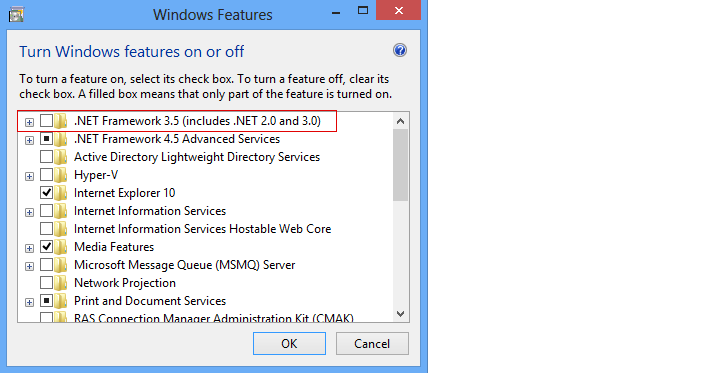
Once your computer has completed the upgrade, please try installing the software again.
Please ensure all other camera software has been closed, including AMCap and any messengers or web browsers which might be trying to access the camera. Once this has been done, select Refresh Camera from the Camera menu within the animation software.
The animation software uses your computer’s default system microphone. For Windows XP users go to your Control Panel, then Sound, then look under the Voice tab. Make sure that HUE’s USB microphone is selected as the Default Device and if necessary click Volume… to adjust its settings. For users of Windows Vista and later, this option is in Control Panel, Sound, then under the Recording tab. Make sure that HUE’s USB microphone is ticked as the Default Device and if necessary click Properties to adjust its volume and boost settings. Remember to save any changes with OK.
Tip: If you’re finding it difficult to open the Control Panel on Windows 8 (or later versions), pressing Windows Key + X will make a menu appear with a link directly to the main Control Panel.
If you are using a SigmaTel sound card, check with your computer’s manufacturer to make sure you are running the most up to date version of the SigmaTel drivers. You should be able to download the newest version from your computer or motherboard manufacturer directly. If the most recent ones still do not work, uninstalling and reinstalling the existing drivers then disconnecting and reconnecting the webcam might fix the problem.
If you have a control panel in your computer settings called Sigma Tel, check that it is set to “allow reconfiguration pop-ups”. You can then try disconnecting and reconnecting the webcam; if the sound card is struggling with anything it should pop up a window asking you to confirm how the microphone is connected.
Finally you can try going to Control Panel, then System, then Hardware, then Device Manager. Under the Sound category please right click and uninstall any sound card drivers then restart your computer. Windows should automatically reinstall the drivers or you can go through your computer manufacturer’s website to get the latest versions.
For further support with this issue please speak to your computer manufacturer.
Please check this separate FAQ for the solution to this issue.
Yes, the camera and HUE Animation software are fully compatible with Windows 7/8/10 in either 32-bit or 64-bit modes. Both the camera and software have been thoroughly tested in both modes and have earned Microsoft Windows compatibility logos for Windows 7, 8 and 10.
32-bit mode has been discontinued by Microsoft with the release of Windows 11, so users of Windows 11 and later can be assured that their kits are compatible. Please check the System Requirements carefully before purchase.
If you see the error “HUE Animation could not write to its settings file. Any saved settings will not persist on application restart.”, it means that there is a problem with file permissions. If a clean reinstallation doesn’t solve the problem, please go to My Computer, then to your C drive, and click on the ProgramData folder. Delete the folder called icreatetoeducate. This should permanently solve the problem.
If you can’t see the ProgramData folder on your C drive, it might be hidden. You can read Microsoft’s instructions for viewing hidden folders here.
We recommend downloading and installing the latest version of the software. If you can’t download the latest version, this issue sometimes occurs when you try to open a project outside of the folder you use to store your animation work (your workspace). The location of your workspace folder is shown in a message each time you start the animation software. Please copy your old project to the folder your chose as your workspace and then try opening it again from there.
This might happen if you have installed a different version of QuickTime from Apple in the past, perhaps as part of iTunes, and it hasn’t updated correctly. To fix it, open QuickTime from your Start Menu (it might appear as QuickTime Player or be inside a folder named Apple) and install any available updates through the Help menu. Your animation software should then be able to install as normal.
We have recently been advised that Apple has made some QuickTime updates unavailable. If you’re having trouble downloading QuickTime version 7.7, please try this alternate link.
HUE Animation for Windows will stop requiring QuickTime from version 1.6.2 onwards.
If the update doesn’t seem to be working please try a clean installation of the animation software.
We recommend that Windows 10 (or later) users update to the latest version of HUE Animation, which does not require QuickTime.
If you are using Windows 10 (or later) and see a warning that it’s not possible to install QuickTime on your system, please try QuickTime 7.7.6 from Apple instead. You may also need to right-click the installer and choose to run it in Compatibility mode for Windows 7.
Once QuickTime has been installed successfully, HUE Animation will run as normal with no further error messages.
On some rare occasions you may see a message which mentions ‘Error Code 0’ and difficulty connecting to our authentication server. This can be caused by Internet problems or a local network restriction.
Under normal circumstances, this should prompt HUE Animation to ask you for your offline activation code. You can generate this instantly through our website by following these instructions.
However, we have recently found that it’s possible for the offline activation prompt not to appear automatically when the issue is caused by an Internet routing problem where the user has a connection but cannot reach our server. The version 1.5.11 update to HUE Animation fixes this and the update can be downloaded from your online HUE account page at any time.
If you can’t update, please try disconnecting your Internet connection temporarily to force the HUE Animation software to prompt you to enter the offline key. The next time it’s opened it will detect the connection problem and you should see the prompt to enter your offline activation details. Your activation will then be saved successfully as normal.
Stop Motion Studio
FAQs: Stop Motion Studio
The Stop Motion Studio software included in HUE Animation Studio has been translated into US English, Czech, Danish, Dutch, French, German, Italian, Japanese, Korean, Polish, Portuguese (Portugal), Russian, Simplified Chinese, Spanish (Spain), Swedish, Turkish and Ukrainian. If your computer is set to use one of these supported languages, Stop Motion Studio will be fully localized.
Stop Motion Studio uses the default microphone on your computer for recording audio. In this FAQ we cover the steps you need to follow to change the default microphone input on macOS and Windows computers.
Instructions for macOS
To enable Stop Motion Studio to use your HUE camera’s integrated microphone on macOS:
- Plug your HUE camera into a USB port on your computer.
- Go to the Apple menu.
- Choose System Preferences.
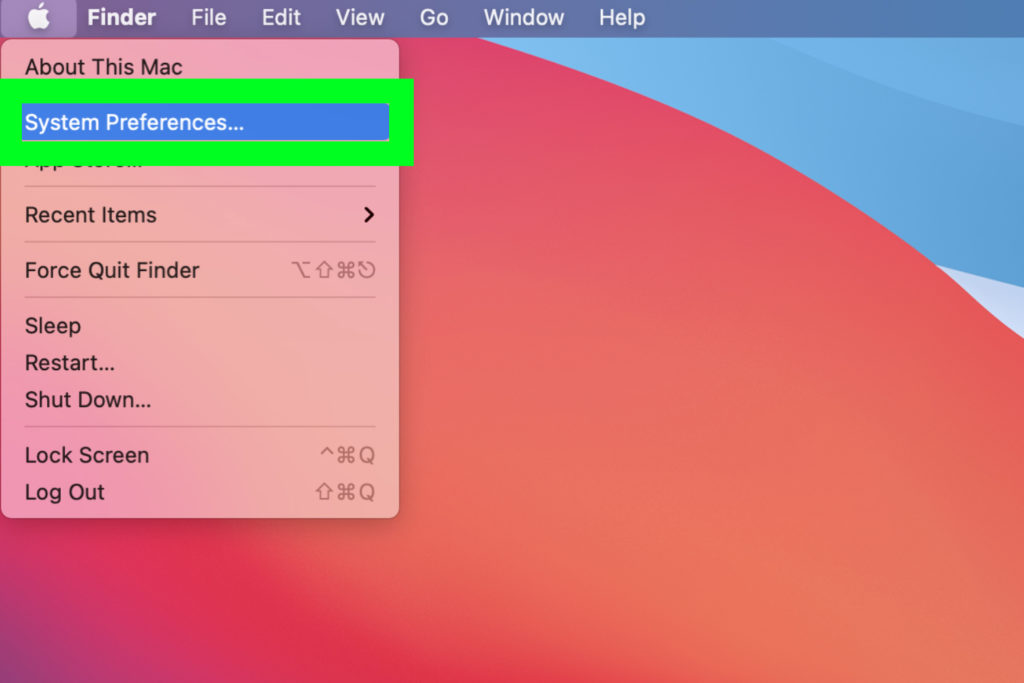
- Click on the Sound icon.
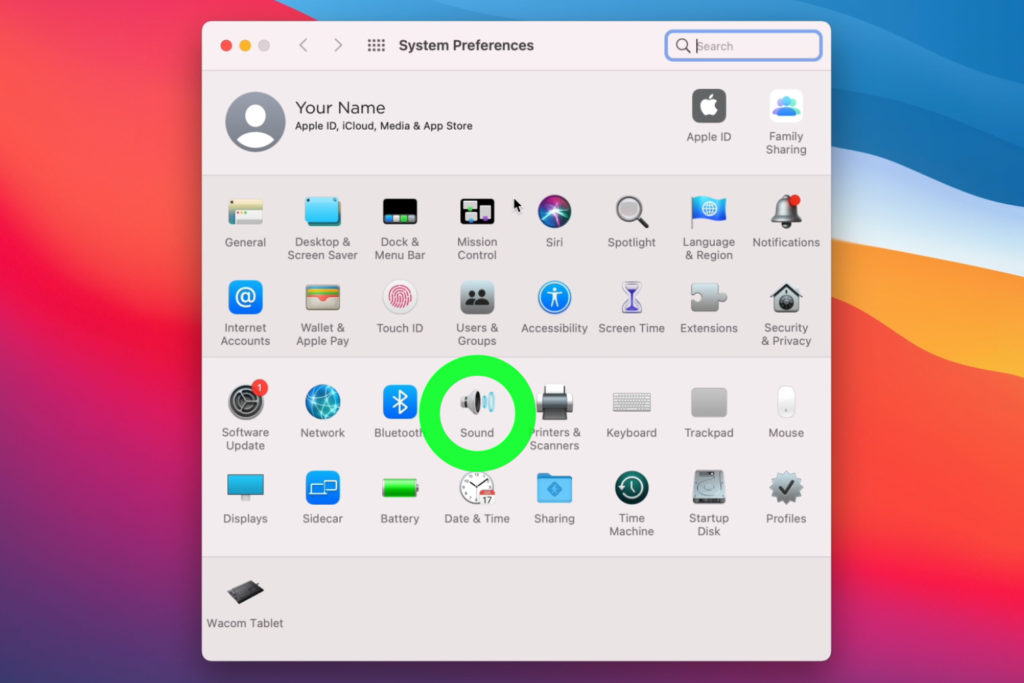
- Select Input from the menu options.
- Choose your HUE camera from the device list.


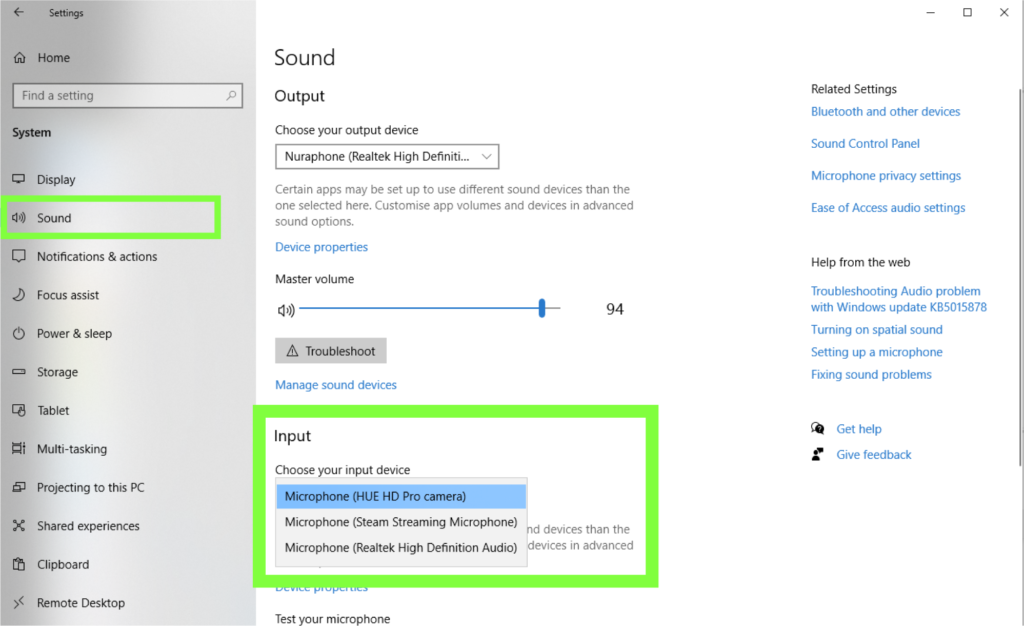
Instructions for Windows
To select your microphone in the PC’s System settings:

- Click on the System button to open the System settings page. You can also search for the Sound settings using the built-in search feature.
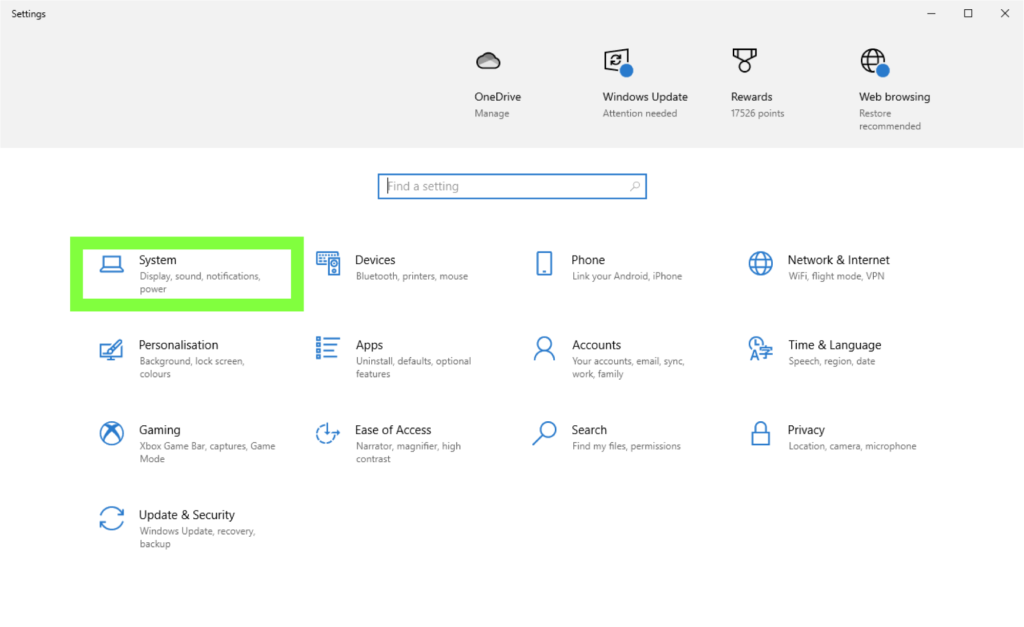
- Click on the Sound option on the left side to reveal the Sound settings.
- At the Input section menu, click on the box below Choose your input device and select your preferred microphone.
Stop Motion Studio system requirements:
- 512MB RAM (1GB recommended)
- Windows 10 or later, or macOS 11+
If your system is not compatible with Stop Motion Studio, you might be able to use HUE Animation software instead.
HUE Animation system requirements:
- PC: Windows 11, 10, 8, 7 or XP and graphics drivers with OpenGL 2.0 support
- Mac: OS X 10.5 (Leopard) to macOS 10.14 (Mojave) * Please note that the HUE Animation software is not compatible with macOS 10.15 (Catalina) or later.
- 512MB RAM (1GB recommended)
If your HUE camera isn’t listed as a capture source in Stop Motion Studio software, checking your computer’s Privacy settings could solve the issue quickly and easily.
In this FAQ you will find written instructions and images – for macOS and Windows – to show you how to allow the Stop Motion Studio app to access your HUE camera.
Instructions for macOS
The Privacy tab will have options to block or allow applications to access your Camera and Microphone. Please ensure that the HUE software you want to use has permission to access both the camera and the microphone; this should unlock the video and audio features in the software.
If the software is missing from the list, removing it and then reinstalling it to the Applications folder should cause macOS to detect it properly. Please contact us if you are having any additional trouble.
Some non-Apple antivirus and security applications also block camera connections by default. Checking your security software settings should help with most connectivity problems.
To allow the Stop Motion Studio app to access your camera:
- Go to the Apple menu.
- Choose System Preferences.
- Click Security & Privacy (also called Privacy & Security in some versions of macOS).
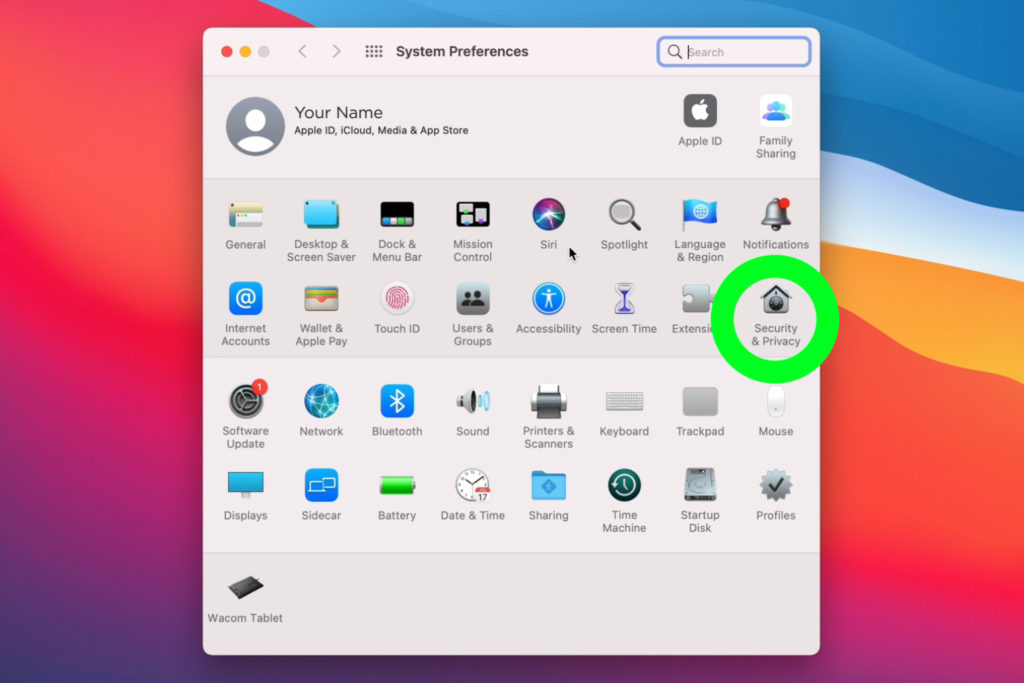
- Choose Camera from the menu.
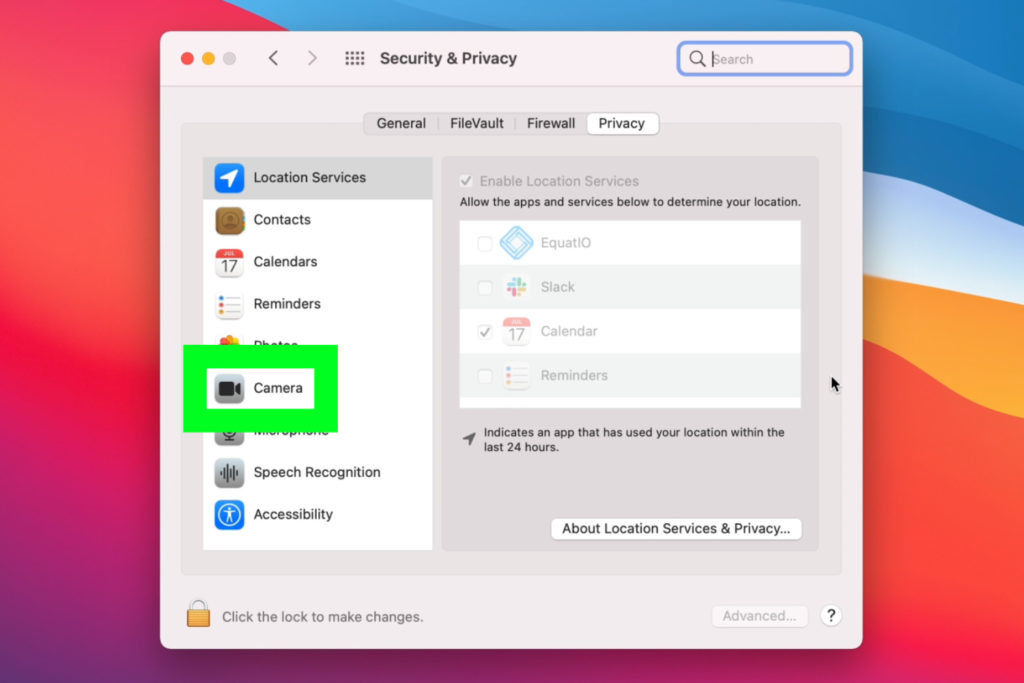
- Allow the Stop Motion Studio app to access your camera.


Instructions for Windows
To prepare your HUE camera for Stop Motion Studio on Windows PCs:
- Open the Settings page and click on the Privacy button. You can also locate the Privacy setting using Windows’ built-in search feature.
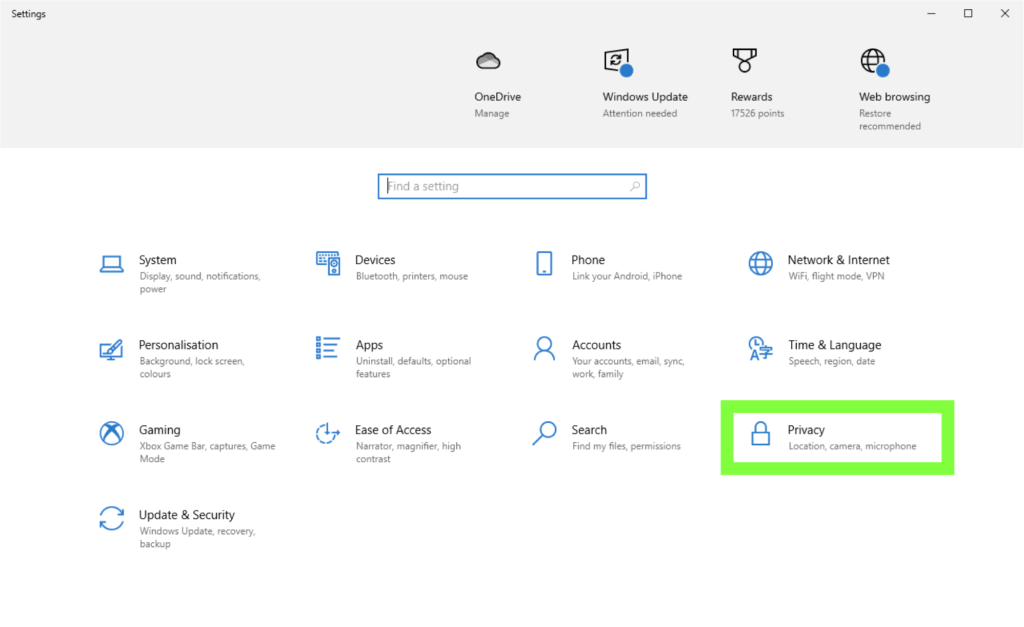
- Click on the Camera option on the left side then toggle the button under Allow apps to access your camera.
- Scroll down and toggle the button next to Stop Motion Studio.
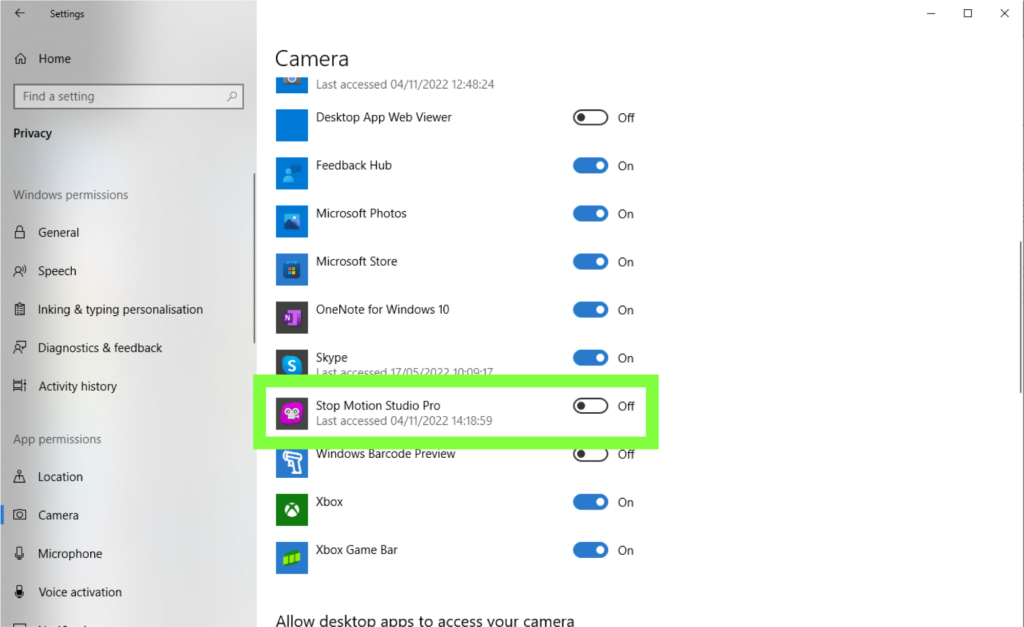
- Click on the Microphone option on the left side to reveal the microphone privacy settings.
- Follow the same steps as you did with the Camera privacy settings by toggling the relevant options.
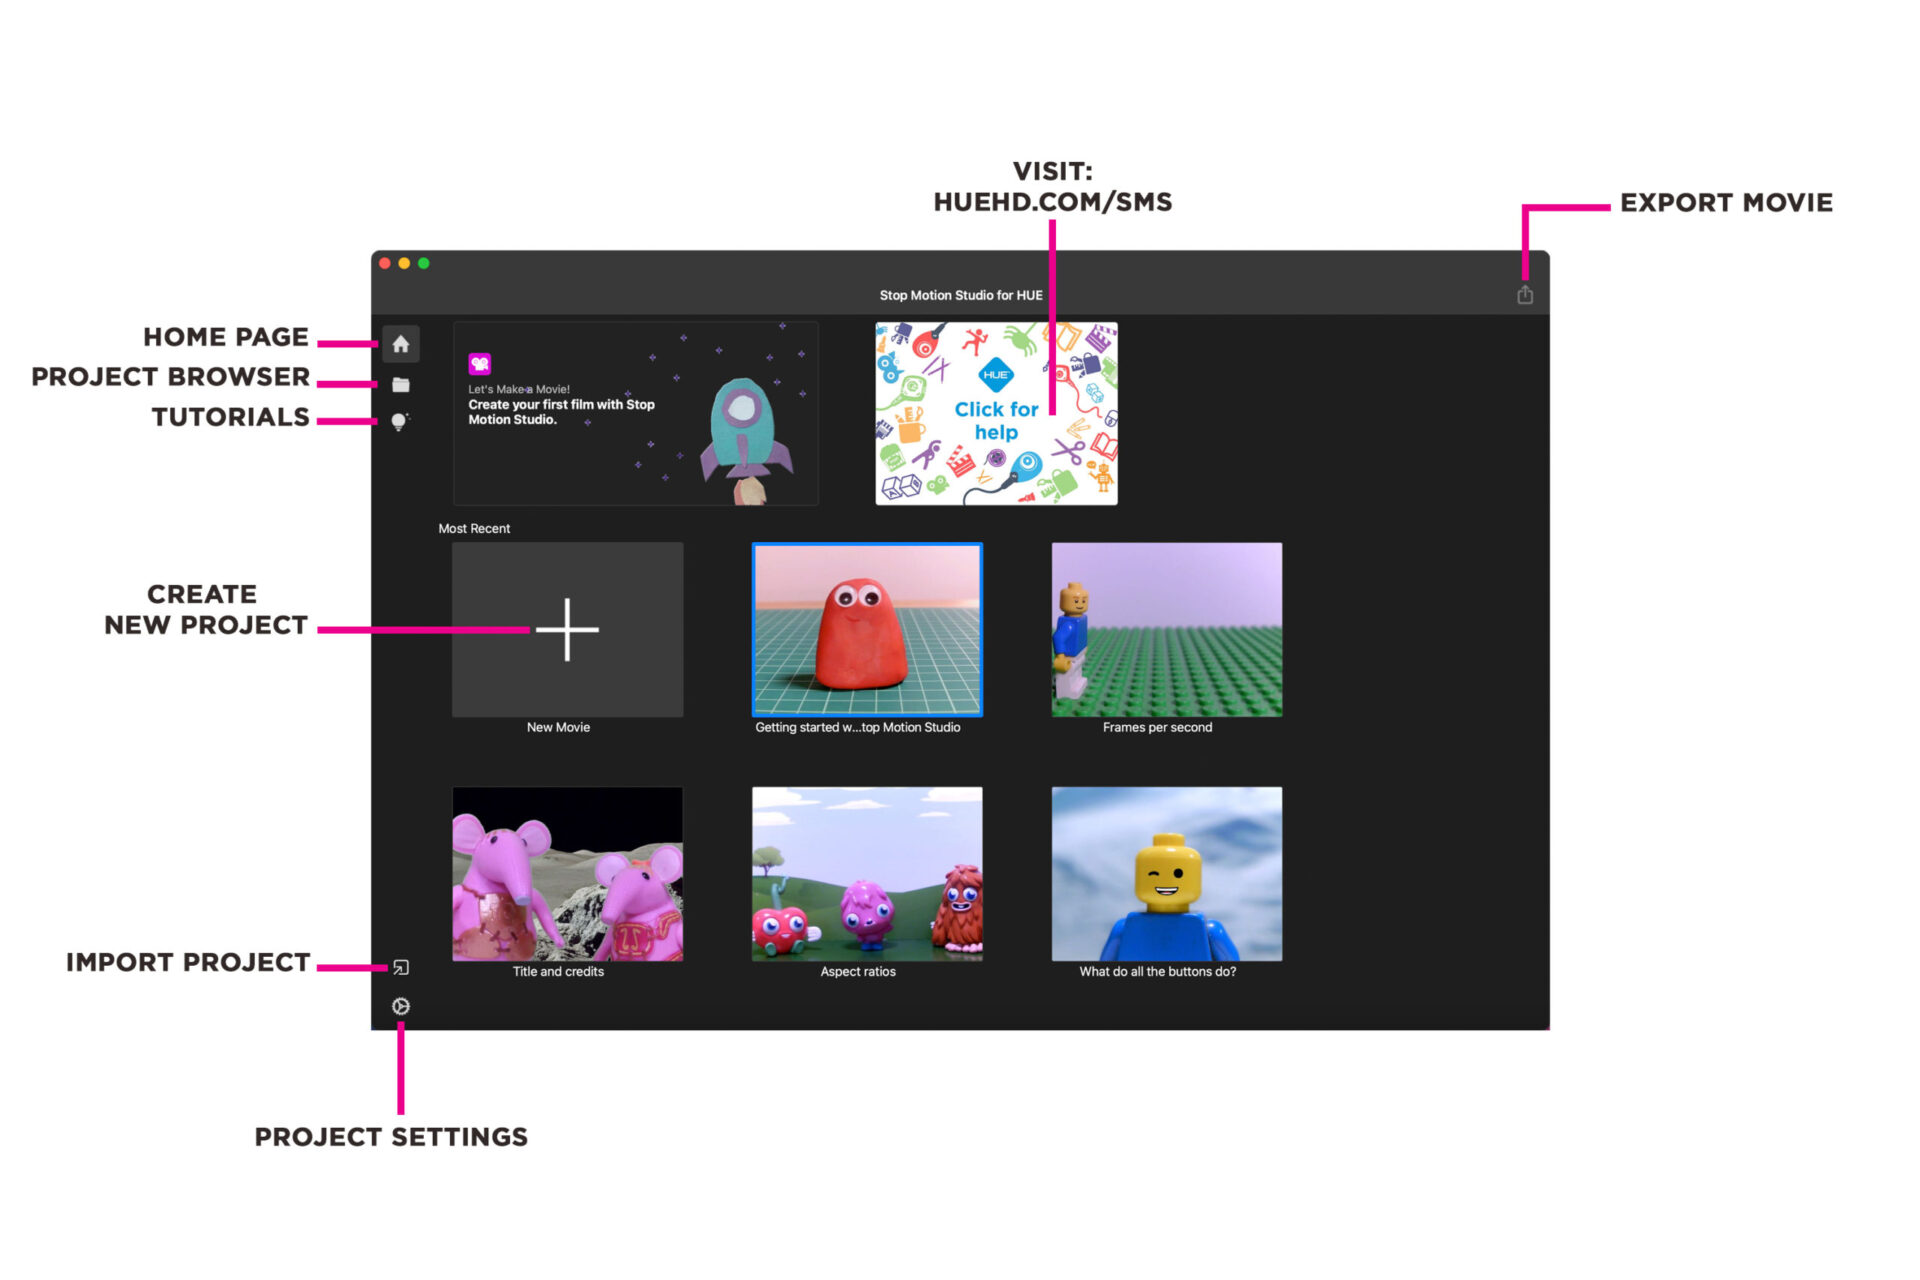
The Stop Motion Studio app HOME PAGE is where you can start a new project, access tutorials and import and export projects.
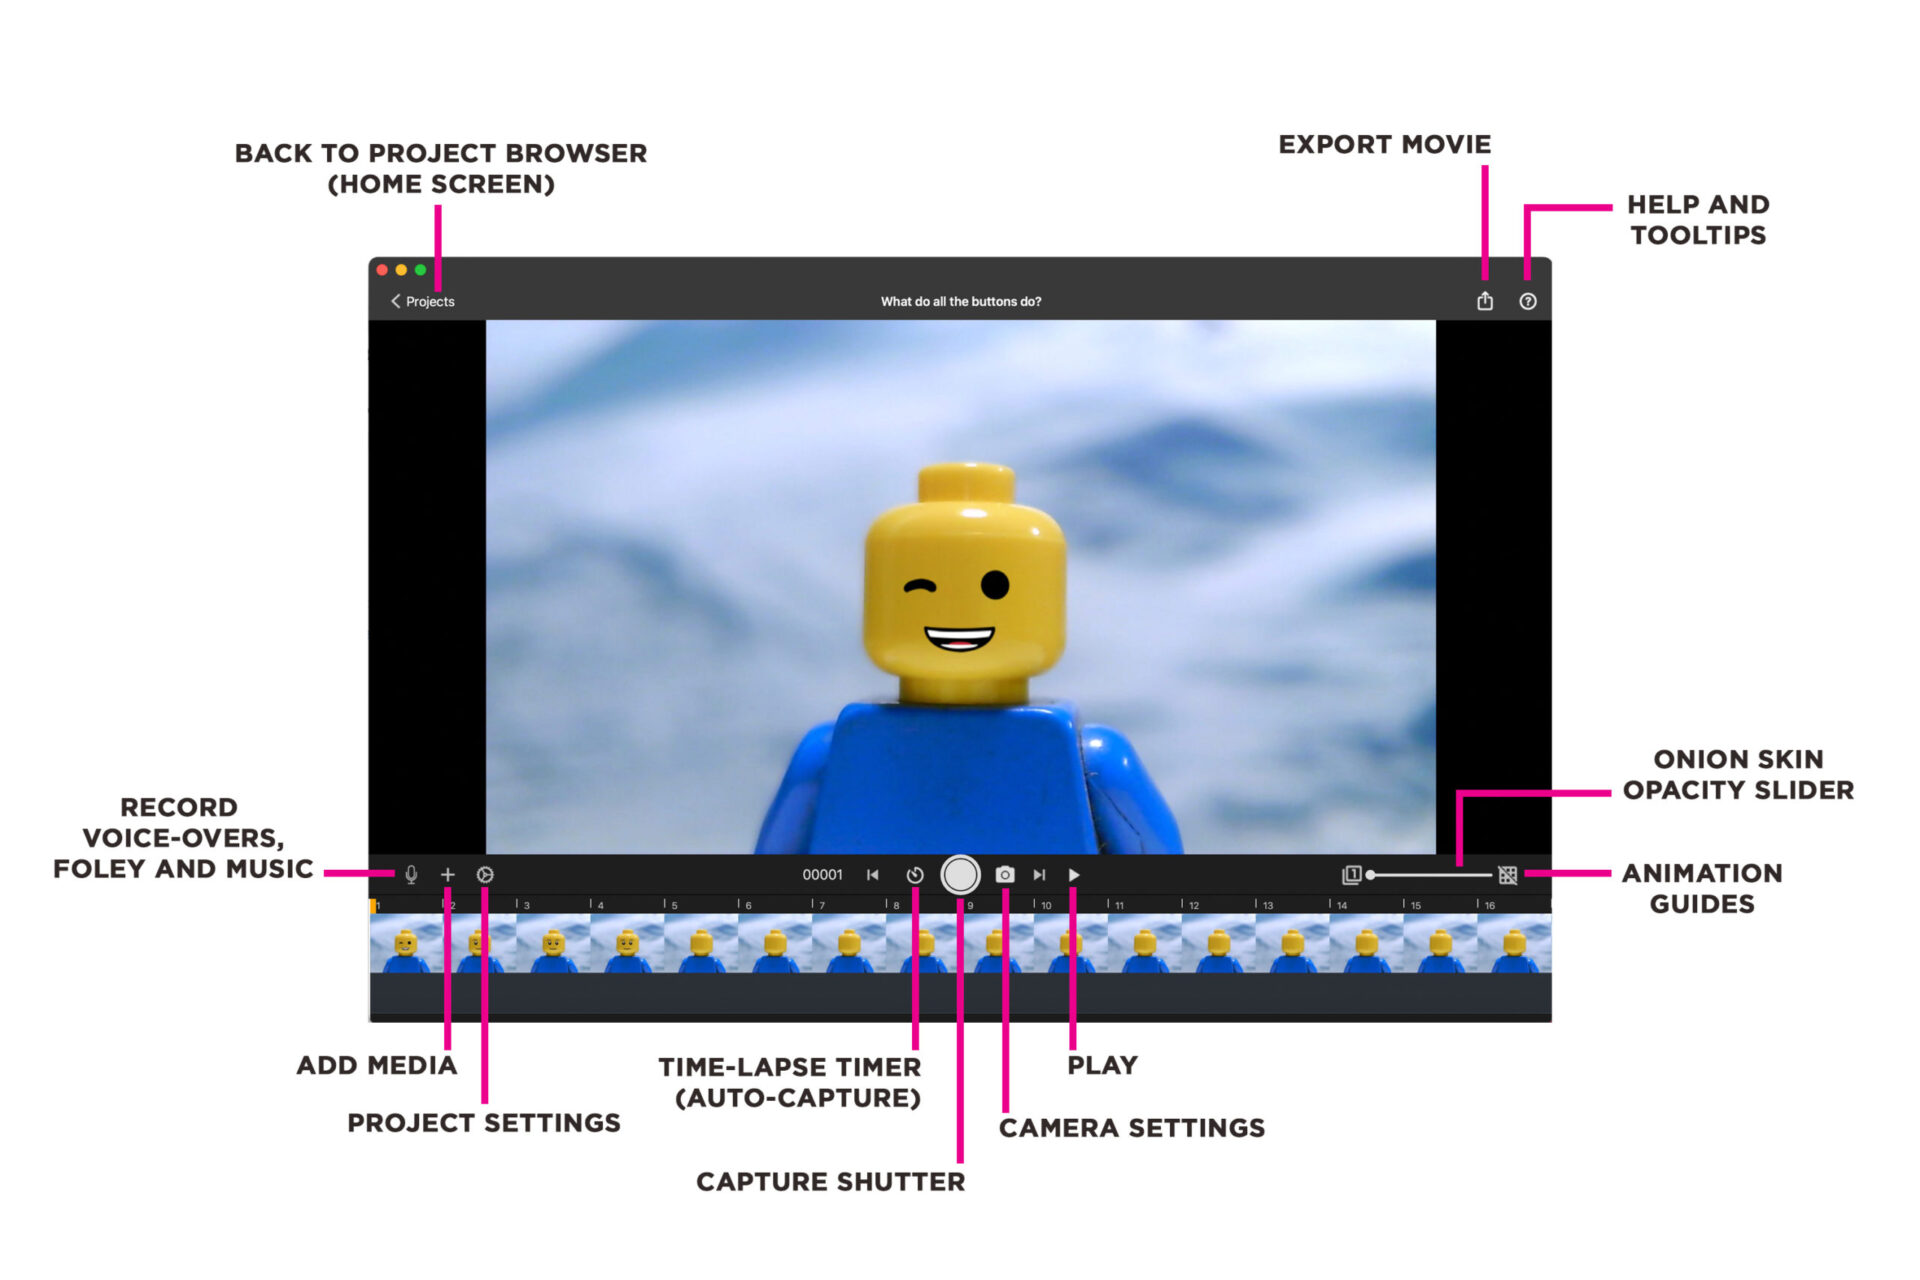
In the PROJECT TIMELINE window, you can access camera and project settings, add media and audio, capture frames, preview your animation and export your movie.
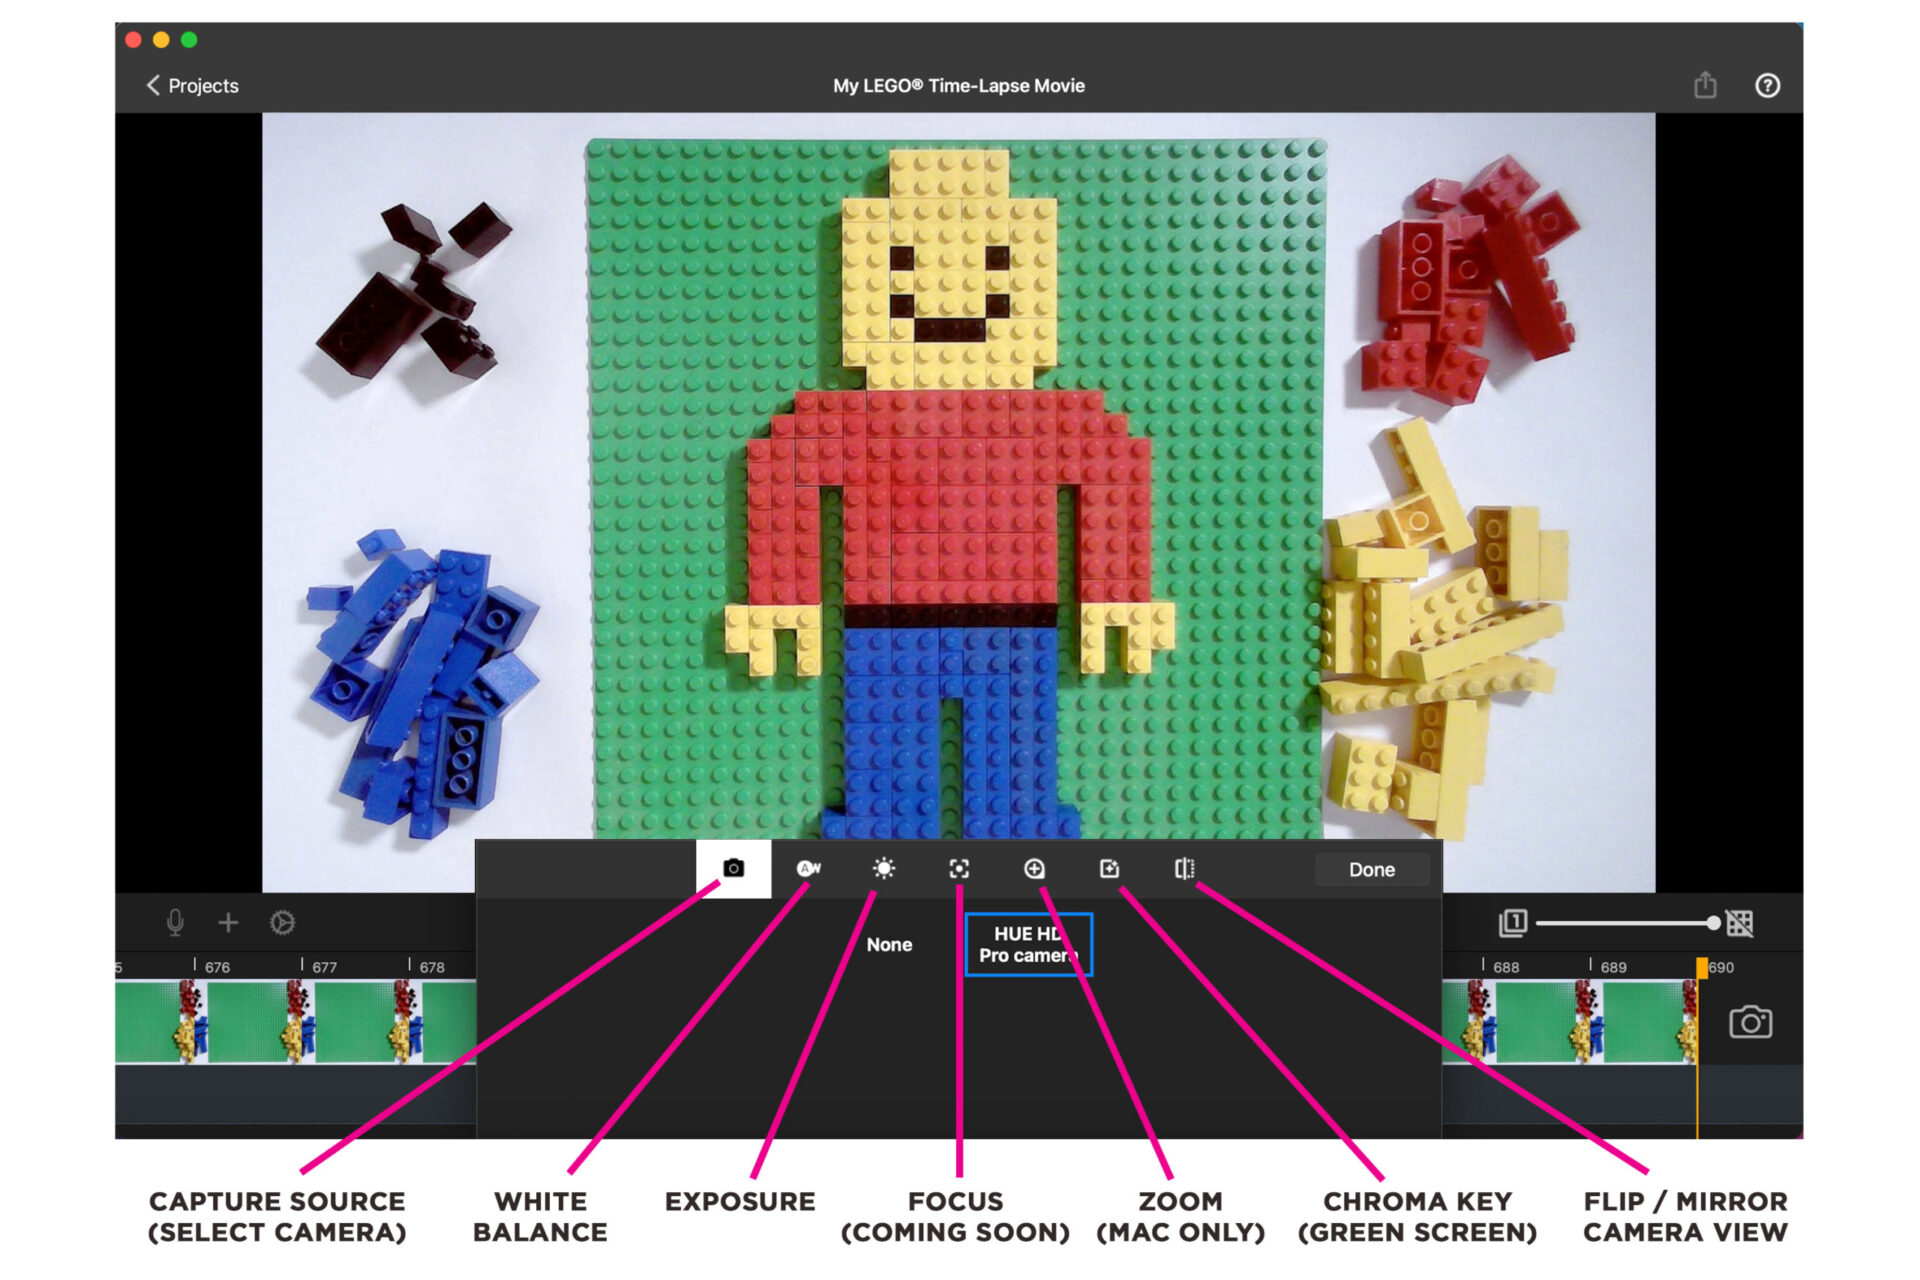
In the CAMERA SETTINGS menu you can select your camera (capture source), make adjustments to the white balance, exposure and orientation of your scene, and access the chroma key (green screen) feature.
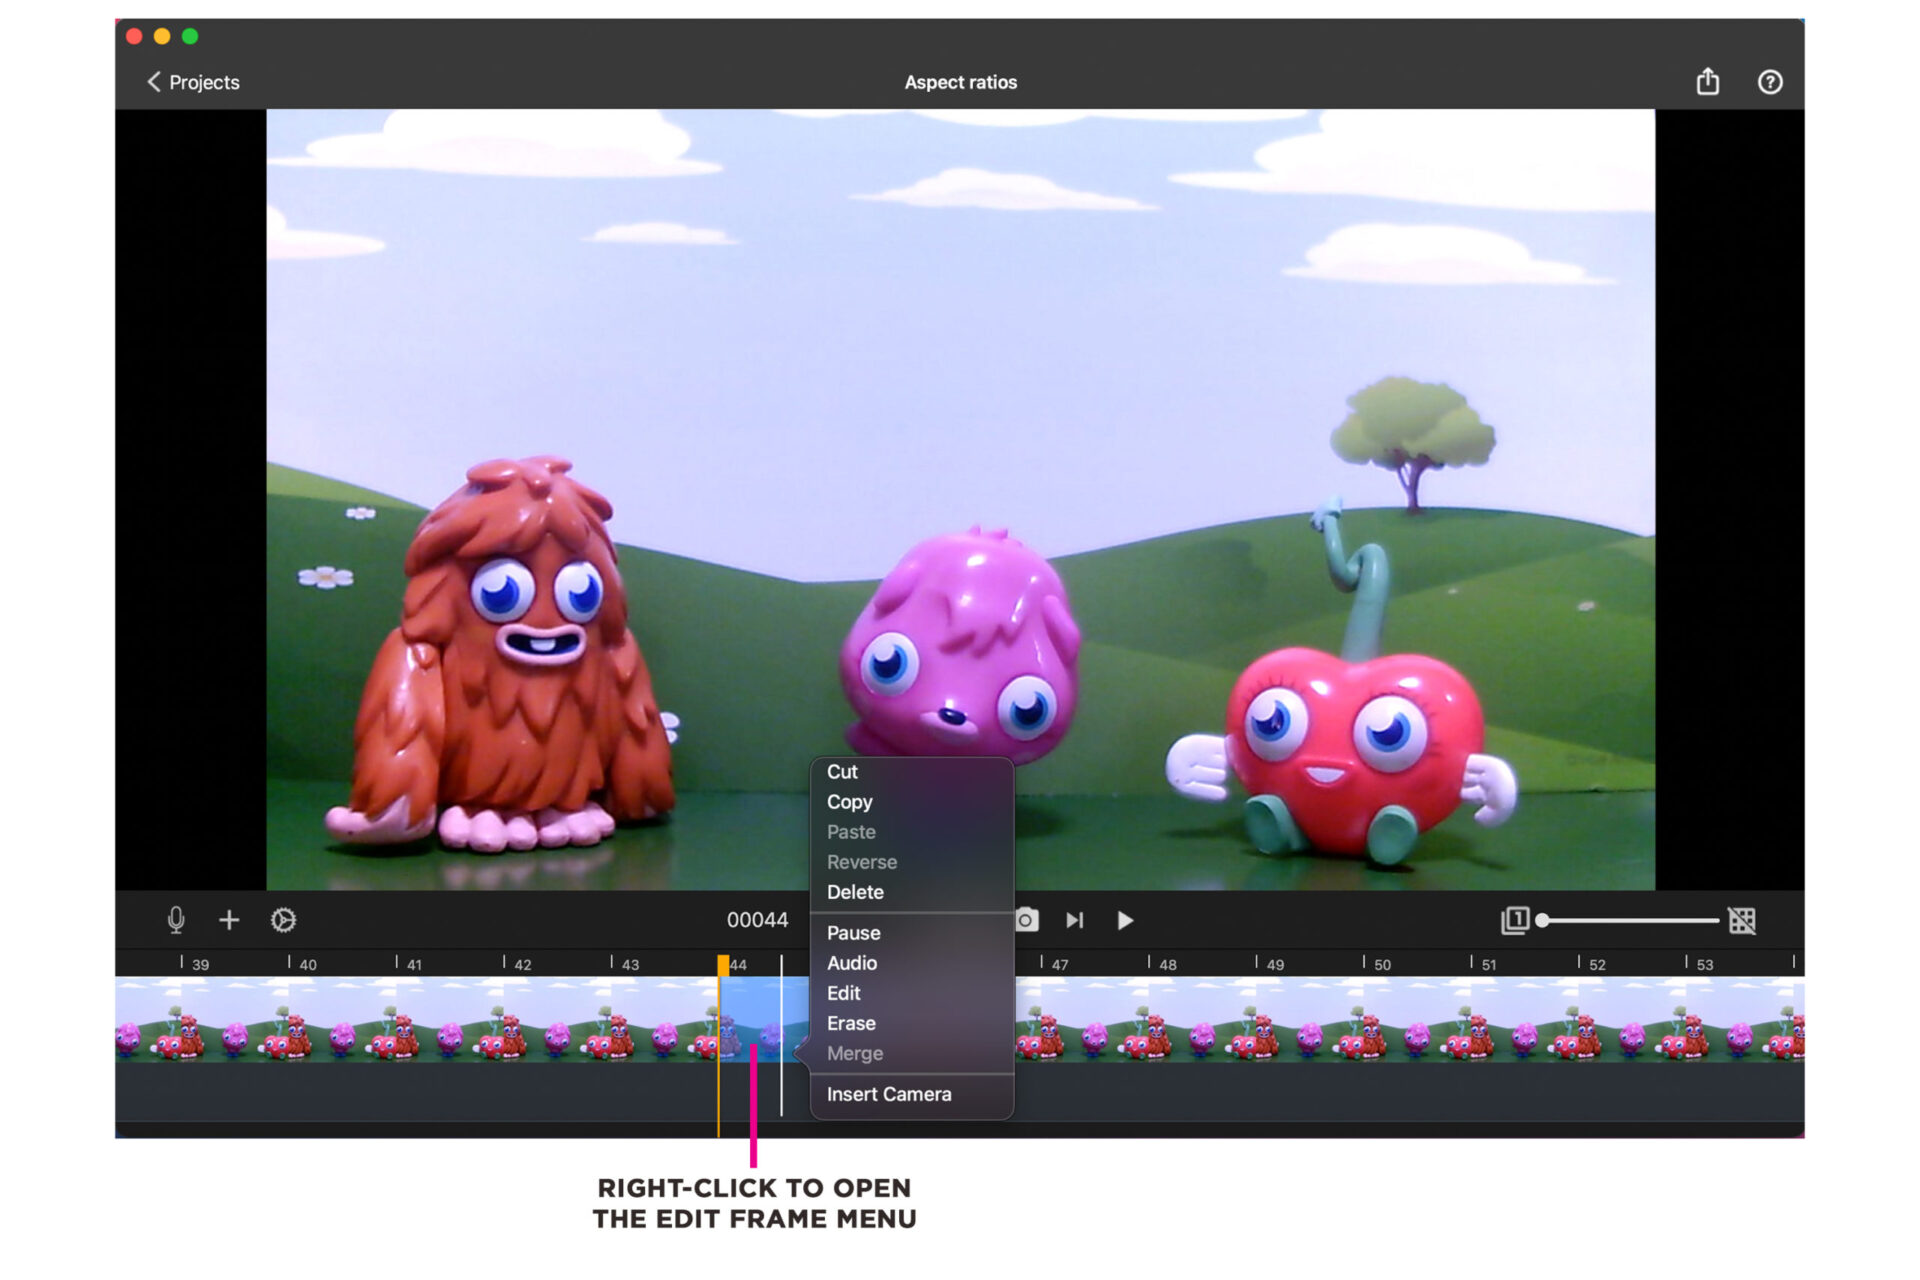
To view the EDIT FRAME menu, right-click on a frame (or multiple frames) in your animation timeline.
In the menu you have options to cut, copy, paste, reverse, delete and pause the duration of the selected frame/s.
Additionally there are options to add audio, edit the frame with drawings, text or shapes, erase drawings, and merge multiple frames.
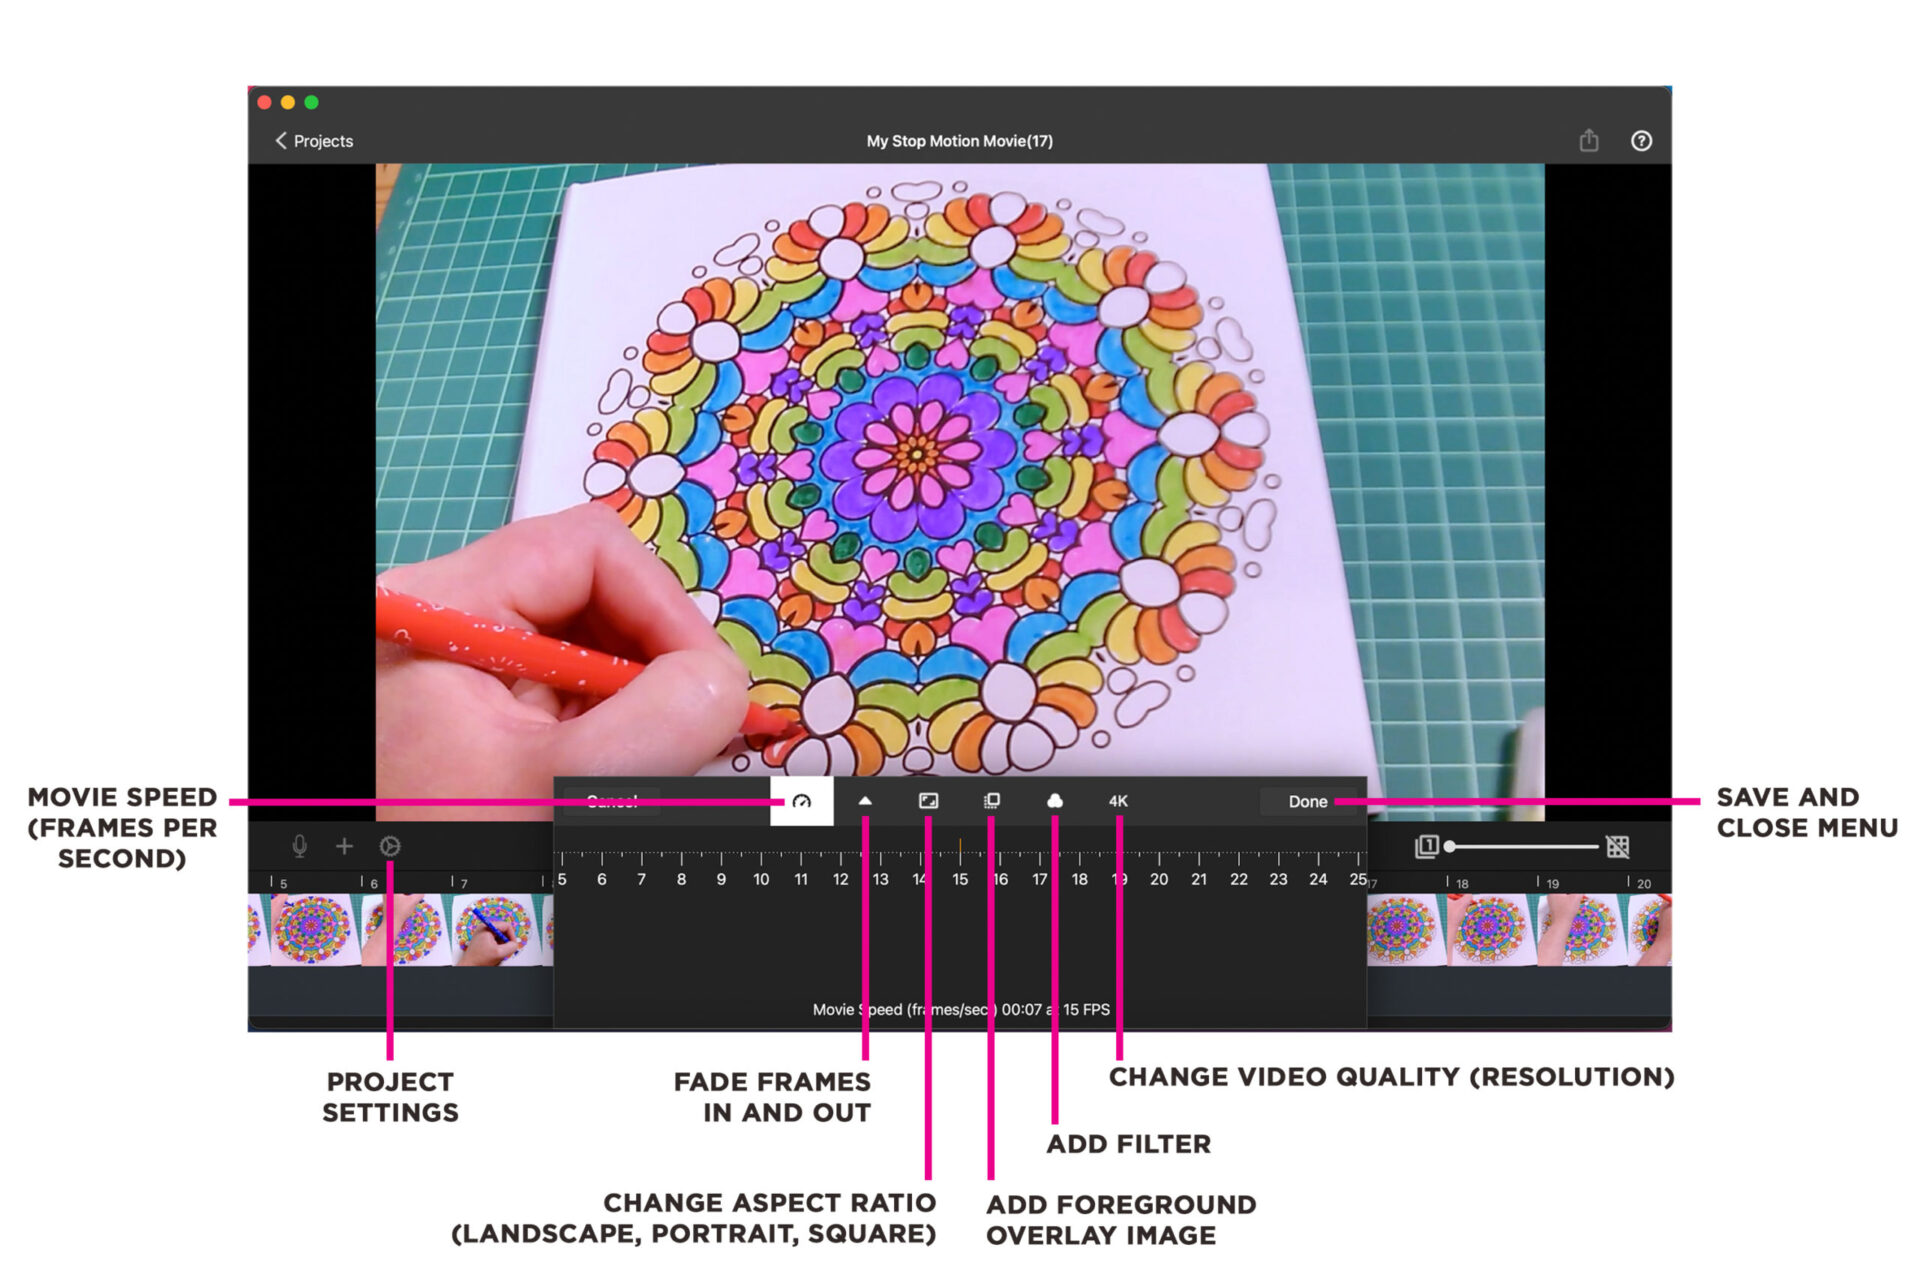
Click the small cog wheel icon to open the PROJECT SETTINGS menu.
Here you will find options to:
- Change the speed of your movie by adjusting the frames per second (fps).
- Fade your movie in or out with a black video overlay.
- Change the aspect ratio of your movie to landscape, portrait or square.
- Add a foreground image over your animation.
- Add a filter effect such as black & white, neon, mirrored and pixelated.
- Change the video quality/resolution of your animation (allowed by the camera you are using).
Click here for the full list of Stop Motion Studio FAQs
HUE Clay
FAQs: HUE Clay
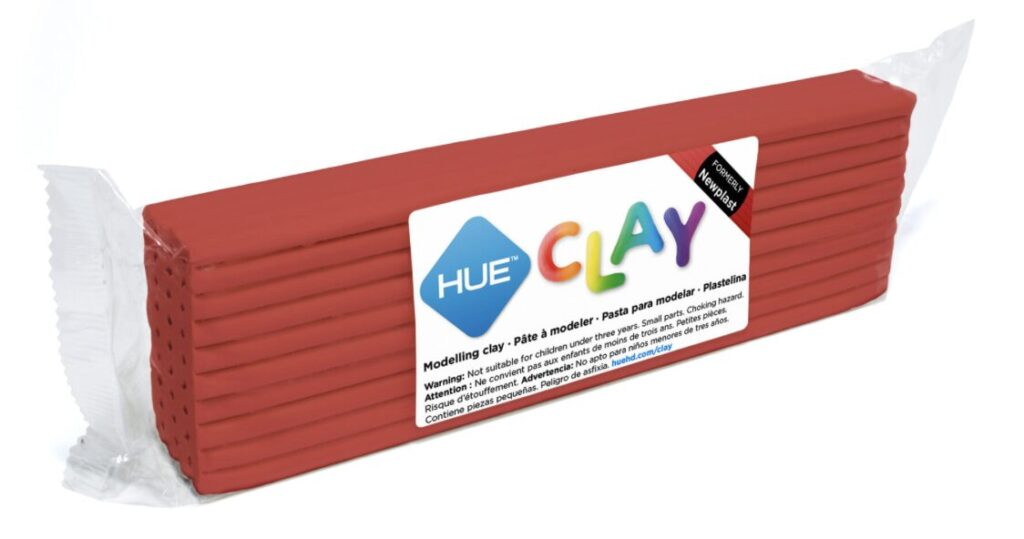
HUE Clay is an oil-based, non-hardening, reusable modelling clay. It is free from sulphur and gluten/wheat.
LHAMA: Conforms to ASTM D-4236.
EU CE/UKCA: Conforms with the European Toy Safety Directive 2009/48/EC.
Safety Warnings
Not suitable for children under three years. Small parts. Choking hazard. HUE Clay is intended to be used by children 3 years and older for arts and crafts purposes.
Do not bake or expose to heat. HUE Clay is a non-drying, non-hardening modelling material such as plastilina, pasta para modelar, pâte à modeller, Knetmasse, and plastilin. It is not designed to be baked. Excessive heat might break down the structure of the clay.
Do not dry and sand. HUE Clay should not be subjected to temperatures over 50°C (122°F) and if it is dried out in this way, it should never be sanded. Sanding dried clay may release particles which can be inhaled.
Do not eat. HUE Clay is not suitable for human consumption.
Please remove outer packaging before giving this product to a child. Parental supervision is recommended.
The recommended storage temperature of HUE Clay is 15°C to 25°C (59°F to 77°F).
Colours and styles may vary slightly from those shown on the packaging due to the manufacturing process. For more details about colour, please consult our clay colour comparison chart.
HUE Clay may transfer colour to hands or surfaces but this can usually be easily washed off with soap and water. Baby wipes or cleaning lotions may be used to remove any colour which remains on the hands.
Always protect work surfaces, furnishings and clothes while using HUE Clay as it may stain. To protect furniture, use a modelling mat. Keep surfaces protected for mess-free fun.
Any staining to clothes can sometimes be removed by soaking overnight before washing. HUE Clay is extremely difficult to remove from carpets and fabrics, so protection is by far the best way to avoid problems. Carpet or fabric cleaner might help – remove as much of the excess HUE Clay as possible first. Do not use water. Being oil-based, HUE Clay is softened by solvents such as paraffin and nail varnish remover (CAUTION: highly inflammable) which makes it easier to remove but might also damage the carpet or fabric.
No, HUE Clay is a non-hardening, reusable modelling material that never dries out such as plastilina, plasticine, pasta para modelar, pâte à modeller, Knetmasse and plastilin.
It is not suitable for baking and will not harden, set or air dry.
HUE Clay is also not meltable for pouring into moulds. Heating it risks irreparable damage.
HUE Clay is a professional grade modelling clay for detailed sculpting and stop motion animation, and it’s one of the hardest modelling materials of its type on the market. That why it is favoured by many animators. The hardness or softness required by individual users is a matter of personal preference. Storage conditions also have a large influence on the hardness of the clay.
The clay can sometimes feel harder than usual when it is first opened or cold. To soften the clay, gently warm it and knead it for a few minutes in your hands. Alternatively, wrap a piece in foil or cling-film and carry it in a pocket for 15 minutes until it is pliable again.
HUE Clay does not contain water and therefore it is non-drying and non-setting. It should remain pliable and workable for several years. However, nothing lasts forever and the modelling clay might become a little harder and more brittle or crumbly with age, particularly if it has been exposed to cold conditions during storage. It can often be re-softened with gentle heat, e.g. with the fingers or in a container in warm water. Working a little linseed oil or petroleum jelly into the HUE Clay can also be effective. If these measures fail, the clay is past salvage and should be replaced by purchasing fresh material.
HUE Clay is non-setting and non-drying so it does not need to be kept in an air-tight container but this is recommended to keep it clean and prevent contact with dust or fluff. It is best stored in a plastic container, plastic bag or wrap.
Avoid long exposure to direct sunlight and other strong lights to ensure that colours remain bright.
The recommended storage temperature to keep HUE Clay in good condition is 15°C to 25°C (59°F to 77°F). Cold conditions might make the HUE Clay hard and crumbly. Please see this separate FAQ if your clay has hardened.
Different HUE Clay colours can be combined to produce an infinite range of colours or ‘marble’ effects.
Tip: Washing hands thoroughly between handling different colours is recommended for preventing unwanted mixing. Soap and water should suffice but baby wipes or cleaning lotions may be used to remove any colour which remains on the hands.
HUE Clay does not contain sulphur and is perfectly suitable for use with silicones in mould-making.
Yes! HUE acquired Newclay Products’ modelling clay brands – including Newplast – and has worked hard to revive the famous non-drying, non-setting modelling material beloved by animators. Also known as Lewis Newplast, it is sufficiently pliable to make a wide variety of models, but is firm enough to retain its shape indefinitely.
Founded in 1967, Newclay captivated generations of children, animators and artists with its innovative and imaginative modelling products. Its flagship product, Newplast, is a special type of non-drying modelling clay that is especially suitable for stop motion animation due to its balance of pliability, firmness and resistance to cracking.
This iconic brand of clay is now back in production for the very first time since previous owners, Paul and Valerie Dearing, announced they were retiring. Newplast is once again available to purchase under its new brand name, HUE Clay.
Newplast is known for being used by multi-Academy Award® and BAFTA® winning Aardman Animations, creators of world famous stop motion films including Wallace & Gromit, Chicken Run and Shaun the Sheep.
“We are delighted HUE has acquired the rights to manufacture Newclay modelling materials. As a family-run business with a strong presence in stop motion animation, HUE gave us the perfect opportunity to bring Newplast and our other quality products into production. Their vision and ambition to expand into the creative education and leisure markets will take the products from strength to strength. We wish them every success on their new journey.”
– Paul and Valerie Dearing, former owners/directors of Newclay Products Limited.
Colours and styles may vary slightly from those shown on the packaging due to the manufacturing process and the way that colours vary across different displays. For more details about colour, please consult our clay colour comparison chart.
There can be small batch-to-batch variations in the clay’s hardness (and colour) due to the nature of the materials used and the production processes. For users for whom the consistency of hardness and/or colour of the HUE Clay is critical to their work, we recommend buying all that you need at the same time to minimise variations, or contacting us for assistance.
No. The only official successor to Newclay Products’ modelling clay brand Newplast is our HUE Clay, which uses the classic Newplast recipe and conforms to international standards to confirm that it is safe to use. Other brands which claim to be based on Newplast have no direct affiliation with HUE or Newclay Products’ Newplast modelling clay.
Please be advised that our safety and technical information does not apply to these third party products, which may use different materials in their production and have different chemical properties even though their branding physically resembles that of Newplast. We are consequently unable to provide any assistance for problems with ‘Nuaplast’ clay. You should contact your supplier if you need help with ‘Nuaplast’ clay.
To help distinguish genuine Newplast (now called HUE Clay) from imitations, please see the images below.
An authentic bar of Newplast clay will be marked with the Newclay Products branding and British/EU conformity information:

An authentic bar of HUE Clay will be marked with HUE branding and safety/conformity information:
Please contact your supplier if you are not sure whether your Newplast is genuine.
HUE Cameras
FAQs: HUE HD Camera (General)
Optimal image capture with the camera in its base is an A5 page (half US letter size). The camera can be placed on a higher surface if a larger capture area is required. If you need to capture a larger area, we recommend choosing the HUE HD Pro camera instead.
Many third party camera apps have options to flip and mirror the live video, as described in our detailed guide to flipping and mirroring the camera feed.
HUE cameras are Plug & Play and will work with any application that recognises a USB video device, such as built-in camera apps on an interactive display or the camera apps included with Windows, ChromeOS, macOS and other operating systems.
Google Meet applies a mirror filter to the camera feed by default. The image you see is mirrored but your call attendees will see the image the correct way around.
This is an application setting and does not have anything to do with the HUE camera. It is also not a setting that can be changed with the HUE software.
There is no way to remove the filter within Google Meet, unlike in Zoom, and if you use third party software to reverse it on your side, it will be mirrored on the attendees’ side as well.
As a workaround you can use the Present feature on Google Meet to share the camera feed from another application, such as HUE Intuition. Google Meet will not recognise the shared feed as a camera input so the mirror filter will not take effect. You can proceed to use the HUE Intuition application features in your call.
Instructions:
- Launch HUE Intuition and select your HUE camera as the video input device.
- Ensure that Google Meet is not already using your HUE camera or you will see a blank screen in HUE Intuition.
- Click on the Present button within Google Meet.
- Select the Application Window tab.
- Click on the HUE Intuition application window.
- Click Share.
For more help, please check our guide on how to use your HUE products with Google Meet.
For help with other apps, please check this alternative FAQ.
The USB cable that is supplied with our HUE cameras is a standard USB A to Mini B cable and it will fit any standard USB Type-A port on a computer.
If your computer only has USB Type-C ports, any standard USB adapter should work. If you don’t have an adapter yet, there are several options that may work for you.
USB to Type-C adapter: These are small adapters which let you convert the USB end of your regular USB cable to Type-C; they just slot right on top of your USB connector. They are a popular choice because they will let you connect the HUE base directly to the power source (computer). This will also let you connect the HUE camera directly to the computer by its flexible neck if you need to use it without the base.
Mini USB to Type-C cable: These are short cables which have a mini USB connector at one end and a USB Type-C connector at the other. Theses cable will let you connect your HUE Camera base to your PC or laptop since the camera’s base already has a mini USB port, completely replacing the USB cable which originally came with the camera. This option is not suitable for everyone since you will need to use the base every time you use the camera. It does have the benefit of offering a direct connection from the base to the computer.
Both types of adapter can be found at all good electronics stores, including Amazon.
Click here for the full list of HUE HD Camera FAQs
FAQs: HUE HD Camera (Mac OS)
So long as the Mac being used meets Apple’s guidelines for running Photo Booth you should be able to use it with HUE. After following the installation process your Mac should automatically detect HUE in Photo Booth if it has no internal camera of its own. If it selects a built-in iSight camera instead, simply use the Camera menu to select the correct device.
If the camera doesn’t seem to be available, please try disconnecting your HUE and reconnecting it once Photo Booth is already running.
If your Mac has a built-in camera already and you’re using an older version of Photo Booth without a Camera menu, Photo Booth will sometimes default to using the built-in webcam. As there is no way to change settings in older versions of Photo Booth this initially makes it difficult to use with external cameras. If you aren’t able to update to a newer version of OS X, one simple way to pick HUE instead of the built-in camera is to first open WebCam Monitor or another camera application and pick the Mac’s internal iSight camera in its Video Settings. This will prevent Photo Booth being able to use the same device. When you start up Photo Booth it will automatically select HUE and work as expected.
So long as the Mac meets Apple’s minimum requirements and runs OS X 10.4.3 (Tiger) or later, it should work with HUE. For our software products please carefully check the individual system requirements for the list of supported operating systems.
Please note that HUE requires a direct connection to the computer, without going through a USB hub.
If the camera works normally each time the Mac is restarted, but disconnecting and reconnecting the camera’s USB cable causes the Mac to stop recognizing it at all, your Mac may be running an old version of Jamf (Casper). Due to a glitch, USB input devices like the camera may disappear in between logins if a login window has been configured through outdated versions of Jamf.
We have been advised that this issue has been corrected in Jamf version 9.98, so updating should resolve the problem permanently. If you’re not running Jamf (or Casper) or need further assistance, please contact us for support.
Please test the webcam in an Apple program such as iChat (FaceTime), Photo Booth or QuickTime. If the webcam works normally there, the problem is with an Apple system file in 10.6.3 which can be fixed by upgrading to OS X 10.6.4 through Software Update.
If you’re using OS X 10.6 or later, your Mac will have QuickTime preinstalled. QuickTime can be used to present live video and record (with or without sound), and it’s fully compatible with HUE.
Please make sure that WebCam Monitor is completely closed before starting up Skype. You have to close the application with Quit from the WebCam Monitor menu, not just by closing the window. Close and reopen Skype once this is done and it should detect the camera properly.
This solution only applies to the old HUE webcams which required software drivers. If you have a new HUE camera, it’s most likely that the camera is already in use in another application and iChat can’t access the video stream.
iChat was designed to accept input from Firewire and UVC webcams. As the HUE is a driver-based USB camera, iChat required some additional third party software called iUSBCam to be installed on systems running Mac OS X 10.5 or earlier. Details can be found at the iUSBCam website.
Once you have installed the iUSBCam software please make sure that WebCam Monitor is completely closed (Quit from the WebCam Monitor menu or press Command-Q on the keyboard) before starting up iChat. In iChat select iUSBCam from the Video menu. Go to Change Video Source… and pick the camera from the dropdown menu.
For further iUSBCam questions please contact the creators at the link above.
Please fully quit WebCam Monitor (Quit from the WebCam Monitor menu or press Command-Q on the keyboard) so that it does not show up in your Dock. Then try opening WebCam Monitor again.
Please also make sure that the camera is directly connected to your Mac; not to a USB hub or through the keyboard. If you change the USB port the camera is connected to, please make sure that the WebCam Monitor application is fully quit as above and then reopen it after reconnecting the device.
This issue has been reported to us and is under investigation. Some of the newer HUE cameras do not offer the option to adjust the camera’s exposure settings.
This problem affects a small number of Mac users who use the third party iGlasses software to manage their camera.
WebCam Monitor was the Mac software installed with the original HUE HD Camera (instead of AMCap, which is Windows-only). It can be used to record video using HUE. If you’re using Mac OS X 10.6 or later, we recommend the built-in version of QuickTime for recording instead as it has better support for plug and play cameras.
The HUE HD Pro camera ships with HUE Intuition rather than WebCam Monitor.
HUE requires an Apple Mac running Mac OS X 10.4.3 or higher. Please note that when using OS X some functions may not be supported, such as the YUY2 format, interpolation, special effects, face tracking and digital zoom features.
You can also view the current system requirements on this page.
HUE will be automatically installed when it’s connected to a Mac; no additional software is required. You will need to open camera software such as QuickTime, Photo Booth, Skype™ or HUE Intuition to start streaming the video. QuickTime and Photo Booth are preinstalled on all Macs as standard.
If you have a very old camera and are using OS X 10.5 or earlier, insert the driver CD into your computer before connecting HUE. Click the WebCam Driver Install.pkg icon to launch the installer. Follow the on screen instructions to install the software. You can then connect HUE to an available USB port on your computer and you’re ready to go. Please contact your retailer if you need more instructions for older models.
The easiest way to check whether your computer is able to connect to the camera is to launch System Information. This can be opened straight from Spotlight or from the Utilities directory in your Applications folder.
Alternatively, go to the Apple Menu and select About This Mac, then click the button for More Info. You can launch System Report from the next window which appears.
On earlier Macs, the System Information screen was called System Profiler instead. Aside from the difference in its name, it can be accessed in the same ways described above.
Upon opening the System Information tool, you should see a screen which looks like this one:

Click the USB category on the left hand side first, then expand the USB devices on the right. You should see the camera in your list as shown. It might be called HUE or simply identified as a basic USB Camera; either is fine.
If the camera is missing, please check the connection between your computer and your HUE camera carefully. The camera should be firmly pushed into its base. Go to File and then Refresh Information (Command + R) to refresh the list of devices when you want to check whether the problem is solved.
If the camera is showing up correctly in the System Information screen, it should be available in all of your other camera applications such as Skype, FaceTime and Photo Booth. Please check that it’s not ‘in use’ in another application then Quit and reopen the software you want to use.
FAQs: HUE HD Camera (Windows)
If you notice a whistling noise in the background of your recordings in HUE Intuition and other apps, you may need to adjust your Windows sound settings to optimize them for your microphone.
If you open your Windows Control Panel and select Sound, then the Recording tab, you will be able to select the Properties of your USB microphone. The Advanced tab will allow you to adjust the default format for microphone recordings. Adjusting this setting should allow you to eliminate any background sounds. If you are hearing a whistling sound, choosing Radio quality/Tape recorder from the dropdown menu should eliminate the problem.
The same steps apply when using any other USB microphones which exhibit a similar problem.
In some cases, recent versions of Kaspersky and Avast antivirus/security software might block video devices and webcams by default until the user manually grants permission within the Kaspersky/Avast preferences. Please carefully check your settings within Kaspersky/Avast to ensure that access to the camera is permitted, and also ensure that none of the following applications are not being blocked:
HUE Animation (HUE Animation.exe)
HUE Intuition (HUE Camera Manager.exe, HUE Camera Manager.vshost.exe, ffmpeg.exe)
We are unable to assist directly with finding the correct settings as there are many versions of these security suites and they are constantly being updated. Please contact the makers for direct support if you’re experiencing problems running USB cameras while their software is active.
Check with your computer’s manufacturer and make sure you are running the most up to date version of the SigmaTel drivers. You should be able to download the newest version from your computer or motherboard manufacturer directly. If the most recent ones still do not work, uninstalling and reinstalling the existing drivers then disconnecting, uninstalling and reinstalling the camera might fix the problem.
If you have a control panel in your computer settings called Sigma Tel, please check that it is set to “allow reconfiguration pop-ups”. You can then try disconnecting the camera and uninstalling/reinstalling that; if the sound card is struggling with anything it should pop up a window asking you to confirm how the microphone is connected.
Finally you can try going to Control Panel, then System, then Hardware, then Device Manager. Under the Sound category please right click and uninstall any sound card drivers then restart your computer. Windows should automatically reinstall the drivers or you can go through your computer manufacturer’s website to get the latest versions.
For further support with this issue please speak to your computer manufacturer.
An update to Windows 10 released in April 2018 added new Privacy options to the computer’s system Settings. If these are configured incorrectly it is possible that they will block any applications from accessing cameras. Both internal webcams and USB cameras such as HUE are affected by these settings. If you updated from an earlier version of Windows 10, you may have been asked to choose your settings immediately after the update was installed. It is important that these settings allow camera and microphone access, otherwise the software will be unable to connect to the camera and microphone.
If you want to unblock the camera, press the Start button and open the Settings screen, or alternatively press Windows Key + I. You will see an option called Privacy in the list.
There will be sections on this page for your Camera and Microphone settings. Please ensure that the applications you want to use with your HUE have full access to both the camera and the microphone.
You may need to switch on the option to Allow apps to access your camera before the individual applications appear in the list.
For Microsoft’s help page about the new camera settings, please click here. You can learn more about their privacy settings in this Microsoft FAQ. This information also applies to Windows 11.
Another common cause of video not appearing in this way is third party security software. This separate FAQ includes advice if you believe that this may be the problem.
This is an issue with some older versions of the Skype software rather than the camera itself. We suggest updating your video drivers from your computer manufacturer’s website and making sure your Skype software is always up to date as this problem was fixed in later versions.
If you’d like to install the drivers, a technical limitation of Windows means that the camera must be connected to each individual computer at the time of installation so there’s no network-deployable version. However, HUE is completely plug and play so the drivers are completely optional.
If you find you need the camera viewing tool from the driver package but not the drivers, you can download a standalone executable for this which can be copied across your network silently. Silent network installation is also planned for our HUE Intuition software (sold separately).
Our animation software (available separately or as part of HUE Animation Studio) can be installed over a network as required. Please contact us if you need any additional information.
We have been made aware of a problem with Windows Live Movie Maker (2012) detecting external webcams on certain laptop models. We have reported the issue to Microsoft; in the meantime, older versions of Movie Maker and alternative camera software should work. If your laptop is affected you can record movies using the camera software here or our HUE Intuition application.
We have recently been made aware of a problem with the very latest version of Skype clashing with various webcam drivers. The problem is under urgent investigation. We expect this issue to be fixed in the next Skype update but our engineers are looking at whether a workaround is possible in the meantime, so please continue to check the HUE website as we’ll release any updates there as soon as they’re ready.
In the meantime, you should be able to solve the problem by downgrading to an earlier version of Skype for Windows. Another solution is to uninstall the camera drivers (you can still use the camera in Skype without drivers installed) until the problem is fixed.
If Skype is installed, it doesn’t have to be connected and online to trigger the blue screen issue. If you definitely don’t have Skype installed on the computer, please let us know.
If you’re using Windows, please download the latest camera drivers here.
Please note that the special effects and software interpolated higher resolutions are only available on Windows. In plug and play mode without any drivers installed, the current HUE should use a resolution of 1280×720 by default.
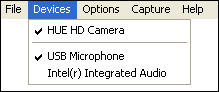
Please open the camera software and check that the correct camera is selected in the Devices menu. If your camera isn’t shown in the list, run Windows Update and check that your computer’s software is fully up to date.
If the message persists, please try a different USB port on the computer and test whether the camera works without its base in case there’s a problem with the connection.
Please uninstall and reinstall the camera driver software, ensuring the camera is disconnected until the installation is complete. There may have been a problem with the original installation.
The recorded video will be in raw format (uncompressed) and can take up a lot of disk space; you may wish to change the resolution of the movie clip in AMCap by selecting Video Capture Pin… from the Options menu and adjusting the Output Size. You can also edit and compress your movie clip using Windows Movie Maker or other video editing suites, or record using a different program directly from the camera.
Make sure all other webcam software is closed, then open AMCap. Select HUE as both camera and microphone in the Devices menu (you should be able to tick both). Before recording a video, select Set Capture File… from the File menu and choose a location on your computer where your recorded video will be saved. Enter a file name (we recommend putting .avi at the end) and click Open to confirm. On the next window, if you are not sure, set the size to 0 to avoid setting limitations on what you can record. You can then record a video using the Capture menu in AMCap. Make sure that Capture Audio is ticked, then click Start Capture to begin recording and Stop Capture to finish.
You should be able to view your AMCap recordings in software such as Windows Media Player and VLC.
If your AMCap recordings are not recognized, try adding .avi to the end of the file name.
Our current HUE HD cameras use the built-in Windows camera driver so if you’re seeing this message, you might have an older model.
The easiest way to check is to look at the silver focusing ring around the camera’s lens. There will be some text printed on that ring.
If the text includes the number ‘2.0’ or our website address, you have one of the newer models and it should be automatically detected on Windows, Mac OS X and Linux. If it’s not working, please contact our technical support team for assistance.
If you can see the number ‘1.3’ on the ring, you might have an older camera. If that’s the case, please disconnect the camera from the computer and install this driver software, then reconnect the camera once the installation is complete.
Note: The HUE HD Pro camera does not require any drivers and does not have text printed around the focusing ring.
Please make sure that AMCap (or the HUE HD Camera application) is completely closed before starting up any other camera applications. USB cameras will only stream their video to one program at a time.
If connecting the camera to your system produces a USB error, please contact your retailer with the details. Your hardware may be defective.
If other cameras were previously installed on the computer and you are receiving a Code 39 error when you plug in the HUE camera, do the following:
- Start Menu > Run and type in “regedit” (without quote marks).
- File >Export and save a copy of your current registry. Always save a copy before making changes to the registry settings.
- Find the key: HKEY_LOCAL_MACHINE\SYSTEM\CurrentControlSet\Control\Class\{6BDD1FC6-810F-11D0-BEC7-08002BE2092F}
- In the right hand panel, find and delete the UpperFilters and LowerFilters values.
- Disconnect and reconnect the camera from the computer.
The error should be gone.
Please download the correct software from our website, then close AMCap and disconnect the camera from the computer. Uninstall the drivers and install the downloaded software, then reconnect the camera. HUE should be available for selection in the Devices menu.
If you have a plug and play HUE camera, the drivers aren’t necessary. Please check that the camera is securely connected and the camera is selected in the Devices menu, then contact our technical support team for further assistance if the error persists.
Check that there are no new USB 2.0 drivers for your computer in Windows Update. If updates are available please install them and try again.
If there are no updates, this error can also be caused by a problem with the computer’s power supply. It can usually be cleared with no side effects by shutting down the computer, physically unplugging the computer’s power cable from the mains socket and leaving it for at least 30 minutes to allow any remaining electrical charges to disperse. After that you can reconnect the computer and start it up again; the error should be gone. If this happens more than once it may be advisable to replace the computer’s power supply and mains cable.
One other cause of this problem could be that the system’s USB drivers have stopped working. You can uninstall them in the Device Manager control panel. Windows should reinstall them when you next restart or you can install them manually from the computer manufacturer’s website. If you try this please be careful to have a non-USB keyboard/mouse plugged in so that you can still use your keyboard/mouse in between.
Please ensure that you have Windows XP Service Pack 2 (or later) installed. This is a free major update from Microsoft which should be available in Windows Update as an optional item. Service Pack 2 (or later) is required if you want to use USB cameras on Windows XP.
“Cannot install this hardware. Error occured during installation of the device. Driver installation file for this device is missing a necessary entry. May be because the INF was written for Win 95 or Later. Contact your hardware vendor.”
This error message refers to a problem with your computer’s configuration and should be investigated with your computer’s manufacturer if none of the other tips help. In your Windows INF directory (usually Windows\INF on your C drive) there should be three files installed with Windows called usb.inf, wdmaudio.inf and wdma_usb.inf. If any of these is missing you may encounter the error message. To restore one of the missing files, you can try reinstalling Windows, repairing Windows from the original installation CD or copying it from another computer running the same version of Windows as yours. We are unable to provide copies of working INF files; please contact your computer manufacturer for further help with this problem.
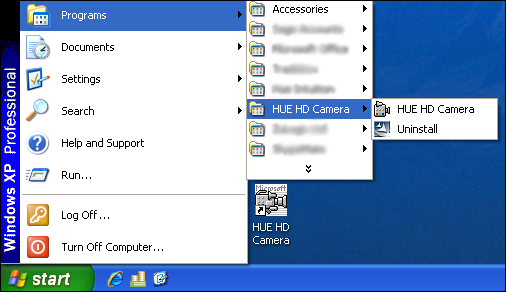
Go to Programs in the Start Menu and select HUE HD Camera, then open the HUE HD Camera application (AMCap in older versions of the software). If any error messages appear, clear them with OK. In the Devices menu, look for the camera and its microphone. If both of these devices are present, then the system is recognising the camera. Make sure that the HUE is selected in the Devices menu. Show Preview should also be checked from the menu bar.
If either the camera or its microphone is missing from the list of Devices, please check that the camera is properly connected to the computer. If the camera is connected through the base station, check that the neck was firmly pushed into the base to make a good connection. You can also try to reboot you computer, then go back to the software and check the devices again.
Try plugging the camera into a different USB port. If the camera is plugged into one of the ports in the front try one of the ports in the rear of the computer. Try to uninstall the driver and do a fresh install with any antivirus software temporarily disabled. As HUE can be used without drivers, we recommend trying with and without the drivers installed to see whether this solves the problem.
Note: If you see a preview window with video from the camera, then the installation was successful. If you are still having problems when trying to use particular programs, please make sure that all other applications are closed before you test the camera, then contact the vendor of the software you are attempting to use for further support.
If you’ve installed the optional camera software from our website, you can access its digital zoom feature.
1. Launching the software
First, open the software from the Start Menu. You might have to click All Programs first. Windows 8 (and later) users can search for the application by name: HUE HD Camera.
When the software opens it should show a live preview from your camera. If it’s missing, select the camera from the Devices menu first.
If the window is still blank, check that the camera isn’t open in any other software at the same time and ensure that Preview is selected in the Options menu.
2. Activating the zoom feature
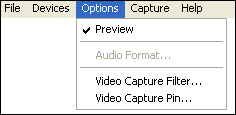
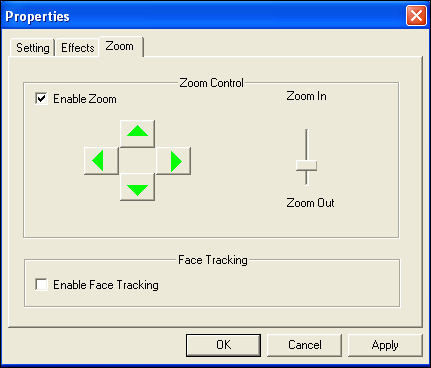
Select Video Capture Filter from the Options menu and go to the third tab: Zoom.
By checking the Enable Zoom box, you can use the slider and arrow keys to zoom in and pan around the live video image.
If the options are greyed out, the system may be streaming the video in MJPG format which blocks the extra controls. To check, click Cancel and select Video Capture Pin from the Options menu.
Locate the Color Space/Compression setting as pictured below. Change it to YUY2 mode and ensure the Output Size is set lower than the camera’s maximum resolution.
Once you’ve made the changes, click OK. The additional options in the Video Capture Filter screen will become available and allow you to tune the image.

3. Using digital zoom
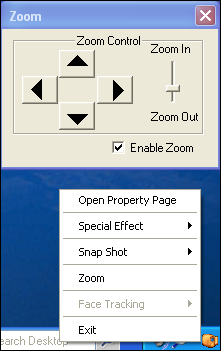
Another way to access the zoom controls is by right-clicking the small camera icon in your System Tray, near the clock.
Clicking on Zoom will produce a smaller version of the controls so that you can zoom and pan across the image even when out of the configuration window.
The zoom option will be unavailable if the camera is capturing in MJPG mode or the video software is closed.
Note: If you’re using Mac OS X, there’s no built-in digital zoom so you will either have to move the camera closer and turn the focusing ring to refocus, or install a third party application such as iGlasses.
These instructions apply to AMCap, the optional camera software available with the original HUE HD Camera. If you’re using different software, please check the publisher’s website for instructions. Our HUE Animation and HUE Intuition software packages (sold separately) have built-in flip/mirror features.
1. Launching the software
First, open the software from the Start Menu. You might have to click All Programs first. Windows 8 (or later) users can search for the application by name: HUE HD Camera.
When the software opens it should show a live preview from your camera. If it’s missing, select the camera from the Devices menu first.
If the window is still blank, check that the camera isn’t open in any other software at the same time and ensure that Preview is selected in the Options menu.
2. Accessing the camera settings
Select Video Capture Filter from the Options menu. You’ll be taken straight to the screen you need with the camera settings.
There are two boxes at the top of the screen: Image Mirror (horizontal flip) and Image Flip (vertical flip). Select the options you’d like to use and click OK. The live video feed will automatically refresh and start using your new settings.
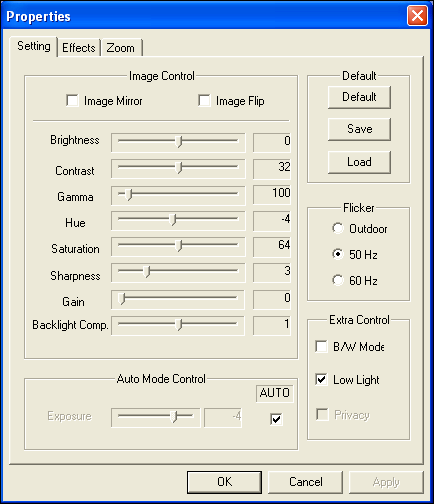
If the options are greyed out, the system may be streaming the video in MJPG format which blocks the extra controls. To check, click Cancel and select Video Capture Pin from the Options menu.
Locate the Color Space/Compression setting as pictured below. If you change that to YUY2 mode and click OK, the additional options in the Video Capture Filter screen will become available and allow you to tune the image.
Note for Mac users
If you’re using Mac OS X, the only way to access additional controls for the camera at this time is to install a third party application such as iGlasses.
Some Apple software automatically flips the image to make live chat more intuitive. For recording videos where it’s important that the image isn’t flipped, we recommend the free version of QuickTime included in OS X 10.6 and later.
If the options in the Video Capture Filter screen are greyed out, the system may be streaming the video in MJPG format which blocks the extra controls. To check, go to Video Capture Pin in the Options menu and locate the Color Space/Compression dropdown. If you change that to YUY2 mode, the flip/mirror boxes should start working in Video Capture Filter and allow you to tune the image.
This FAQ only applies to older HUE HD Camera models, which had an integrated Snapshot button. The current models do not include this feature.
For the Snapshot button to work, the camera needs to be running and the drivers must have been installed. If no program or website is using the HUE camera, pressing the Snapshot button on the back of the camera will appear to do nothing. By default the first click of the Snapshot button will start AMCap so that you can take pictures. You can also take pictures using the camera icon in your system tray.
If the Snapshot button is not functioning at all, make sure that the process “vsnp2std.exe” is running in the Windows Task Manager’s Processes tab. If that process is missing, another program must be blocking it or the camera’s installation may have been unsuccessful.
To run this process, go to your Windows Directory (usually on your C: drive in My Computer) and double click the vsnp2std.exe file. If it still does not appear in the process list, another program – usually antivirus software – may be preventing the software from running. If you suspect that the problem is with the HUE software you can uninstall and reinstall the driver from the Downloads page.
Please note that the Snapshot button has no effect on Macs, or on Windows computers which don’t have the optional driver software installed.
AMCap is a program which can be installed with HUE on Windows systems. You may use it to take still pictures or record video using HUE. AMCap is not required to use HUE and it can be uninstalled or deleted without affecting the use of HUE with other applications.
To remove the software from your system:
- Delete the AMCap shortcut from your desktop
- Go to your Windows install drive (the C: drive by default) and delete the program called amcap.exe in the Windows folder
Please note that you will need to first close HUE Animation or HUE Intuition to use AMCap, and vice versa. Only one application can be using the camera stream at a time.
After installing the optional drivers, open AMCap and select Video Capture Filter… from the Options menu to adjust the settings to your personal preferences.
HUE will be installed automatically a few seconds after it’s connected, and it will be available for selection in your chosen software such as HUE Animation, Skype™ or HUE Intuition. If you want to install the extra drivers on your CD you can begin installation as soon as the computer has recognized the camera.
If you have an older model, insert the Install CD into your computer before connecting your HUE. Follow the Installshield Wizard. After you have completed installing the camera software, connect HUE to an available USB port on your computer and you’re ready to go. Please contact your retailer if you need more instructions or help with your older HUE.
This solution does not apply to newer versions of Windows.
We have received some reports of users running Windows 7 or 8 seeing a greyscale or distorted picture in Skype when the camera is working perfectly in other applications. The cause seems to be a recent Skype update on computer running certain graphics hardware.
From initial testing, the problem appears to be limited to Skype’s preview window (in Tools, Options, Video Settings) and the video displays normally during actual calls.
If the problem also seems to be affecting your video calls, we suggest taking the following steps:
- Ensure that you are using the very latest version of Skype. However, if the problem appeared recently, consider downgrading to a previous version of Skype.
- If you previously installed the HUE camera drivers, uninstall them through your Control Panel (Programs and Features). The camera will work in Skype and other applications without any drivers installed.
- Run Windows Update and check that all of your computer’s software is up to date.
- Visit your computer manufacturer’s website and check for any graphics card or video updates specific to your computer.
- Try updating DirectX from Microsoft’s website. If you’re using Windows 8, you can skip this step; Windows 8 comes with a later version built-in.
If none of this helps, please contact our technical support team so that they can assist further. If you can include plenty of details about your computer’s configuration it will help us find the solution as quickly as possible.
Many Surface devices use Windows RT, which is different to standard desktop operating systems such as Windows XP and Windows 10.
Our cameras use Windows’ built-in UVC drivers and the animation software requires OpenGL. Unfortunately, Windows RT does not include any of these drivers as standard so the kit wouldn’t be compatible. If this changes in a future software update and Microsoft choose to add UVC drivers and OpenGL support for Windows RT, the camera will work out of the box.
If you use a Surface with a desktop version of Windows installed and driver support for OpenGL, it should work with our products. Please contact us if you need any assistance.
FAQs: HUE HD Pro Camera
Optimal image capture is an A4 page (US letter size) and maximum image capture is an A3 sheet of paper. Both the HUE Intuition and HUE Camera Viewer apps have options to flip and mirror the live video.
HUE cameras are Plug & Play and will work with any application that recognizes a USB video device, such as built-in camera apps on an interactive display. Please check with the screen manufacturer for compatibility with a particular model.
It is now possible to use HUE cameras with iPads running iPadOS 17 or later, which allows the iPad to connect to external USB cameras and microphones. This applies to all ‘plug and play’ HUE cameras, including the HUE HD camera and HUE HD Pro. A standard USB Type-C adapter may be required to physically connect the camera to the iPad.
Apple currently does not allow external USB video cameras to stream to the iPhone, other iOS devices or older iPad devices even if you purchase a camera connector kit.
HUE cameras work with a wide range of video conferencing and picture editing software. Any software that is designed to work with a USB camera should work using HUE as its video input source, including Zoom, Google Meet, MS Teams, Skype, QuickTime, Seesaw, Loom, FaceTime, Discord, Twitch, Slack, OBS, Webex, Chime and many more. You can find guides for using popular video conferencing apps with your HUE camera in our Tutorials section.
Pick which video chat network you wish to join, download the software from their website and follow their setup instructions. Make sure you set the USB camera as your camera and microphone in the new app’s settings, then you’re ready to chat!
If you can’t install extra software on your computer, Windows users can connect through the built-in Microsoft Camera app (requires Windows 8.1+). Users of macOS or Mac OS X 10.6 or later can use the built-in version of QuickTime for viewing the live video and making recordings.
Google Meet applies a mirror filter to the camera feed by default. The image you see is mirrored but your call attendees will see the image the correct way around.
This is an application setting and does not have anything to do with the HUE camera. It is also not a setting that can be changed with the HUE software.
There is no way to remove the filter within Google Meet, unlike in Zoom, and if you use third party software to reverse it on your side, it will be mirrored on the attendees’ side as well.
As a workaround you can use the Present feature on Google Meet to share the camera feed from another application, such as HUE Intuition. Google Meet will not recognise the shared feed as a camera input so the mirror filter will not take effect. You can proceed to use the HUE Intuition application features in your call.
Instructions:
- Launch HUE Intuition and select your HUE camera as the video input device.
- Ensure that Google Meet is not already using your HUE camera or you will see a blank screen in HUE Intuition.
- Click on the Present button within Google Meet.
- Select the Application Window tab.
- Click on the HUE Intuition application window.
- Click Share.
For more help, please check our guide on how to use your HUE products with Google Meet.
For help with other apps, please check this alternative FAQ.
Click here for the full list of HUE HD Pro Camera FAQs
HUE Software
FAQs: HUE Intuition
This issue might be caused by having an older YouTube account.
One side effect of Google merging its system with YouTube was that it transitioned from account names to email addresses a few years ago. Some users consequently have accounts with multiple logins, all of which Google accepts through its website.
However, the YouTube interface used in our software only accepts the newer-style email address logins instead of the account names for some user accounts. We are currently in the process of updating the software to accommodate both types of login.
If you’re logging in with a username and password combination, please try using your YouTube email address (and the same password) instead.
You can check the registered account details by going to your YouTube account page and clicking on Advanced. It should say ‘Signed in as’ in the Account Information area. If it gives your email address after the text ‘Signed in as’, then you may need to use your email address to upload through the HUE software – even if the YouTube website accepts either your account name or email address.
If this advice doesn’t help please contact us (with screenshots or photographs if possible). However, please do not share your YouTube/Yahoo login password. We do not require these details to assist.
If you need to upload your video immediately, you can upload it manually as a temporary workaround. Save the video file by clicking on the ‘save the video to my computer‘ button in the Playback tab (HUE Intuition) or export it to your desktop using HUE Animation. This creates a compressed video file from the larger raw footage that is generated immediately after recording.
Longer videos can take minutes to be converted so you would need to press the button and then wait for the video compression to be completed before closing the application. You will know that the compression is still in progress because you will not be able to switch tabs or click anything else within the software.
Once you have saved your video, you can upload it to YouTube via the website upload page.
The back page of the booklet included with the HUE HD Pro camera includes your unique HUE Intuition activation code, which can be used to register your software for support and updates, and to activate older versions of HUE Intuition. HUE Intuition is not freeware, and support is only available for customers who own a license to use the software.
Please keep a record of your code or register it online in case you need technical support with your software.
The Hide Intuition button is designed for monitoring your computer’s surroundings when you are not present. It is currently only included in the Windows version of HUE Intuition.
When Hide Intuition is selected and you start recording in Image Capture mode, the app will carry on taking pictures in the background and saving them in your chosen save location without any sign that the software is open.
On some setups, it can be difficult to restore the HUE screen if you decide to end your automated image capture early. You can terminate the capture manually by going to Task Manager (CTRL+Alt+Delete then click Task Manager) and selecting the Details tab. If you end the task called HUE Camera Manager, you will be able to reopen HUE Intuition again normally. This will not delete the images that you already captured.
The HUE Intuition software is designed for Windows and macOS. Please check this page if you need help using your HUE HD Pro camera with your ChromeOS device.
HUE Intuition 2.0 includes many new bug fixes, as well as saving your settings when the software is closed. There have also been major changes to our software activation system.
HUE Intuition 2.0 no longer requires you to enter the activation code during installation. Instead, the software can be registered online through our website.
Please note that HUE Intuition is not freeware and a license is required for software support, which will not be available unless your license details are provided. A single HUE Intuition license is included with every purchase of the HUE HD Pro camera.
HUE Intuition licenses can also be purchased from the HUE shop.
Please see our updated user guide which reflects the changes in the new version of HUE Intuition.
Click here for the full list of HUE Intuition FAQs
FAQs: HUE Camera Viewer
At this time, HUE Camera Viewer can only be used with HUE cameras.
If you have a HUE camera and see a warning that no HUE camera is detected, please check this solution and then let us know if you are still having trouble with your camera being recognized.
You can contact us with your comments; we would love to hear how we can make HUE Camera Viewer better for our Chrome users.
After all of the feedback so far we have removed the features to streamline the web app for instantaneous live presentations.
HUE Camera Viewer is currently only supported for the Google Chrome browser, compatible with Windows, macOS, ChromeOS and Linux. We recommend checking that your browser is up to date before using the software.
While it may be possible to use HUE Camera Viewer in other browsers, support is only available for Google Chrome at this time.
Open your Google Chrome browser settings and Select the HUE Camera.
- Open HUE Camera Viewer in the Google Chrome browser, then click or tap the menu in the top right of the browser window. It’s represented by three horizontally-stacked dots. One quick way to get there is to hit Ctrl + Shift + Del and then hit the Escape key when that window appears. Then, click or tap Site settings and skip down to Step 5.
- Otherwise, choose Settings from the menu.
- Scroll all the way down the page and open the Advanced link.
- Scroll to the bottom of the Privacy and security section and choose Site settings.
- Choose either Camera or Microphone to configure either setting.
- Refresh the site.
Note: If the camera is still not recognized then click the Secure label next to the website address in the top left of the browser window. Then click Site settings and allow the Camera and Microphone.
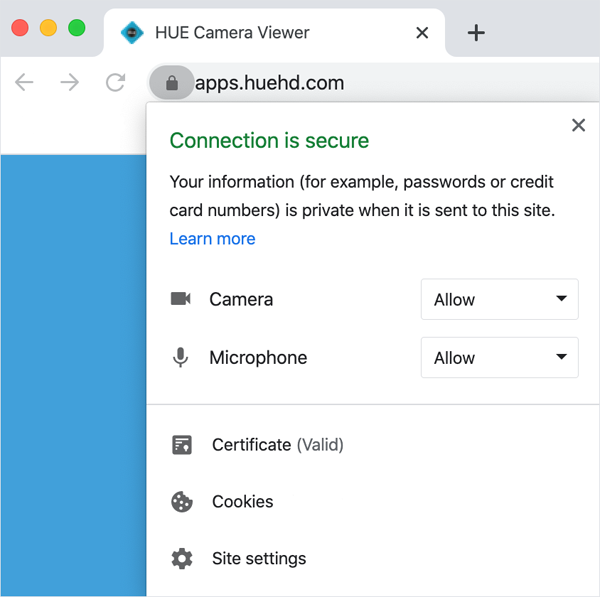
On some older versions of Chrome, the Site settings area is called Content settings.
FAQs: myCreate for iOS
Please send us a message with a full description of the problem. Our team will assist as quickly as possible – often the same day.
The HUE Animation and Stop Motion Studio software included in HUE Animation Studio only works on a Windows PC or Mac. Please check the System Requirements carefully when choosing your product.
As of iPadOS 17, Apple now supports USB cameras on iPads. If you have the iPad version of Stop Motion Studio (available separately) you will be able to use it with your HUE camera.
Using a HUE camera with Stop Motion Studio for iOS (separate purchase required)
If your camera isn’t initially available in the Stop Motion Studio software, please go to your iPad’s settings and into the Privacy & Security category. You may need to specifically give permission for Stop Motion Studio to access the ‘Camera’, as shown in the screenshot below.
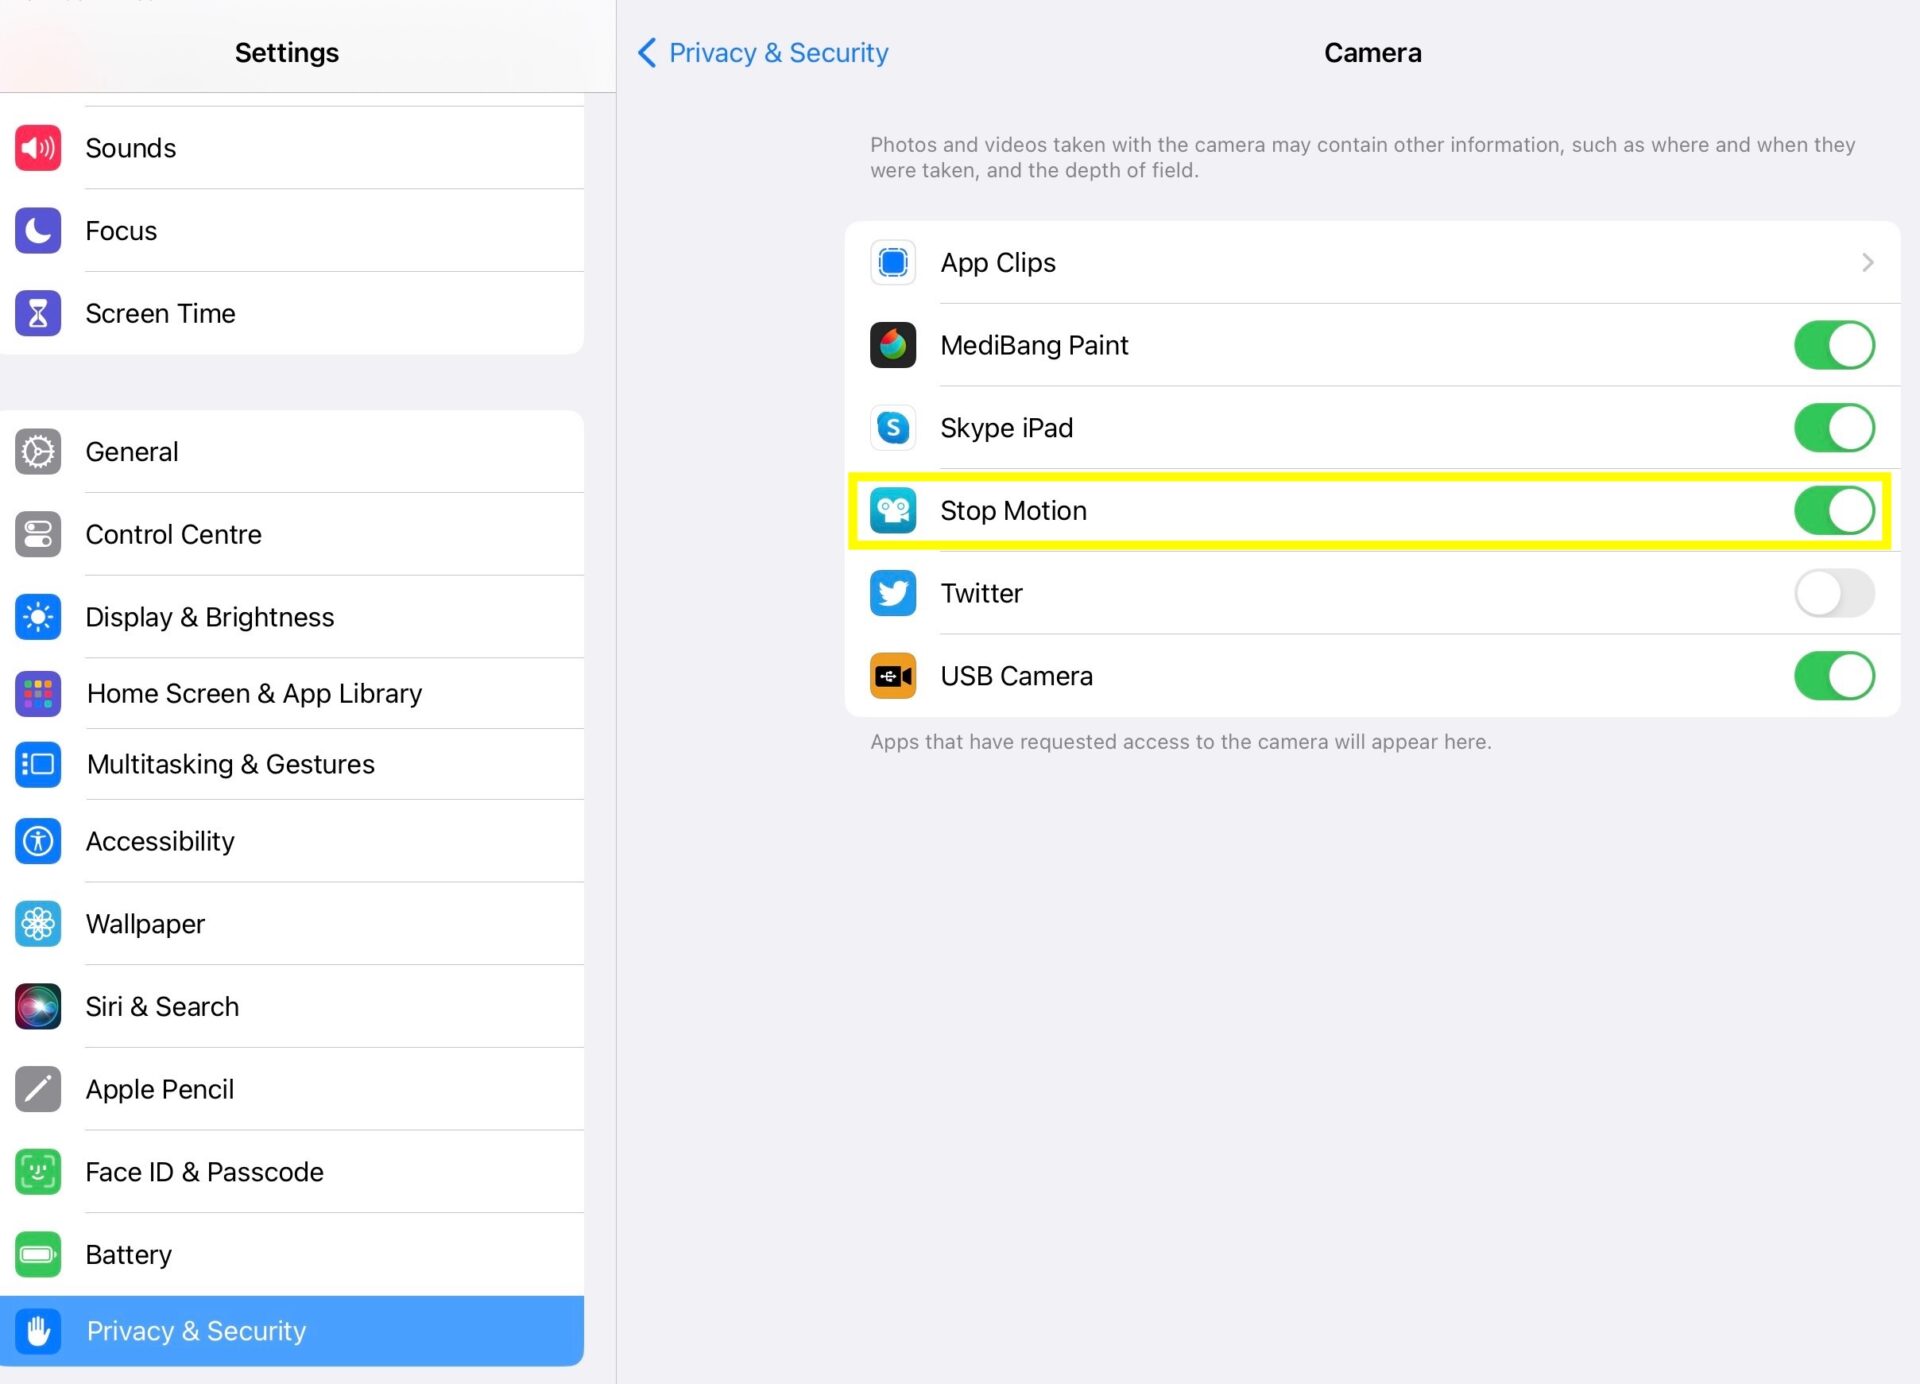
Once this has been done, the HUE camera should appear in the camera settings in Stop Motion Studio for iPad. The settings can be found near the bright red Record button, as highlighted in yellow below.

Selecting the HUE USB camera as your video device should immediately switch the live video displayed on the screen to HUE, rather than the built-in iPad camera.
At the moment, our myCreate app works with iOS 6.1 and later on the iPad 2 or 3, iPhone, and iPod Touch. You can view the latest system requirements and download the app directly from the store here.
Earlier versions of myCreate required you to manually adjust the privacy permissions in order to export your video.
However, we have since released an updated version which automatically prompts you to allow myCreate to access your photos. Please update to the latest version of myCreate through the app store to resolve this issue.
When sharing a video via social media channels and email, iOS currently reduces the video quality to make it smaller and easier to transmit. If you would like to work with the original high definition version of the video, you will need to export the video to your albums from myCreate and then transfer the movie from your albums to your computer directly.
There was a bug in myCreate 2.0.5 (full version) and 2.0.1 (lite version) that caused the export to album function to crash.
We released an update which fixes this crash, so if you’re affected please download the latest version of myCreate from the app store.
It is now possible to use HUE cameras with iPads running iPadOS 17 or later, which allows the iPad to connect to external USB cameras and microphones. This applies to all ‘plug and play’ HUE cameras, including the HUE HD camera and HUE HD Pro. A standard USB Type-C adapter may be required to physically connect the camera to the iPad.
Apple currently does not allow external USB video cameras to stream to the iPhone, other iOS devices or older iPad devices even if you purchase a camera connector kit.
Other
FAQs: The HUE Book of Animation
If you have purchased the standalone HUE Book of Animation and software bundle, these instructions will take you through the activation process.
Step 1: Locate your unique Activation Code
The Activation Code for registering your animation software is printed on the back cover of the HUE Book of Animation.

Step 2: Activate your software
Visit My Account on the HUE website and create an account, if you do not already have one.
Once you have logged into your account, click on Register New Software. Type your Activation Code into the box provided, then click the blue Activate Code button. This will permanently add your software download links and license keys to your online account.

Step 3: Download your software
In order to provide animation software for as many customers as possible, we provide a choice of two stop motion animation applications.
Stop Motion Studio is our newer software offering which is compatible with Windows 10 and later, and macOS 11+.
Make sure you download the correct application for your computer operating system! If you’re not sure or have questions, please contact us and our team will be delighted to assist you.
HUE Animation is our legacy software application for customers with older computer operating systems, such as Windows 8, 7 or XP and legacy versions of Mac OS X (macOS 10.14 and earlier). It requires graphics drivers with OpenGL 2.0 support.

Step 4: Install the animation software
Once you have downloaded and are installing the appropriate software application, you will be prompted to enter your license key into the application, which can be found in the License Keys section of your account. Here you will find the license keys for both software applications so make sure you copy the correct key!
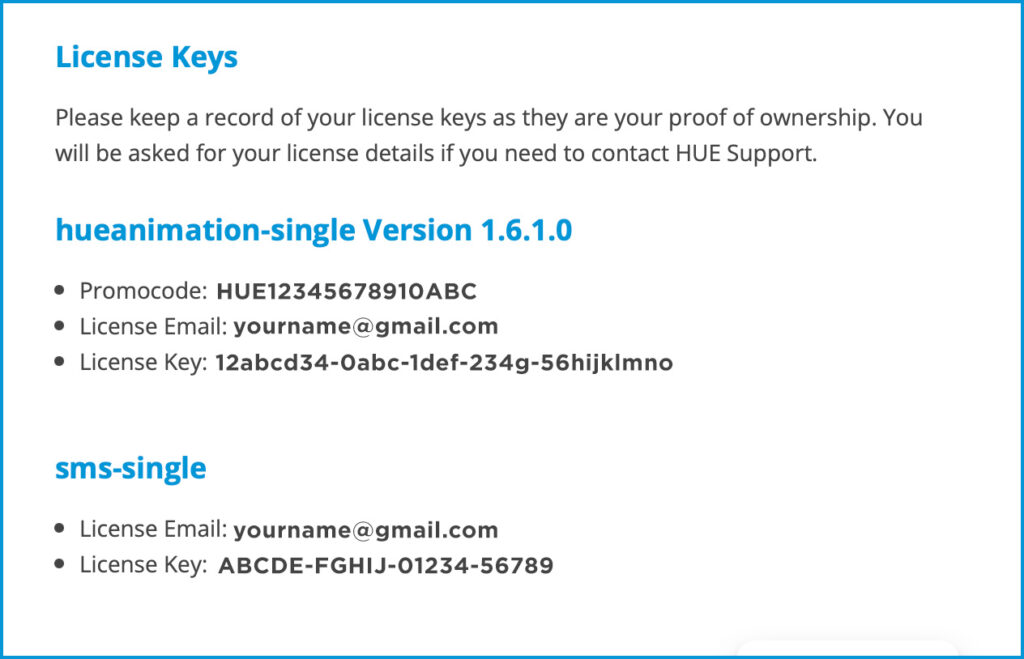
You will then be ready to plug in your HUE camera and start animating. On newer systems, you may need to give the software permission to use your camera.
Tutorials
Watch the Stop Motion Studio for HUE tutorial playlist on YouTube to find out how to navigate the software. Subtitles are available in multiple languages.
You may also find the HUE Animation Studio Quickstart Guide (from the HUE Animation Studio kit) useful as a reference when connecting your camera for the first time.
Please send us a message with a full description of the problem. Our team will assist as quickly as possible – often the same day.
The HUE Book of Animation is a revised animation activity guide based on the old Klutz Book of Animation. Both contain the exact same examples, activities and ideas to help you get the most out of your HUE Animation products. Various bundles are available; please see the book’s product page for more information.
Where do I register my free license from the Klutz Book of Animation?
The Klutz Book of Animation is no longer published by Scholastic and the offer for a free SAM Animation license is no longer running.
A revised edition of the book, complete with a bundled license, is now available as The HUE Book of Animation.
Please contact your retailer if you have been advised that your copy of the Klutz Book of Animation should have included a free license.
Where are the Klutz example videos?
You can view the example videos referenced in the Klutz Book of Animation here in our gallery.
If you need to download the files from your HUE Animation CD on a computer with no CD drive, or if you have lost your CD, these extras are available to all HUE Animation owners through the Downloads page in their online account.
At the bottom of the Downloads page there will be a link to Other downloads which can be expanded to show the activity pack as shown.

If you need help accessing your account, please check this guide. If you don’t see any downloads available on the page you may still need to register your HUE Animation kit by activating your software.
Please contact us with your activation code and email address if you have any problems downloading your files.
Miscellaneous Questions
All HUE camera products include a three year manufacturer’s warranty against faults. If you purchased through a reseller, please contact your place of purchase for any issues with the order or delivery in accordance with their terms and conditions. If your HUE product develops a fault and the place of purchase is unable to help, you can contact us for support.
If you purchased directly through our online store or from the official HUE store on Amazon, please check this separate FAQ for further assistance.
Belgium
WEEE: To recycle your old waste electrical and electronic equipment (WEEE), please contact us. We are registered with Recupel for Electrical and Electronic Equipment sold in Belgium.
France
WEEE: To recycle your old waste electrical and electronic equipment (WEEE), please contact us. We are registered with Ecosystem for Electrical and Electronic Equipment sold in France (UIN FR034857_05W62N).
Packaging: Our Unique Identification Number (UIN) from ADEME is FR245277_01FDPO.
Germany
WEEE: To recycle your old waste electrical and electronic equipment (WEEE), please contact us. We are registered with Stiftung ear via Zentek for Electrical and Electronic Equipment sold in Germany (ElektroG WEEE-Reg.-Nr. DE 64486095).
Packaging: Our Unique Identification Number (UIN) is DE1726903193599.
Italy
WEEE: To recycle your old waste electrical and electronic equipment (WEEE), please contact us. We are registered with Erion WEEE for Electrical and Electronic Equipment sold in Italy (UIN BP011851, registration number IT22040000013832).
Republic of Ireland
PRL number 03501W.
Waste Electrical and Electronic Equipment (WEEE) is taken back free of charge on a one-for-one, like-for-like basis. Each local authority must also accept household WEEE free of charge at its recycling facilities. All WEEE must be recycled and should not be placed in any of your household wheelie bins. Make sure you always recycle all your old electrical goods.
WEEE is accepted at the below address (please also check local recycling facilities):
RECYCLE IT
Clondalkin Community Recycling Initiative Limited, Unit 14/2 Crag Terrace,
Clondalkin Industrial Estate,
Clondalkin, Dublin 22, Ireland
E: info@recycleit.ie T: 0035314578321
Included in these prices is a contribution to recycling costs.
Spain
Our Spanish RII_AEE number is 7873. We can provide a declaration of conformity for importing WEEE into Spain. WEEE can be collected through Ecotic.
Switzerland
WEEE can be collected through the Swico recycling system.
United Kingdom
Our UK EEE Producer Registration number is WEE/MM5902AA.
Packaging advice
The box, booklet, feedback card and cardboard sleeve included with HUE cameras are recyclable in most regions. The plastic bag included with some models, the stickers used to seal the boxes and the cable tie are generally non-recyclable.
Older cameras (sold without a ‘carry case’ included in the box) come packed with a plastic blister tray which is non-recyclable.
As part of our efforts to reduce waste, we are working to remove the protective plastic bags from our packaging and newer products may not include them. HUE camera products are not shrink-wrapped.
HUE Clay is packaged in a plastic wrapper made from biaxially oriented polypropylene (BOPP) film. The wrapper is suitable for contact with food and recyclable where facilities exist as Code 5: PP (Polypropylene).
Immediate cancellations: If your order has not yet shipped, please contact us urgently with the order details. We may be able to cancel the shipment and refund your order in full immediately, though this is not always possible as much of the shipping process is automated.
Post-shipment cancellations: If your order has already shipped and you change your mind, you can refuse delivery and the item will automatically return to us. We will process a refund for the item price once the order arrives at our office. If your item was sent by a Tracked service, you can email us to confirm that you refused delivery and we may be able to process the refund immediately after confirming with the carrier.
Returning an order after delivery: If your reason for return is not a technical issue with the product itself, in order to refund you, we require that you contact our team who will provide a returns form. Our main warehouse is located in the UK and this is usually where the goods will need to be returned (customers whose orders were processed by our US subsidiary will be able to return orders to our US warehouse).
If the order is being returned after a significant time has elapsed since delivery (outside of the applicable distance selling time limits), a restocking fee may be charged.
Return postage: Please note that we do not refund the cost of shipping where the reason for the return is outside of our control. We are unable to collect and ask that return postage is arranged by the buyer, unless our technical support team have confirmed that the item is faulty.
Warranty returns: If your item has a technical fault, please check the online FAQs and contact our support team with all of the details. They will be able to assist you with your return if the item is confirmed to be faulty. All HUE cameras come with a three year warranty against faults.
If you have purchased any of our HUE activity guides, they will be permanently saved in your HUE website account. Please go to My Account (you will need to log in) and then choose Purchased Guides from the menu to view your collection.
The HUE shop accepts payments in GBP (Pound Sterling), EUR (Euros) or USD (US Dollars). By default, buyers from the UK will be shown pricing in pounds, buyers from Europe will see pricing in Euros and everyone else will see pricing in US dollars.
If you are seeing the wrong pricing for your region, please first check that your shipping and billing addresses are set to the correct country in your cart and checkout screens.
If it is still incorrect, please clear your browser’s cache as it may be providing conflicting information. The steps to clear this data can vary depending on your browser; please see the help pages for Chrome, Edge, Firefox or Safari for detailed instructions.
We are unable to offer payment in any other currencies at this time.
We ship worldwide and can provide full invoices upon request.
If you’re ordering a physical product such as a HUE camera, it’s important to be aware that our warehouses are located in and despatch from the UK. Some countries charge the recipient import taxes and duties when a parcel arrives from overseas, and these additional charges are the responsibility of the buyer. We are unable to provide estimates for overseas import taxes and duties. In addition, the courier may add their own clearance fees. Please contact your country’s Customs office for any estimates.
Please note that smaller orders will ship by Airmail, which has a maximum weight limit of 2kg (4.4lbs). Orders for more than three cameras will usually be split into separate packages which may arrive on different days if they are separated in transit. For very large orders, some couriers have limits on how many packages can be included in a single shipment. We will do our best to ship your order in as few packages as possible.
The Harmonised System (HS) tariff code for your HUE hardware will be 8525890000 (10-digit HS code) or 85258900 (8-digit EU code). The Country of Origin is China.
If you have purchased HUE Clay, the Country of Origin for Customs purposes is Germany.
HUE products do not require a UK export license.
Note: For customers in the European VAT or Australia area, taxes on some products may be charged at the local rate for your country during checkout according to current EU regulations. This currently includes digital products (such as software). All applicable taxes for affected digital products will be clearly displayed during checkout and tax invoices will be available upon request.
We ship worldwide and there are no restrictions on support; your HUE software will work no matter which country you visit.
The appropriate UK sales taxes will be calculated and displayed automatically during checkout and added to your order. UK VAT is added to all orders for physical products shipped to the UK. For customers in the European VAT area, taxes on some digital products may be charged at the local rate for your country according to current EU regulations.
Full VAT invoices will be provided upon request.
If you’re ordering a physical product such as a camera, it’s important to be aware that our warehouses are located in and despatch from the UK. Some countries charge the recipient import taxes, duties and processing fees when a parcel arrives from overseas, and these additional charges are the responsibility of the buyer. We are unable to provide estimates for overseas import taxes and duties.
Schools can use our website checkout to reserve stock and save an order as a quotation if they want to use their own purchase order documentation. Please check this page for more information about ordering HUE products for your school.
The purchase order option will appear directly below the credit card payment option if you are ordering from a supported region. Please note that the purchase order option may not be available for very small orders.

If your school is registered as tax-exempt, please contact us with your tax exemption details so that we can update your account. You will then be able to select to have sales tax removed from your online orders during checkout, as shown in the picture below.